


AS DRY AS THEY COME
Page 104
If you've noticed an error in this article please click here to report it so we can fix it.
Many truck manufacturers fit air dryers as standard, but the same benefits can be obtained by retrofitting. Colin Sowman sees how it is done.
There is no quicker way to ruin a Mercedes-Benz's EPS gearbox than to feed it with water-laden compressed air.
That's why Mercedes, like other manufacturers, now fits air dryers as standard. But the benefits of dry compressed air go much further; condensation in air braking systems causes problems of corrosion and brakes freezing solid on cold mornings.
Retrofitting an air dryer, however, won't remove corrosion from older trucks' braking systems. But it will stop it getting any worse and prevent freezing up in future. To find out what is involved Workshop went along to watch a retrofit installation of a Wabco air dryer.
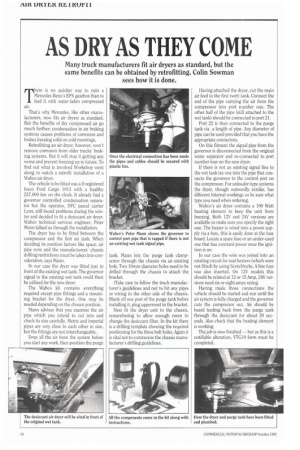
The vehicle to be fitted was a D registered lveco Ford Cargo 1013 with a healthy 257,000 km on the clock. It already had a governor controlled condensation separator but the operator, NFC parcel carrier Lynx, still found problems during the winter and decided to fit a desiccant air dryer. Wabco technical services engineer, Peter Mann talked us through the installation.
The dryer has to be fitted between the compressor and the first air tank. When deciding its position factors like space, air pipe runs and the manufacturers' chassis drilling restrictions must be taken into consideration, says Mann.
In our case the dryer was fitted just in front of the existing wet tank. The governor signal to the existing wet tank could then be utilised for the new dryer.
The Wabco kit contains everything required except pipe fittings and a mounting bracket for the dryer. One may be needed depending on the chosen position.
Mann advises that you examine the air pipe which you intend to cut into and check its size carefully. Metric and imperial pipes are very close to each other in size, but the fittings are not interchangeable.
Drop all the air from the system before you start any work, then position the purge
tank. Mann lets the purge tank clampscrew through the chassis via an existing hole. Two lOmm diameter holes need to be drilled through the chassis to attach the bracket.
(Take care to follow the truck manufacturer's guidelines and not to hit any pipes or wiring in the other side of the chassis. Blank off one port of the purge tank before installing it, plug uppermost in the bracket.
Next fit the dryer unit to the chassis, remembering to allow enough room to change the desiccant filter. In the kit there is a drilling template showing the required positioning for the three bolt holes. Again it is vital not to contravene the chassis manufacturer's drilling guidelines. Having attached the dryer, cut the main air feed to the first (wet) tank. Connect the end of the pipe carrying the air from the compressor into port number one. The other half of the pipe (still attached to the wet tank) should be connected to port 21.
Port 22 is then connected to the purge tank via a length of pipe. Any diameter of pipe can be used provided that you have the appropriate connectors.
On this fitment the signal pipe from the governor is disconnected from the original water separator and re-connected to port number four on the new dryer.
If there is not an existing signal line to the wet tank tee one into the pipe that connects the governor to the control port on the compressor. For unloader-type systems the dryer, though outwardly similar, has different internal workings so be sure what type you need when ordering.
Wabco's air dryer contains a 100 Watt heating element to keep the unit from freezing. Both 12V and 24V versions are available so make sure you specify the right one. The heater is wired into a power supply via a fuse, this is easily done at the fuse board. Locate a spare fuse or an under-used one that has constant power once the ignition is on.
In our case the wire was joined into an existing circuit for seat heaters (which were not fitted) by using Scotchlocks. A line fuse was also inserted. On 12V models this should be related at 12 or 15 Amp, 24V versions need six or eight amps rating.
Having made those connections the vehicle should be started and run until the air system is fully charged and the governor cuts the compressor out. Air should be heard feeding back from the purge tank through the desiccant for about 30 seconds. Also check that the heating element is working.
The job is now finished — but as this is a notifiable alteration, VTC10 form must be completed.