The Use of Tools : Drilling Apparatus.
Page 27

Page 28

If you've noticed an error in this article please click here to report it so we can fix it.
By an Engineer-in-Charge.
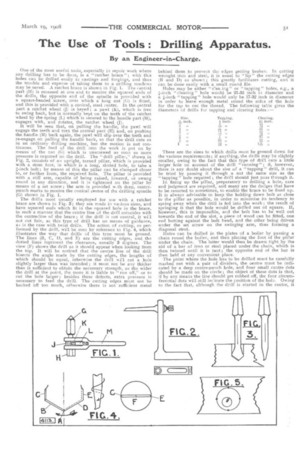
One of the most useful tools especially in repair work where any drilling has to be done, is a "ratchet brace" ; with this holes can be drilled easily in castings and forgings, and thus the trouble and expense of taking them to a drilling machine may be saved. A ratchet brace is shown in Fig. 1. The central part (H) is recessed at one end to receive the squared ends of the drill; the opposite end of the spindle is provided with a square-headed screw, over which a long nut (G) is fitted, and this is provided with a conical, steel centre. In the central part a ratchet wheel (J) is keyed ; a pawl (K), which is free to swing back, but is normally kept on the teeth of the ratchet wheel by the spring (L) which is secured to the handle part (It1), engages with, and rotates, the ratchet wheel (3). It will be seen that, on pulling the handle, the pawl will engage the teeth and turn the central part (H) and, on pushing the handle (M) back again, the pawl will slip over the teeth and re-engage on pulling the handle back, so that the drill cuts as in an ordinary drilling machine, but the motion is not continuous. The feed of the drill into the work is put on by means of the nut (G) which is unscrewed as soon as more pressure is required on the drill. The " chill pilla-," shown in
2, consists of an upright, turned pillar, which is provided with a stout foot, in which is a long, slotted hole, to take a ;1-inch bolt ; by means of this the pillar can be clamped closer to, or further from, the required hole. The pillar is provided with a stiff arm, capable of being raised, lowered, or swung round in any direction, and it is tightened on the pillar by means of a set screw ; the arm is provided w.th deep, centrepunch marks to receive the conical centre of the drilling spindle (G) shown in Fig. 1.
The drills most usually employed for use with a ratchet brace are shown in Fig. 3; they are made in various sizes, and have squared ends which fit in the squared hole in the brace, in such a mariner that the centre line of the drill coincides with the centre-line of the brace ; if the drill is not central, it will not cut fair, as this type of drill has no means of guidance, as is the case with twist drills. The action of cutting, as performed by the drill, will be seen by reference to Fig. 4, which illustrates the way that drills of tins type must be ground.
The lines (13, C, and E) are the cutting edges, and the dotted lines represent the clearance, usually 3 dcgrees. The view (F) shows the drill as it should appear when looking from the top. It will be noticed that the centre line of the drill bisects the angle made by the cutting edges, the lengths of which should be equal, otherwise the drill will cut a hole slightly larger than was intended; it must not be any thicker than is sufficient to obtain the necessary strength, as the wider the drill at the point, the more it is liable to "run off," or to cut the hole larger ; besides these defects, extra pressure is necessary to feed the drill. The cutting edges must not be backed off too much, otherwise there is not sufficient metal
behind them to prevent tha edges getting broken. In cutting wrought iron and steel, it is usual to "lip " the cutting edges (B and D) as shown ; this greatly facilitates cutting, and it can be done easily with a small round file.
Holes may be either " clea lag' or "tapping" holes, e.g., a g-inch "clearing' hole would be 21-32 inch in diameter and a Finch "tapping" hole would only be 17-32 inch in diameter in order to leave enough metal round the sides of the hole for the tap to cut the thread. The following table gives the diameters of drills for tapping and clearing holes :—
These are the sizes to which drills must be ground down for the various requirements; if anything, the drills may be slightly smaller, owing to the fact that this type of chill cuts a little larger hole on account of the drill "running"; if, however, there is any doubt about the size of a 'tapping" drill, it can be tried by passing it through a nut the same size as the "tapping" hole required ; the drill should just pass through it.
In fixing up -the pillar, preparatory to drilling a hole, care and judgment are required, and many are the dodges that have to be resorted to sometimes, to enable the brace to be fixed up. It is always advisable to keep the holding down bolt as close to the pillar as possible, in order to minimise its tendency to spring away when the drill is fed into the work ; the result of springing is that the hole would be drilled out of square. If, however, this is impossible, and the bolt has to be well out towards the end of the slot, a piece of wood can be fitted, one end hutting against the bolt bead, and the other being driven under the set screw on the swinging arm, thus forming a diagonal strut. Holes can be drilled in the plates of a boiler by passing a chain round the boiler, and then placing the foot of the pillar under the chain. The latter would then be drawn tight by the aid of a bar of iron or steel placed under the chain, which is then twisted until it is taut ; the opposite end of the bar is then held at any convenient place.
The point where the hole has to be drilled must he carefully marked out with a pair of dividers, the centre must be indicated by a deep centre-punch hole, and four small centre dots should be made on the circle ; the object of these dots is that, if by any means the line should get rubbed off, the four circumferential dots will still indicate the position of the hole. Owing to the fact that, although the drill is started in the centre, it does not always run true; the position of the hole should be checked before the drill cuts to its full diameter ; it is almost impossible to rectify this matter afterwards. After the drill has been rigged up, a few revolutions should be made, and the cuttings should then be cleared away, and the circle the drill is describing should be carefully examined, to make sure that it corresponds with the one previously marked off with the dividers, If this seems all right, a few more revolutions should be made, thus increasing the diameter of the drill circle, and again it should be examined. These operations should be repeated until it is ascertained that the drill circle is concentric with the marked circle, Le., all the four circumferential dots are equidistant from the drill circle. If, on examination, the drill circle is not fair with the marks, but is to one side of them, as shown by the smaller circle in Fig. 5, the drill must be taken down and the hole drawn with a small "round nose" chisel, by cutting a small groove from the top of the hole to the bottom on the side where the drill circle is furthest away from the marked circle; tile drill then has a tendency to "travel" towards the groove and so to bring the drill circle more nearly concentric with the marked circle. This operation may have to be repeated two or three times, and it requires a certain amount of care and judgment because, the deeper the groove, the further the drill will travel, so that, if it is too deep, the drill may travel too far, and it will then have to be "drawn" the opposite way. If the drill is running out only a small amount, it can very often be brought fair by putting a fairly-deep, centre-punch mark on the bottom of the hole, towards the side, where the drill is required to go ; this must be done before the drill has cut the full diameter.
When drilling a hole, care should be taken to see that the drill is going in squarely, especially when the pressure has been applied, as this may cause the pillar to spring away from the hole arid carry the brace over with it. The brace should be
set slightly out of square to start with, and sufficient pressure should be put on the drill until it stands square; this pressure should then be maintained during the drilling. It the pressure varies much, with this class of drill, the side of the hole will be much more irregular than in. the case of a twist drill, which has more guidance. This is not of so much consequence in a "clearing" hole, but, in the case of a tapping hole, it most be avoided as much as possible, otherwise the threads will not hold up. In drilling a blind hole, it is a good plan to put a chalk mark on the drill at the distance it is required to enter. If a through hole is being drilled, as soon as the point of the drill begins to break through, no more pressure should be applied, but the pressure due to the spring of the pillar should be allowed to force the drill through; neglect of this precaution will probably lead to the breaking of the drill. One of the most frequent jobs to which a ratchet brace is put is that of drilling out studs that have broken in their holes, and it is often impossible to remove these by any other means. The first thing to do in such a case is to centre the stud exactly, taking great care that the drill enters quite centrally, otherwise it may cut away a part of the thread that has been tapped to receive the stud ; the drill should, therefore, be slightly less than the tapping size. Another way to remove a broken stud is to grind the drill "left handed," i.e., the cutting edges should be ground in the opposite way to those shown in Fig. 4, or tending to turn the stud out when drilling. This, of course, would mean using a reversible ratchet brace, or the pawl and spring of an ordinary ratchet brace could be temporarily fixed at the other side of the handle (M). If, when drilling this way, the drill tightens itself, then the stud is screwing out, and the pressure on the drill must be relieved accordingly.
It is advisable to keep in stock a set of clearing and tapping drills, ground to the correct sizes, and clearly marked for "clear" and "tapping" holes.


