


FORD VAN POINTERS,.
Page 19
Page 20
If you've noticed an error in this article please click here to report it so we can fix it.
By R. T. Nicholson (Author of "The Book of the Ford").
I.
WHEN YOUR 16t-brake chatters and dithers, instead of taking hold firmly and smoothly, it is time for something to be done. Generally,' the dithering is a sign that the band" wants relining, but there May tit other Causes te" account f Or the trouble.
113.—That Chattering Foot-brake.
The brake drum. may be worn unevenly, or the drum and the band may not be getting enough lubrication from the engine, owing to the oil level being carried too low. When the chattering comes, on suddenly, it may be taken as a warning that the engine wants more oil, and it. is therefore a valuable danger signal.
Unless it is lack of lubrication that is at the bottom of the trouble, you ought to consult a motor mechanic at once. A dithering brake strains all the mechanism—especially the transmission and the back axle parts. It is also rough on tyres. Do not continue to drive with a, foot-brake that chatters.
• 114.—A Lubrication Time-table.
Out this table out, stick it up in your motor house, or in the van itself, study it, and, live up to it, and you will save yourself many an anxious moment, and save the " boss" (whether yourself or somebody else) a lot of expense,
Daily.
Feed oil to engine "through breather pipe, so as -to restore level to point between the two petcocks. (A on chart.) 115.—Some Special Points about Lubrication.
In course of these pointers, I have said a good deal at odd times •about the more important questions concerned with lubrication. I now _avant to deal with a few of the minor points.
Lubricators.
See that these really take the oil. when you apply it by squirting with the oil can. It is possible Yor the holes at the bottom. of the lubricators to get choked with filth, and then no oil will find its way to the parts needing it. When you insert the nozzle of the oil can into the lubricator opening, the oil should flow away freely—at all events at first–to the mechanism that the lubricator serves. If it does not do so, suspect stoppage. Most of these lubricators can be screwed out, washed in paraffin, and replaced : but treat. them very carefully, for they are rather. frail. And be careful that you do not cross-thread them in putting them back. They can easily be forced in cross-threaded, as it is a question of brass against steel—and the brass will give. 'But if you get the lubricator back cross-threaded, there is little chance of its stopping where it belongs : it will soon fall off on to the road.. • If you have helmet-cap lubricators, turn them clockwise for the purpose of uncovering the lubrication hole.. If you turn the helmets the other way— to the left—you will probably strain the internal springs that are intended to close them and keep them closed.
Grease Caps.
.0ne turn is enough for the fan hub grease cup: three or four turns should be given to the others.
Differential.
If too much grease is supplied to the differential, you will get the stuff thrown out at the back axles. It is difficult to know exactly how much grease to supply without overdoing it. The overflowing of grease from the back axles is not altogether a certain sign of your overdoing the greasing, because the grease-retaining washers may be worn and need replacing. If, however, you follow the instructions given, and only supply grease every 1,000 miles, up to the level of the bottom of the hole, you are not likely to overdo it.
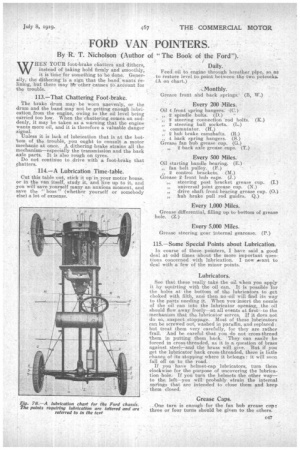
Steering Gear Internal Gearcase.
(This is the round brass-finished ease immediately under the steering wheel.) The filling of this case with grease is rather a tricky business. The simplest way is to take right out the little screw that holds the cap on to the case ; then to turn back and off the cap itself : you will then be able to pull off the steering wheel, and the gearcase will then be open to receive the supply of grease. Fill the case right up, using a knife to plaster it in. Vaseline is quite a good lubricant here.
You will find replacement of the steering wheel, with the cap, quite easy, though it may need a little humouring for you to get the gears on it in engagement with those left in the case. Do not think it necessary to replace the steering wheel in exactly the same position in which it was before you removed it. This is not at all necessary. The gears must, however, engage properly before you begin to screw the cap down.
And when you have the cap home, be careful about replacing the set-screw that holds the cap. The hole in the case must be in dead-true line with the, hole in the cap. Get them so by using a French wire-nail, humouring the case a bit till you can pass the nail through and in. Then you will be able to turn the set-screw in-, If you do not see to this point, you will make a mess of the set-screw thread. and make it useless for evermore. Do not force the set-screw ; it should tighten quite easily, and will do so unless cross-threaded.
Front Hub Caps.
When replenishing, do not try to fill these right up : if you do, you will not succeed in replacing the hub caps themselves. Fill them from one-half to two-thirds full.
Back Hub Caps.
These do not require grease. Any number of conscientious drivers go through their lives filling the back hub caps up, and so wasting good time and c48 good grease. The back hub caps are simply there to make things look pretty, and to exclude dust and dirtfrom the parts that would, without them, be exposed.
116.—Thief-proof Switch Lock. for Fords.
Lock your switch, in off position, and you lock your van. But how ? Clearly, there is little purpose in your switching off and removing the key ; for every expert Ford thief carries a switch key—and there you Are—and there the van is not I
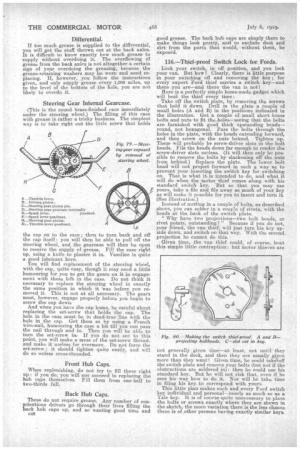
Here is a perfectly simple home-made gadget which will beat the thief every time :
Take off the switch plate, by removing the screws that hold it down. Drill in the plate a couple of small holes (A and B) in the positions indicated in the illustration. Get a couple of small short brass bolts and nuts to fit the holes—seeing that the bolts are furnished with good thick upstanding heads— round, not hexagonal. Pass the bolts through the holes in the plate, with the heads extending forward, and then screw on the nuts behind. Tighten up. Them will probably be screw-driver slots in the bolt heads. File the heads down far enough to render the screw-driver slots useless. (It will then only be possible to remove the bolts by slackening off the nuts from behind.) Replace the plate. The lower bolt head will not project forward in such a way as to prevent your inserting the switch key for switching on. That is what it isintended to do, and what it will do when the motor thief comes along with his standard switch key. But so that you may use yours, take a file and file away so much of your key as will make it possible for you to insert and turn it. (-See illustration.) Instead of nutting in a couple of bolts, as described above, you can solder in a coup:',e of rivets, with the heads at the back of the switch plate.
" Why have two projections—two bolt heads, or rivet points, outstanding?" Because if you do not your friend, the van thief, will just turn his key upside down, and switch on that way. With the second, projection he cannot do this.
Given time, the van thief could, of course, beat this simple little contraption : but motor thieves are
not generally given time—at least, not until they stand in the dock., and then they are usually given more than they want! Given time, he could takef,off the switch plate and remove your bolts (but not if the obstructions are soldered in): then he could use his standard key. But he will not risk that, even if he sees his way how to do it. Nor will he take, time in filing his key to correspond with yours.
This little plan makes each and every Ford switch key individual and personal—nearly as much so as a Yale key. It is of course quite unnecessary to place the bolts or screws exactly where they are shown in the sketch, the more variation there is the less chance there is of other persons having exactly similar keys.