


M AN has worked steadily to improve its position in the
Page 107
Page 108
Page 113
Page 114
If you've noticed an error in this article please click here to report it so we can fix it.
eightlegger league: in 1986 it took fourth place with 9.8% of the market As far as numbers go, it hit a high in 1989 with 182 registrations. At the end of that year the F90 cab was introduced —just as the recession dealt the eight-legger market a blow from which it has yet to recover.
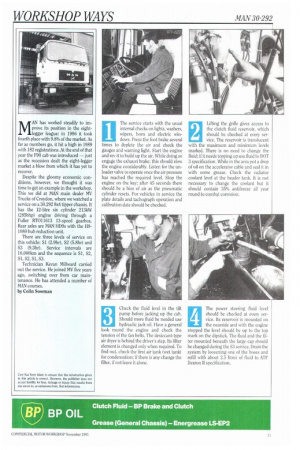
Despite the gloomy economic conditions, however, we thought it was time to get an example in the workshop. This we did at MAN main dealer MV Trucks of Croydon, where we watched a service on a 30.292 8x4 tipper chassis. It has the 12-litre six cylinder 213kW (285bhp) engine driving through a Fuller RT011613 13-speed gearbox. Rear axles are MAN HD9s with the H91080 hub reduction unit.
There are three levels of service on this vehicle: Si (2.9hr), S2 (5.8hr) and S3 (9.3hr). Service intervals are 10,000km and the sequence is Si, S2, Sl, S2, Sl, S3.
Technician Kevan Millward carried out the service. He joined MV five years ago, switching over from car maintenance. He has attended a number of MAN courses.
by Colin Sowman The service starts with the usual internal checks on lights, washers, wipers, horn and electric windows. Press the foot brake several times to deplete the air and check the gauges and warning light. Start the engine and rev it to build up the air. While doing so engage the exhaust brake; this should slow the engine considerably. Listen for the unloader valve to operate once the air pressure has reached the required level. Stop the engine on the key; after 45 seconds there should be a hiss of air as the pneumatic cylinder resets. For vehicles in service the plate details and tachograph operation and calibration date should be checked.
1
Lifting the grille gives access to the clutch fluid reservoir, which should be checked at every service. The reservoir is translucent with the maximum and minimum levels marked. There is no need to change the fluid; if it needs topping up use fluid to DOT 3 specification, While in the area put a drop of oil on the accelerator cable and seal it in with some grease. Check the radiator coolant level at the header tank. It is not necessary to change the coolant but it should contain 35% antifreeze all year round to combat corrosion.
Check the fluid level in the tilt pump before jacking up the cab. Should more fluid be needed use hydraulic jack oil. Have a general look round the engine and check the tension of the fan belts. The desiccant-type air dryer is behind the driver's step. Its filter element is changed only when required. To find out, check the first air lank (wet tank) for condensation: if there is any change the filter, if not leave it alone.
3
The power steering fluid level should be checked at every service. Its reservoir is mounted on the nearside and with the engine stopped the level should be up to the top mark on the dipstick. The fluid and the filter mounted beneath the large cap should be changed during the S3 service. Drain the system by loosening one of the hoses and refill with about 2.5 litres of fluid to ATF Dexron II specification.
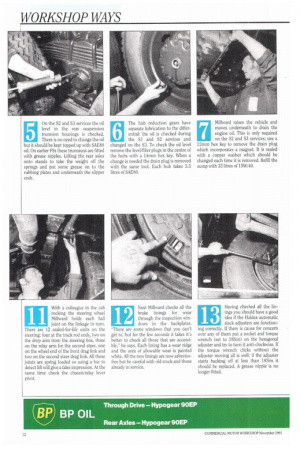
On the S2 and S3 services the oil level in the rear suspension trunnion housings is checked. There is no need to change the oil but it should be kept topped up with SAE80 oil. On earlier F8s these trunnions are fitted with grease nipples. Lifting the rear axles onto stands to take the weight off the springs and put some grease on to the rubbing plates and underneath the slipper ends.
5
The hub reduction gears have separate lubrication to the differential: the oil is checked during the Si and S2 services and changed on the S3. To check the oil level remove the level/filler plugs in the centre of the hubs with a 14mm hex key. When a change is needed the drain plug is removed with the same tool. Each hub takes 3.5 litres of SAE80. Mil!ward raises the vehicle and moves underneath to drain the engine oil. This is only required on the S2 and 53 services; use a 12mm hex key to remove the drain plug which incorporates a magnet. It is sealed with a copper washer which should be changed each time it is removed. Refill the sump With 33 litres of 15W/40.
7
ri Next on the checklist is the Fuller
13-speed constant-mesh box, 13-speed constant-mesh box, which has both a splitter and range change. Its level/filler plug is to the rear of the nearside. Millward points out the drain plug, which is reached through a hole in the cross member. Both plugs are tapered so no sealing device is needed. The oil level is checked on the Si and 82 services and changed during the S3 with 13 litres of SAE80. In front of the front drive axle is the through-drive gearing which provides power to the rear axle. it has its own lubrication which "will drain through from the axle but it takes for ever", says Millward. Like the gearbox oil the SAES° oil is changed on the S3 service and checked on the others. As he removes the level plug Millward indicates where the drain is located. Refill capacity is two litres.
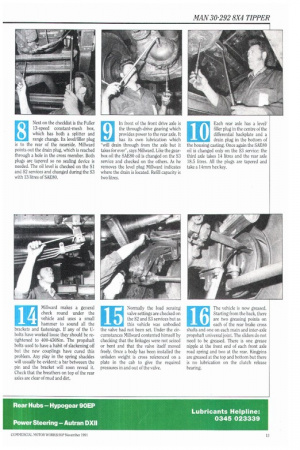
10 Each rear axle has a level/ filler plug in the centre of the
differential backplate and a drain plug in the bottom of the housing casting, Once again the SAE80 oil is changed only on the S3 service: the third axle Lakes 14 litres and the rear axle 18.5 litres. All the plugs are tapered and take a 14mm hex key, With a colleague in the cab rocking the steering wheel Millward holds each ball joint on the linkage in turn. There are 12 sealed-for-life units on the steering: four at the track rod ends, two on the drop arm from the steering box, three on the relay arm for the second steer, one on the wheel end of the front drag link and two on the second steer drag link. All these joints are spring loaded so using a bar to detect lift will give a false impression. At the same time check the chassis/relay lever pivot.
11
14 Millward makes a general
check round under the vehicle and uses a small hammer to sound all the brackets and fastenings. If any of the Ubolts have worked loose they should be retightened to 400-450Nm. The propshaft bolts used to have a habit of slackening off but the new couplings have cured this problem. Any play in the spring shackles will usually be evident: a bar betweeen the pin and the bracket will soon reveal it. Check that the breathers on top of the rear axles are clear of mud and dirt.
15 Normally the load sensing valve settings are checked on
the S2 and S3 services but as this vehicle was unbodied the valve had not been set. Under the circumstances Millward contented himself by checking that the linkages were not seized or bent and that the valve itself moved freely. Once a body has been installed the unladen weight is cross referenced on a plate in the cab to give the required pressures in and out of the valve.
16 The vehicle is now greased. Starting from the back, there
are two greasing points on each of the rear brake cross shafts and one on each main and inter-axle propshaft universal joint. The sliders do not need to be greased. There is one grease nipple at the front end of each front axle road spring and two at the rear. Kingpins are greased at the top and bottom but there is no lubrication on the clutch release bearing. Checking the air filter is easiest from beneath the vehicle. It should be checked on the S2 and S3 services. There is no set replacement period but Millward finds that by the 53 service the filter usually needs to be renewed, especially on off-road vehicles. There is a restriction indicator behind the front grille. When there is no restriction indicated the filter is removed and blown out with an airline. Clean out the housing before re-installing the filter and check that the water drain is not blocked.
18 There are two disposable
canister-type filters and a sediment trap in the fuel
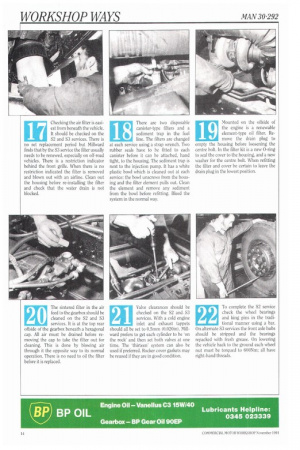
line. The filters are changed at each service using a strap wrench. Two rubber seals have to be fitted to each canister before it can be attached, hand tight, to the housing. The sediment trap is next to the injection pump. It has a white plastic bowl which is cleaned out at each service: the bowl unscrews from the housing and the filter element pulls out. Clean the element and remove any sediment from the howl before refitting. Bleed the system in the normal way. 19 Mounted on the offside of the engine is a renewable
element-type oil filter. Re move the drain plug to empty the housing before loosening the centre bolt. In the filler kit is a new 0-ring to seal the cover to the housing, and a new washer for the centre bolt. When refitting the filter and cover be certain to leave the drain plug in the lowest position.
20 The sintered filter in the air feed to the gearbox should be
cleaned on the S2 and S3 services. It is at the top rear offside of the gearbox beneath a hexagonal cap. All air must be drained before removing the cap to take the filter out for cleaning. This is done by blowing air through it the opposite way to its normal operation. There is no need to oil the filter before it is replaced. Valve clearances should be checked on the S2 and .S3 services. With a cold engine inlet and exhaust tappets should all be set to 0.5mm (0.020in). Millward prefers to gel each cylinder to be on the rock and then set both valves at one time. The 'thirteen' system can also be used if preferred. Rocker cover gaskets may be reused if they are in good condition.
21
22 To complete the S2 service check the wheel bearings
and king pins in the tradi tional manner using a bar. On alternate S3 services the front axle hubs should be stripped and the bearings repacked with fresh grease. On lowering the vehicle back to the ground each wheel nut must be torqued to 600Nm; all have right-hand threads.
12 Next Millward checks all the brake linings for wear
through the inspection win dows in the backplates. "There are some windows that you can't get to, but for the few seconds it takes it's better to check all those that are accessible," he says. Each lining has a wear ridge and the area of allowable wear is painted white. All the new linings are now asbestosfree but be careful with old stock and those already in service.
13 Having checked all the lin
ings you should have a good idea if the Haldex automatic slack adjusters are functioning correctly. If there is cause for concern over any of them put a socket and torque wrench (set to 18Nm) on the hexagonal adjuster and try to turn it anti-clockwise. If the torque wrench clicks without the adjuster moving all is well; if the adjuster starts backing off at less than 18Nm it should be replaced. A grease nipple is no longer fitted.