


T he F7 eight-wheeler had already won itself a reputation for
Page 87
Page 88
Page 89
Page 90
If you've noticed an error in this article please click here to report it so we can fix it.
reliability when the 10-litre engine option was announced. That change was one of many made when the FL cab was launched in 1985. The 10-litre engine was specified in 60% of Volvo's eightleggers last year and is the subject of this month's Workshop Ways. Our vehicle has the 229kW (311hp) TD102FM engine coupled to the SR1400 ninespeed gearbox and has the lighter B-ride rear bogie.
There are two levels of service and safety inspection on the Volvo: the L3 service is carried out every three months or 30,000km and the LA once a year or every 90,000km.
The safety check-inspection (SCI) is carried out to comply with 0-licence requirements and the basic checkinspection (BCI) is conducted every six months.
A service will usually combine an 1.3 or IA with a SC1 or BCI and will take the following times: L3, Lairs; L4, 2.05hrs; SCI, 2.06hrs and BCI, 5.05hrs. There is also an additional service carried out annually which covers items like changing the coolant and painting the battery box.
Workshop watched technician Paul Mills carry out an 13 and SCI at Heathrow Commercials in Croydon. Mills, who also took part in the F12 Workshop Ways last October, served his apprenticeship at Heathrow and has attended most of the manufacturer's training courses.
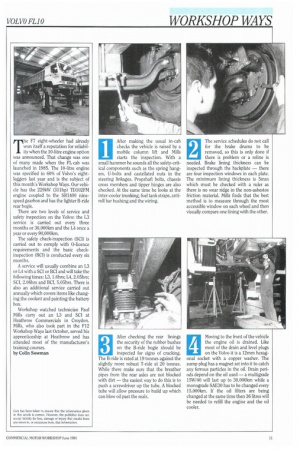
by Colin Sowman After making the usual in-cab checks the vehicle is raised by a mobile column lift and Mills starts the inspection, With a small hammer he sounds all the safety-critical components such as the spring hangers, U-bolts and castellated nuts in the steering linkages. Propshaft bolts, chassis cross members and tipper hinges are also checked. At the same time he looks at the inter-cooler trunking, fuel tank straps, antiroll bar bushing and the wiring. The service schedules do not call for the brake drums to be removed, so this is only done if there is problem or a reline is needed. Brake lining thickness can be inspected through the backplate — there are four inspection windows in each plate. The minimum lining thickness is 5mrn which must be checked with a ruler as there is no wear ridge in the non-asbestos friction material. Mills finds that the best method is to measure through the most accessible window on each wheel and then visually compare one lining with the other.
After checking the rear linings the security of the rubber bushes on the B-ride bogie should be inspected for signs of cracking.
The B-ride is rated at 19 tonnes against the slightly more robust T-ride at 20 tonnes. While there make sure that the breather pipes from the rear axles are not blocked with dirt — the easiest way to do this is to push a screwdriver up the tube. A blocked tube will allow pressure to build up which can blow oil past the seals.
Moving to the front of the vehicle the engine oil is drained. Like most of the drain and level plugs on the Volvo it is a 12mm hexag onal socket with a copper washer. The sump plug has a magnet set into it to catch any ferrous particles in the oil. Drain periods depend on the oil used — a multigrade 15W/40 will last up to 30,0001on while a monograde SAE30 has to be changed every 15,000km. lithe oil filters are being changed at the same time then 36 litres will be needed to refill the engine and the oil cooler.
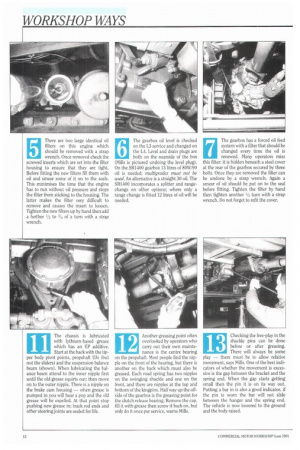
There are two large identical oil filters on this engine which should be removed with a strap wrench. Once removed check the screwed inserts which are set into the filter housing to ensure that they are tight. Before fitting the new filters fill them with oil and smear some of it on to the seals. This minimises the time that the engine has to run without oil pressure and stops the filter from sticking to the housing. The latter makes the filter very difficult to remove and causes the insert to loosen. Tighten the new filters up by hand then add a further 1/2 to 3/4 of a turn with a strap wrench. The gearbox oil level is checked on the L3 service and changed on the L4. Level and drain plugs are both on the nearside of the box (Mills is pictured undoing the level plug). On the SR1400 gearbox 13 litres of 80IAT/90 oil is needed; multigrades must not be used. An alternative is a straight 30 oil. The SR1400 incorporates a splitter and rangechange on other options; where only a range change is fitted 12 litres of oil will be needed. The gearbox has a forced oil feed system with a filter that should be changed every time the oil is renewed. Many operators miss this filter: it is hidden beneath a steel cover at the rear of the gearbox secured by three bolts. Once they are removed the filter can be undone by a strap wrench. Again a smear of oil should be put on to the seal before fitting. Tighten the filter by hand then tighten another 1/2 turn with a strap wrench. Do not forget to refit the cover.
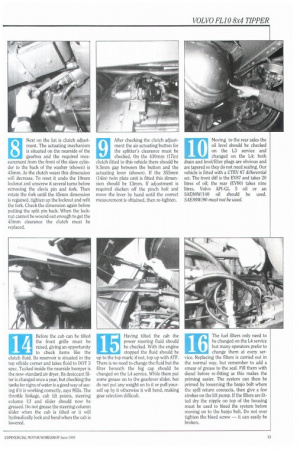
Next on the list is clutch adjustment. The actuating mechanism is situated on the nearside of the gearbox and the required measurement from the front of the slave cylinder to the back of the washer (shown) is 45mm. As the clutch wears this dimension will decrease. To reset it undo the 19mm locknut and unscrew it several turns before removing the clevis pin and fork. Then rotate the fork until the 45mm dimension is regained, tighten up the locknut and refit the fork. Check the dimension again before putting the split pin back. When the locknut cannot be wound out enough to get the 45mm clearance the clutch must be replaced. After checking the clutch adjustment the air actuating button for the splitter's clearance must be checked. On the 430mm (17in) clutch fitted to this vehicle there should be 9.5mm gap between the button and the actuating lever (shown). If the 355mm (14in) twin plate unit is fitted this dimension should be 13mm. If adjustment is required slacken off the pinch bolt and move the lever by hand until the correct measurement is obtained, then re-tighten.
10 Moving to the rear axles the oil level should be checked
on the L3 service and changed on the L4; both drain and level/filter plugs are obvious and are tapered so they do not need sealing. Our vehicle is fitted with a CTEV 87 differential set. The front diff is the EV87 and takes 20 litres of oil; the rear (EV80) takes nine litres. Volvo API-CL 5 oil or an SAE80W/140 oil should be used. SAE8OW/90 must not be used.
11 The chassis is lubricated
with lythium-based grease which has an EP additive.
Start at the back with the tipper body pivot points, propshaft UJs (but not the sliders) and the suspension balance beam (shown). When lubricating the balance beam attend to the inner nipple first until the old grease squirts out; then move on to the outer nipple. There is a nipple on the brake cam housing — when grease is pumped in you will hear a pop and the old grease will be expelled. At that point stop pushing new grease in; track rod ends and other steering joints are sealed for life.
Another greasing point often overlooked by operators who carry out their own maintenance is the centre bearing on the propshaft. Most people find the nipple on the front of the bearing, but there is another on the back which must also be greased. Each road spring has two nipples on the swinging shackle and one on the front, and there are nipples at the top and bottom of the kingpins. Half way up the offside of the gearbox is the greasing point for the clutch release bearing. Remove the cap, fill it with grease then screw it back on, but only do it once per service, warns Mills. 13 Checking the free-play in the shackle pins can be done before or after greasing. There will always be some play there must be to allow relative movement, says Mills. One of the best indicators of whether the movement is excessive is the gap between the bracket and the spring end. When the gap starts getting small then the pin it is on its way out. Putting a bar in is also a good indicator, if the pin is worn the bar will not slide between the hanger and the spring end. The vehicle is now lowered to the ground and the body raised. 14 Before the cab can be tilted
the front grille must be raised, giving an opportunity
to check items like the clutch fluid. Its reservoir is situated in the top offside corner and takes fluid to DOT 3 spec. Tucked inside the nearside bumper is the now-standard air dryer. Its desiccant filter is changed once a year, but checking the tanks for signs of water is a good way of seeing if it is working correctly, says Mills, The throttle linkage, cab tilt points, steering column UJ and slider should now be greased. Do not grease the steering column slider when the cab is tilted or it will hydraulically lock and bend when the cab is lowered. 15 Having tilted the cab the power steering fluid should
be checked. With the engine stopped the fluid should be up to the top mark; if not, top up with ATE. There is no need to change the fluid but the filter beneath the big cap should be changed on the 1,4 service. While there put some grease on to the gearlever slider, but do not put any weight on to it or pull yourself up by it otherwise it will bend, making gear selection difficult.
16 The fuel filters only need to be changed on the lA service but many operators prefer to
change them at every service. Replacing the filters is carried out in the normal way, but remember to add a smear of grease to the seal. Fill them with diesel before re-fitting as this makes the priming easier. The system can then be primed by loosening the banjo bolt where the spill return connects, then give a few strokes on the lift pump. If the filters are fitted dry the nipple on top of the housing must be used to bleed the system before moving on to the banjo bolt. Do not over tighten the bleed screw — it can easily be broken.
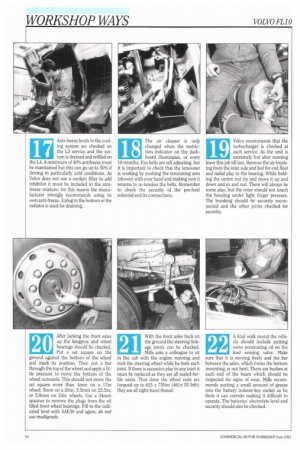
nilAnti-freeze levels in the cooling system are checked on the L3 service and the system is drained and refilled on the IA. A minimum of 40% antifreeze must be maintained but this can go up to 50% if driving in particularly cold conditions. As Volvo does not use a coolant filter to add inhibitor it must be included in the antifreeze mixture: for this reason the manufacturer strongly recommends using its own anti-freeze. A plug in the bottom of the radiator is used for draining. 18 The air cleaner is only changed when the restric
tion indicator on the dash board illuminates, or every 18 months. Fan belts are self adjusting, but it is important to check that the tensioner is working by pushing the tensioning arm (shown) with your hand and making sure it returns to re-tension the belts. Remember to check the security of the pre-heat solenoid and its connections.
19 Volvo recommends that the
turbocharger is checked at each service. As the unit is extremely hot after running leave this job till last. Remove the air trunking from the inlet side and feel for end float and radial play in the bearing. While holding the centre nut try and move it up and down and in and out. There will always be some play, but the rotor should not touch the housing under light finger pressure. The trunking should be securely reconnected and the other joints checked for security.
20 After jacking the front axles
up the kingpins and wheel bearings should be checked.
Put a set square on the ground against the bottom of the wheel and mark its position. Then put a bar through the top of the wheel and apply a little pressure to move the bottom of the wheel outwards. This should not move the set square more than 4mm on a 17in wheel; 5mm on a 20in; 5.5mm on 22.5in; or 5.8mm on 24in wheels. Use a 34mm spanner to remove the plugs from the oil filled front wheel bearings. Fill to the indicated level with SAE30 and again, do not use multigrade.
With the front axles back on the ground the steering linkage joints can be checked. Mills asks a colleague to sit in the cab with the engine running and rock the steering wheel while he feels each joint. If there is excessive play in any joint it must be replaced as they are all sealed-forlife units. That done the wheel nuts are torqued up to 625 ± 75Nm (461± 55 lbftl; they are all right-hand thread.
21
22 A final walk round the vehi
cle should include putting some penetrating oil on the load sensing valve. Make sure that it is moving freely and the bar between the axles, which forms the bottom mounting, is not bent. There are bushes at each end of the beam which should be inspected for signs of wear. Mills recommends putting a small amount of grease into the battery isolator-key socket as he finds it can corrode making it difficult to operate. The batteries' electrolyte level and security should also be checked.