


I n 1977 Iveco Ford was the first manufacturer to offer
Page 99
Page 100
Page 101
If you've noticed an error in this article please click here to report it so we can fix it.
all-round discs as standard on a 7.5 tonne truck. This innovation bought with it the complication of incorporating a park brake into the rear disc calipers.
Some operators have run into problems maintaining the rear brakes, so Iveco Ford has updated its service procedures to overcome these problems and Workshop was invited along to see the latest recommendations being carried out.
There are four levels of service on the Cargo: lubrication, A, B and C. However, the A service is only carried out after the first 1,600km. Its place is taken by a lubrication and inspection service which is carried out every 15,000km. The B service is carried out every 30,000km and the C at 60,000km intervals. Standard time for the lubrication service is 11/2 hours; B service 61/2 hours and the C is 10 hours. These times do not include any allowance for safety inspections.
We watched a D-registered Cargo 0811 going through its B service. This is equipped with the 82kW (110hp), naturally aspirated 6.2-litre Dover engine and is fitted with the now superseded Ford four-speed gearbox.
Technician Dave Perkins carried out the service at Iveco Ford dealer Trimoco at Chelmsford. Perkins served his apprenticeship with the Ford truck dealer for the area 22 years ago and has attended just about every course the manufacturer runs.
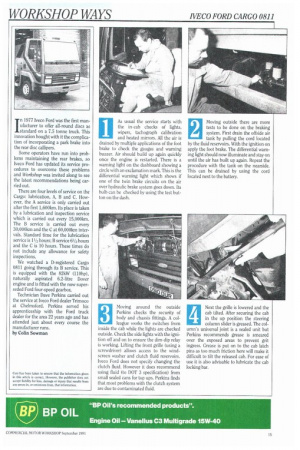
by Colin Bowman As usual the service starts with the in-cab checks of lights, wipers, tachograph calibration and heated mirrors. All the air is drained by multiple applications of the foot brake to check the gauges and warning buzzer. Air should build up again quickly once the engine is restarted. There is a warning light on the dashboard showing a circle with an exclamation mark. This is the differential warning light which shows if one of the twin brake circuits on the air over hydraulic brake system goes down. Its bulb can be checked by using the test button on the dash.
1
Moving outside there are more tests to be done on the braking system. First drain the offside air tank by pulling the cord located by the fluid reservoirs. With the ignition on apply the foot brake. The differential warning light should now illuminate and stay on until the air has built up again. Repeat the procedure with the tank on the nearside. This can be drained by using the cord located next to the battery.
Moving around the outside Perkins checks the security of body and chassis fittings. A colleague works the switches from inside the cab while the lights are checked outside. Check the side lights with the ignition off and on to ensure the dim-dip relay is working. Lifting the front grille (using a screwdriver) allows access to the windscreen washer and clutch fluid reservoirs. Iveco Ford does not specify changing the clutch fluid. However it does recommend using fluid (to DOT 3 specification) from small sealed cans for top ups. Perkins finds that most problems with the clutch system are due to contaminated fluid.
3
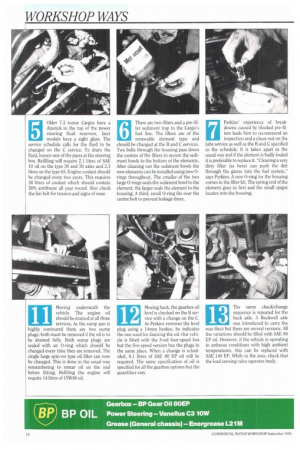
Next the grille is lowered and the cab tilted. After securing the cab in the up position the steering column slider is greased. The column's universal joint is a sealed unit but Perkins recommends grease is smeared over the exposed areas to prevent grit ingress. Crease is put on to the cab latch pins as too much friction here will make it difficult to tilt the released cab. For ease of use it is also advisable to lubricate the cab locking bar. Older 7.5 tonne Cargos have a dipstick in the top of the power steering fluid reservoir, later models have a sight glass. The service schedule calls for the fluid to be changed on the C service. To drain the fluid, loosen one of the pipes at the steering box. Refilling will require 2.1 litres of SAE 10 oil on the type 30 and 50 axles and 2.3 litres on the type 65. Engine coolant should be changed every two years. This requires 30 litres of coolant which should contain 50% antifreeze all year round. Also check the fan belt for tension and signs of wear.
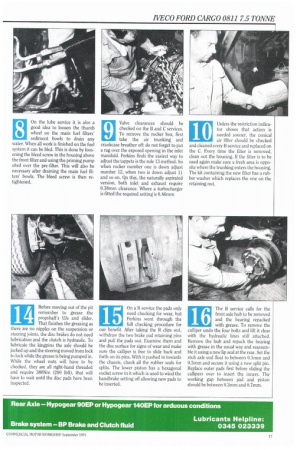
There are two filters and a pre-filter sediment trap in the Cargo's fuel line. The filters are of the renewable element type and should be changed at the B and C services. Two bolts through the housing pass down the centres of the filters to secure the sediment bowls to the bottom of the elements, After cleaning out the sediment bowls the new elements can be installed using new 0rings throughout. The smaller of the two large 0-rings seals the sediment bowl to the element; the larger seals the element to the housing. A third, small 0-ring fits over the centre bolt to prevent leakage there.
Perkins' experience of breakdowns caused by blocked pre-filters leads him to recommend an inspection and a clean-out on the lube service as well as the B and C specified in the schedule, It is taken apart in the usual way and if the element is badly fouled it is preferable to replace it. "Cleaning a very dirty filter (as here) can push the dirt through the gauze into the fuel system," says Perkins. A new 0-ring for the housing comes in the filter kit. The spring end of the element goes in first and the small spigot locates into the housing.
8
On the lube service it is also a good idea to loosen the thumb wheel on the main fuel filters' sediment bowls to drain any water. When all work is finished on the fuel system it can be bled. This is done by loosening the bleed screw in the housing above the front filter and using the priming pump sited over the pre-filter. This will also be necessary after draining the main fuel filters' bowls. The bleed screw is then retightened. Valve clearances should be checked on the B and C services. To remove the rocker box, first take the air trunking and crankcase breather off; do not forget to put a rag over the exposed opening in the inlet manifold. Perkins finds the easiest way to adjust the tappets is the rule 13 method. So when rocker number one is down adjust number 12, when two is down adjust 11 and so on. (in this, the naturally aspirated version, both inlet and exhaust require 0.38mm clearance. Where a turbocharger is fitted the required setting is 0.46mm
10 Unless the restriction indica
tor shows that action is needed sooner, the conical air filter should be checked and cleaned every B service and replaced on the C. Every time the filter is removed, clean out the housing. If the filter is to be used again make sure a fresh area is opposite where the trunking enters the housing. The kit containing the new filter has a rubber washer which replaces the one on the retaining nut.
Moving underneath the vehicle. The engine oil should be drained at all three services. As the sump pan is highly contoured there are two sump plugs: both must be removed if the oil is to be drained fully. Both sump plugs are sealed with an 0-ring which should be changed every time they are removed. The single large spin-on type oil filter can now be changed. This is done in the usual way remembering to smear oil on the seal before fitting. Refilling the engine will require 14 litres of 15W40 oil.
11
12 Moving back, the gearbox oil
level is checked on the B ser vice with a change on the C.
As Perkins removes the level plug using a 14mm hexkey, he indicates the one used for draining the oil. Our vehicle is fitted with the Ford four-speed box but the five-speed version has the plugs in the same place. When a change is scheduled, 6.1 litres of SAE 80 EP oil will be required. The same specification of oil is specified for all the gearbox options but the quantities vary.
13 The same check/change
sequence is repeated for the back axle. A Rockwell axle
was introduced to carry the rear discs but there are several versions. All the variations should be filled with SAE 90 EP oil. However, if the vehicle is operating in arduous conditions with high ambient temperatures, this can be replaced with SAE 140 EP. While in the area, check that the load sensing valve operates freely. 14 Before moving out of the pit
remember to grease the propshaft's 11.1s and slider.
That finishes the greasing as there are no nipples on the suspension or steering joints, the disc brakes do not need lubrication and the clutch is hydraulic. To lubricate the kingpins the axle should be jacked up and the steering moved from lock to lock while the grease is being pumped in. While the wheel nuts will have to be checked, they are all right-hand threaded and require 380Nm (280 lbft), that will have to wait until the disc pads have been inspected.
15 On a B service the pads only
need checking for wear, but Perkins went through the full checking procedure for our benefit. After taking the R clips out, withdraw the two brake pad retaining pins and pull the pads out. Examine them and the disc surface for signs of wear and make sure the calliper is free to slide back and forth on its pins. With it pushed in towards the chassis, check all the rubber seals for splits. The lower piston has a hexagonal socket screw in it which is used to wind the handbrake setting off allowing new pads to be inserted.
16 The B service calls for the
front axle hub to be removed and the bearing repacked with grease. To remove the calliper undo the four bolts and lift it clear with the hydraulic lines still attached. Remove the hub and repack the bearing with grease in the usual way and reassemble it using a new lip seal at the rear. Set the stub axle end float to between 0.1mm and 0.3mm and secure it using a new split pin. Replace outer pads first before sliding the callipers over to insert the inners. The working gap between pad and piston should be between 0.3mm and 0.7mm.