


HINTS ON MAINTENANCE.
Page 28
If you've noticed an error in this article please click here to report it so we can fix it.
How to Get the Best Out of a Vehicle, to Secure Reliability 'and to Avoid Trouble,
rIONTRIBUTIONS are invited for this page from ‘.....frfleet managers, drivers, garage foremen, and mechanics, works staff and draughtsmen, and will be paid for on a generous scale. Every system, make, and type of commercial motor vehicle is being dealt with, and the matter should be written with a view zo the. disclosure of workshop and garage practice in the maintenance of a vehicle,
which is fitted to some Hanford vehicles. This failure results in rapid consumption of oil, as this is thrown through the annular space on to the flywheel.
These" neck rings are made of white metal and are rather expensive to renew, but in certain instances an effective repair has been made by fitting brass rings of the type and size illustrated. Each ring is machined in one piece, drilled and countersunk for six setscrews, cut into halves and fitted on the outside of-the crankcase.
It will be noted that the ring is machined for the insertion of ii, felt packing washer.
493.—A Mirror as an Aid to Magneto Timing.
Magnetos are often placed in somewhat inaccessible positions, where it is practically impossible adequately to inspect the make and break.
In cases like this, a small mirror is almost invaluable, as often, if the points are adjusted without their exact position being seen' the gap between the points may be either too great or too small. Weak sparking causes misfiring and bad pulling, and a large gap will sometimes alter the timing very considerably, and even cause difficult sparking, but if a mirror be used the correct gap can easily be ascertained-. Incidentally, this gap should, be about 1-50th in. or .5 mm.
494.—Some Useful Advice on Leyland Valves.
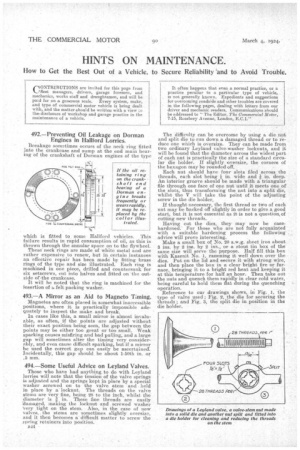
Those who have had anything: to do with Leyland lorries will note that the tension of the valve springs is adjusted and the springs kept in place by a special washer screwed on to the valve stem 'and. held in place by a ' locknut. The threads on the valve stems are very ne, being 28 to the inch, whilst the
i diameter is • in. These fine threads are easily 'damaged, ma ing the locknut and screwed washeL 'very tight on the stem. Also, in the case of new valves,, the stems are sometimes slightly oversize., and it then becomes a:difficult matter to screw the wring retainers into position.
The difficulty can be overcome by using a die nut and split die to run down a damaged thread or to reduce one which is oversize. They can be made from two ordinary Leyland valve-washer locknuts, and it will be found that the diameter across the widest part of each nut is practically the size of a standard circular die holder. If slightly oversize, the corners of the hexagon may be rounded off.
Each nut should have four slots filed across the threads, each slat being * in. wide and * in. deep. An interior groove should be made with a triangular file through one face of one nut until it meets one of the slots, thus transforming the nut into a split die, whilst the V will take the point of the adjusting screw in the die holder.
If thought necessary, the first thread or two of each nut may be backed off slightly in order to give a. good start, but it is not essential as it is not a question, of cutting new threads.
Having cut the dies they may now be casehardened. For those who are not fully acquainted with a suitable hardening process the following advice will prove interesting.
Make a small box of No. 20 s.w.g. sheet iron about 3 ins. by 2 ins. by 2 ins., or a stout tin box of the same size will serve the purpose. Half fill this box with Kasenit No. 1, ramming it well down over the dies. Put on the lid and secure it with strong wire, and then place the box in a clear bright fire or furnace, bringing it to a bright red heat and keeping it at this temperature for half an hour. Then take out the nuts and quench them rapidly in clear cold water, being careful to hold them flat during the quenching operation. Reference to our drawings shows, in Fig. 1, the type of valve used ; Fig. 2, the die for securing the threads ; and Fig. 3, the split die in position in the die holder.