


HINTS ON MAINTENANCE.
Page 68
If you've noticed an error in this article please click here to report it so we can fix it.
A Peerless Exhaust-pipe Improvement. Reassembling a Maudslay Engine. How to Take Up Sideplay on Thornycroft Rear Wheels.
A Joint for the Peerless Exhaust Pipe.
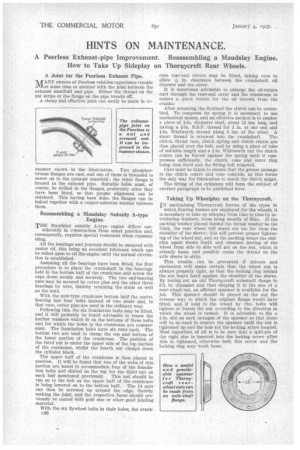
ANY owners of Peerless vehicles experience trouble IT-Lat some time or another with the joint between the exhaust manifold and pipe. Either the thread on the nut strips or the flange on the pipe breaks off.
A cheap and effective joint can easily be made in tin manner shown in the illustration. Two phosphorbronze flanges are cast, and one of these is threaded to screw on to the exhaust manifold; the other flange is brazed to the exhaust pipe. Suitable holes must, of course, be drilled in the flanges, preferably after they have been fitted, so that proper alignment can be obtained. This having been done, the flanges can be bolted together with a copper-asbestos washer between them.
Reassembling a Maudslay Subsidy A-type Engine.
THE Mandslay subsidy A-type engine differs considerably in construction from usual practice and, consequently, requires special treatment when reassembling.
All the bearings and journals should be smeared with castor oil, this being an excellent lubricant which can be relied upon to oil the engine until the normal circulation is established.
Assuming all the bearings have been fitted, the first procedure is to place the crankshaft in the bearings held in the bottom half of the crankcase and screw the caps down evenly and securely. The two end-bearing nuts may be secured by cotter pins and the other three bearings by wire, thereby retaining the studs as well as the nuts.
With the new-type crankcase bottom half the centre bearing has four bolts instead of two studs and, in that case, cotter pins are used in the ordinary way. Following this, the six foundation bolts may be fitted, and it will probably be found advisable to renew the leather washers which fit on the bottoms of these bolts and for which the holes in the crankcase are countersunk. The foundation bolts have six nuts each. The bottom two are used to clamp the top and bottom of the lower portion of the crankcase. The position of the third nut is under the upper side of the top portion of the crankcase, whilst the fourth nut clamps down the cylinder block.
The upper half of the crankcase is then placed in position. It will be found that two of the webs of this portion are bored to accommodate four of the founda tion bolts and slotted on the top for the third nut on each bolt mentioned previously. This nut should be
run on to the bolt as the upper half, of the crankcase
is being lowered on to the bottom half. The 14 nuts can then be screwed up around the edge, thereby making the joint, and the respective faces should previously be coated with gold size or other good jointing material.
With the six flywheel bolts in their holes, the crankc46
case rear-end covers may be fitted, taking care to
allow in. clearance between the crankshaft oil thrower and the cover.
It is sometimes advisable to enlarge the oil-return duct through the rear-end cover and the crankcase to ensure a quick return for the oil thrown from the cranks.
After mounting the flywheel the clutch can be assembled. To compress its spring it is necessary to use mechanical means, and an effective method is to employ a piece of fin, diameter steel, about 12 ins, long, and having a fin. B.S.F. thread for 1 in. at one end and fin. Whitworth thread along 6 ins. at the other. A short thread is screwed into the crankshaft. The clutch, thrust race, clutch spring and clutch centre are then placed over the bolt, and by using a piece of tube of suitable length and a fin. Whitworth nut the clutch centre can be forced against the spring until it compresses sufficiently, the clutch, cone and outer ring being then fixed and the fitting bolt removed.
Care must be taken to ensure that the grease passage in the clutch centre and cone coincide, as this forms the only way for lubrication to reach the clutch spigot.
The fitting of the cylinders will form the subject of another paragraph to be published later.
Taking Up Wheelplay on the Thornycroft.
IN maintaining Thornycroft lorries of the types in which floating bushes are employed for the wheels, it is necessary to take up sideplay from time to time by introducing washers, these being usually of fibre. If the packing washer placed behind the thrust washer be too thick, the rear wheel will stand out too far from the shoulder of the sleeve; this will prevent proper tightening of the wheel nut, and as the packing wears the endplay again shows itself, and constant moving of the wheel from side to side will act on the hut, which is already loose, and possibly cause the thread on the axle sleeve to strip.
This trouble can be prevented. if drivers and mechanics will make certain that the wheel nut is always properly tight, so that the locking ring behind the nut bears hard against the shoulder of the sleeve. By boring out an old Thornycroft axleshaft flange to 3i26 in. diameter and then shaping it to the size of a rear-wheel nut, an efficient spanner is available for the job. This spanner should be placed on the nut the reverse way to which the original flange would have fitted, and if held to the wheel by two bolts will tighten or loosen the nut according to the direction in which the wheel is turned. It is advisable to tile a fin. slot on each nexagon of the spanner so that there will be no need to remove the spanner until the nut is tightened up and the hole for the locking screw located. Most important of all is to be sure that a split-pin of the right size is inserted into the locking screw after this is tightened, otherwise both this screw and the locking ring may work loose.