


TIPS FOR THE WORKSHOP AND ROADSIDE,
Page 69
If you've noticed an error in this article please click here to report it so we can fix it.
Useful Contributions from Our Driver and Mechanic Readers.
Success in Screw-cutting.
THEHE following precautionary hints are sent us by " A.W..T.," of Widnes :—
Many garage mechanics have not had great opportunities to learn very much about lathe work, as in garage work there are so many other things that have to be learnt, consequently when a screw-cutting job has to be done it is not uncommon for some little mishap to occur that may result in the job being spoilt.
There is nothing really difficult in screw-cutting, so long as one knows all the small pitfalls that are waiting for the man of limited experience, and that proper steps are taken to avoid the little troubles.
It is presumed that the mechanic knows how to find his change wheels. and if he does not he had better get a book that will tell him.
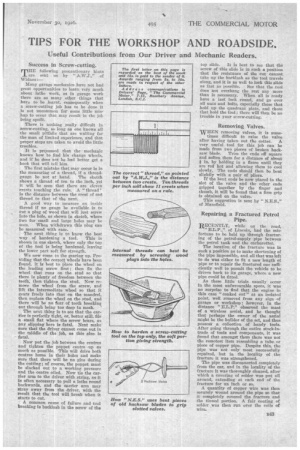
The first mistake that may occur is in the measuring of a thread, if a threadgauge be not at hand. The sketch shows a thread of ten to the inch, yet it will be seen that there are eleven Crests touching the rule. A " thread ' is the distance between the crest of one thread to that of the next.
A good way to measure an inside thread if no gauge be available is to Cut a plug of wood that will just screw into the hole, as shown in sketch, where two for small and large loiles may be seen. When withdrawn this plug can be measured with ease.
The next thing is to know the best way of hardening a tool. This is shown in one sketch, where only the top of the tool is being hardened, leaving the lower part soft for strength.
We now come to the gearing up. Providing that the correct wheels have been found, it is best to Place the wheel on the leading screw first ; then fix the wheel that runs on the stud so that there is plenty of freedom between the teeth, then tighten the stud. Now remove the wheel from the screw, and lift the intermediate wheel so that it gears freely into that on the mandrel, then replace the wheel on the stud, and there will be no fear of teeth breaking out through being too deep in mesh.
The next thing is to see that the carrier is perfectly tight, or, better still, file a small flat where the screw bears, as any slipping here is fatal. Next make sure that the driver cannot come out in the middle of the job, as this also is fatal.
• Now put the job between the centres and tighten the poppet centre up as much as possible. This will drive both centres home in their holes and make sure that there will be no give during the cutting; of course, the poppet must be slacked out to a working pressure and the centre oiled. Now tie the earlier arm to the driver with string, as it is often necessary to pull a lathe round backwards, and the carrier arm may stray away from the driver, with the result that the tool will break when it starts to cut.
A common cause of failure and tool breaking is backlash in the screw of the top slide. It is best to see that the
screw of this slide is in such a position that the resistance of the cut cannot take up the backlash as the tool travels along, and it is as well to lock this elide
as fast as possible. See that the tool does not overhang the rest any more than is necessary. When all is ready have a last look round, and go over all nuts and bolts, especially those that hold up the quadrant plate, and those that hold the tool ; there will then be no trouble in your screw-cutting.
Removing Valves.
WHEN removing valves, it is sometimes difficult to raise the valve after having taken out the cotter. A very useful tool for this job can be made from two pieces of broken hacksaw blade. Trim the ends off square and soften them for a distance of about in. by holding in a flame until they are red hot and allowing them to cool slowly. The ends should then be bent slightly with a pair of pliers.
If the bent ends be now placed in the slot of the valve and the other ends gripped together by the finger and thumb, it will be found that a firm grip is obtained on the valve.
This suggestion is sent by " N.E.S.," of Mansfield.
Repairing a Fractured Petrol Pipe.
RECENTLY, while on the road,
" E.L.P.," of Lincoln, had the misfortune to be held up through fracturing of the petrol-supply pipe between the petrol tank and the carburetter.
The location of the fracture was in such a position as to make shortening of the pipe impossible, and all that was left to do was either to fit a new length of pipe or to repair the fractured one sufficiently well to permit the vehicle to be driven back to its garage, where a new pipe could be fitted.
As these little trials usually occur in the most unfavourable spots, it was no surprise to find that the engine in this case "conked out" at an isolated point, well removed from any sign of garage or workshop • however, in the
distance " Observed the mast of a wireless aerial, and he thought that perhaps the owner of the aerial might be the builder of the set, and thus possesS a collection of handy tools. After going through the entire stock-intrade of tools and components, it was found that amongst them there was not the remotest item resembling a tube or niece of copper pipe. Despite this, the pipe was not only most successfully repaired, but in the locality of the fracture it was strengthened.
The pipe was disconnected completely from the car, and in the locality of the fracture it was thoroughly cleaned, after which a covering of solder was put all around, extending at each end of the fracture for an inch or so.
A quantity of copper wire was then securely wound around the pipe so that it completely covered the fracture and the tinned portion. A fair coating of solder was then run over the coils of wire.