 1
1 2
2 3
3 4
4 5
5 6
6 7
7 8
8 9
9 10
10 11
11 12
12 13
13 14
14 15
15 16
16 17
17 18
18 19
19 20
20 21
21 22
22 23
23 24
24 25
25 26
26 27
27 28
28 29
29 30
30 31
31 32
32 33
33 34
34 35
35 36
36 37
37 38
38 39
39 40
40 41
41 42
42 43
43 44
44 45
45 46
46 47
47 48
48 49
49 50
50 51
51 52
52 53
53 54
54 55
55 56
56 57
57 58
58 59
59 60
60 61
61 62
62 63
63 64
64 65
65 66
66 67
67 68
68 69
69 70
70 71
71 72
72 73
73 74
74 75
75 76
76 77
77 78
78 79
79 80
80 81
81 82
82 83
83 84
84 85
85 86
86 87
87 88
88 89
89 90
90 91
91 92
92 93
93 94
94 95
95 96
96 97
97 98
98 99
99 100
100 101
101 102
102 103
103 104
104 105
105 106
106 107
107 108
108 109
109 110
110 111
111 112
112 113
113 114
114 115
115 116
116 117
117 118
118 119
119 120
120 121
121 122
122 123
123 124
124 125
125 126
126 127
127 128
128 129
129 130
130 131
131 132
132 133
133 134
134 135
135 136
136 • The life of a tipper, particularly one that is
Page 117
Page 118
Page 119
Page 120
If you've noticed an error in this article please click here to report it so we can fix it.
working off-road for a substantial part of its day, is an especially arduous one. It therefore follows that the demands on a vehicle are somewhat different to those on a tractive unit, for example. Reliability and bulletproof construction are more important than fuel consumption a fraction better than a competitor's.
With more and more appearing on construction sites around the country, Workshop decided to take a look at a Hino tipper, firstly to assess how they shape up under harsh operating conditions, and secondly to see if they have any unusual maintenance requirements.
At the premises of Acorn Trucks in Crayford, we watched an FY275 8 x 4 tipper undergo an 'A' service, which is the minor adjustment and oil change service carried out every 20,000km.
This model has a 13.27-litre normally-aspirated straight six producing 205kW (275hp), and has a standard sleeper cab.
Operators have found the Hino's strong chassis withstands great amounts of abuse, though at the expense of weight.
Similarly, the normally aspirated engine is a bit short on power for hilly terrain, but is strong and oil tight. This solidity reflects the demands of the Far Eastern market, where Hino sells large numbers of vehicles.
Fitter Chris Edwards, who has 15 years experience working on Fords and latterly Dais, finds the Hino easy to work on (an example being the excellent brake adjustment system). To be held against this, however, are the huge number of greasing points (Edwards has counted 731) and the time consuming method of replacing the filters.
These items increase servicing times, and show an attitude to maintenance totally opposite to that employed by European manufacturers.
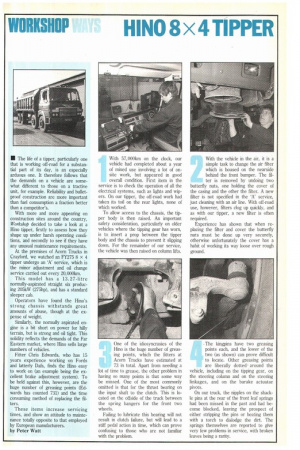
by Peter Watt With 57,000km on the clock, our vehicle had completed about a year of mixed use involving a lot of on site work, but appeared in good overall condition. First item in the service is to check the operation of all the electrical systems, such as lights and wipers. On our tipper, the off-road work had taken its toil on the rear lights, none of which worked.
To allow access to the chassis, the tipper body is then raised. An important safety consideration, particularly on older vehicles where the tipping gear has worn, is to insert a prop between the tipper body and the chassis to prevent it slipping down. For the remainder of our service, the vehicle was then raised on column lifts. With the vehicle in the air, it is a simple task to change the air filter which is housed on the nearside behind the front bumper. The filter is removed by undoing two butterfly nuts, one holding the cover of the casing and the other the filter. A new filter is not specified in the 'A' service, just cleaning with an air line. With off-road use, however, filters clog up quickly, and as with our tipper, a new filter is often required.
Experience has shown that when replacing the filter and cover the butterfly nuts must be done up very securely, otherwise unfortunately the cover has a habit of working its way loose over rough ground.
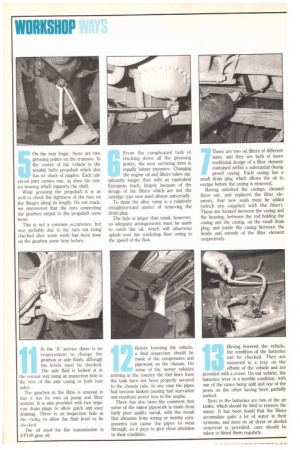
One of the idiosyncrasies of the Hino is the huge number of greasing points, which the fitters at Acorn Trucks have estimated at 73 in total. Apart from needing a lot of time to grease, the other problem in having so many points is that some way be missed. One of the most commonly omitted is that for the thrust bearing on the input shaft to the clutch. This is located on the offside of the truck between the spring hangers for the front two wheels.
Failing to lubricate this bearing will not result in clutch failure, but will lead to a stiff pedal action in time, which can prove confusing to those who are not familiar with the problem. The kingpins have two greasing points each, and the lower of the two (as shown) can prove difficult to locate. Other greasing points are liberally dotted • around the vehicle, including on the tipping gear, on the steering column and on the steering linkages, and on the barake actuator pivots.
On our truck, the nipples on the shackle pins at the rear of the front leaf springs had been missed in the past and had become blocked, leaving the prospect of either stripping the pins or heating them with a torch to dislodge the dirt. The springs themselves are reported to give very few problems in service, with broken leaves being a rarity. On the rear bogie, there are two greasing points on the trunnion. In the centre of the vehicle is the notably hefty propshaft which also has its share of nipples. Each uni vei sal joint carries one, as does the centre beanng which supports the shaft.
While greasing the propshaft it is as well to check the tightness of the nuts on the flanges along its length. On our truck, we discovered that the nuts connecting the gearbox output to the propshaft were loose.
This is not a common occurrence, but was probably due to the nuts not being checked after some work had been done on the gearbox some time before. From the complicated task of tracking down all the greasing points, the next servicing item is equally labour intensive. Changing the engine oil and filters takes sig nificantly longer than with an equivalent European truck, largely because of the design of the filters which are not the catridge type now used almost universally.
To drain the alloy sump is a relatively straightforward matter of removing the drain plug.
The hole is larger than usual, however, so adequate arrangements must be made to catch the oil, which will otherwise splash over the workshop floor owing to the speed of the flow. There are two oil filters of different sizes, and they are both of more traditional design of a filter element contained within a substantial (bump proof) casing. Each casing has a small drain plug which allows the oil to escape before the casing is removed.
Having unbolted the casings, cleaned them out, and replaced the filter elements, four new seals must be added (which are supplied with the filter). These are located between the casing and the housing, between the rod holding the casing and the casing, on the small drain plug, and inside the casing between the inside and outside of the filter element respectively. The sealing arrangements are substantially the same for both filters, although on the smaller one there are a couple of things to look out for. The seal between the filter element and the housing can stick to the housing when the filter is removed (as shown), and if this is not spotted leaks can occur when a new element is fitted.
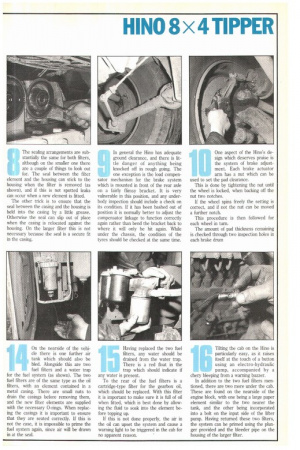
The other trick is to ensure that the seal between the casing and the housing is held into the casing by a little grease. Otherwise the seal can slip out of place when the casing is relocated against the housing. On the larger filter this is not necessary because the seal is a secure fit in the casing. In general the Hino has adequate ground clearance, and there is little danger of anything being knocked off in rough going. The one exception is the load compen sator mechanism for the brake system which is mounted in front of the rear axle on a fairly flimsy bracket. It is very vulnerable in this position, and any underbody inspection should include a check on its condition. If it has been bashed out of position it is normally better to adjust the compensator linkage to function correctly again rather than bend the bracket back to where it will only be hit again. While under the chassis, the condition of the tyres should be checked at the same time. One aspect of the Hino's design which deserves praise is the system of brake adjustment. Each brake actuator arm has a nut which can be used to set the pad clearance.
This is done by tightening the nut until the wheel is locked, when backing off the nut two notches.
If the wheel spins freely the setting is correct, and if not the nut can be moved a further notch.
This procedure is then followed for each wheel in turn.
The amount of pad thickness remaining is checked through two inspection holes in each brake drum In the 'A' service there is no requirement to change the gearbox or axle fluids, although the levels must be checked. l'he axle fluid is looked at in t no, mat way using an inspection hole in the rear of the axle casing or both rear axles.
The gearbox in the Hino is unusual in that it has its own oil pump and filter system. It is also provided with two separate drain plugs to allow quick and easy draining. There is an inspection hole in the easing to allow the fluid level to be checked.
The oil used for the transmission is FP14() gear oil. Before lowering the vehicle, a final inspection should be made of the components and pipework on the chassis. On some of the newer vehicles arriving in the country the fuel lines from the tank have not been properly secured to the chassis rails. In one case the pipes had become kinked causing fuel starvation and resultant power loss in the engine.
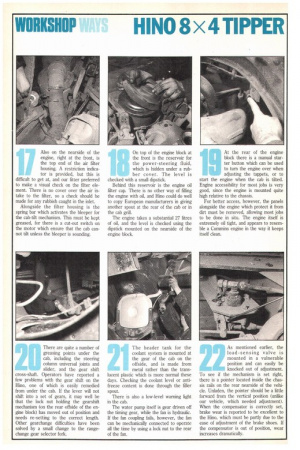
There has also been the comment that some of the minor pipework is made from fairly poor quality metal, with the result that abrasion from wiring or nearby components can cause the pipes to wear through, so it pays to give close attention to their condition. Having lowered the vehicle, the condition of the batteries can be checked. They are mounted in a tray on the offside of the vehicle and are provided with a cover. On our vehicle, the batteries were in a terrible condition, with one of the cases being split and one of the posts on the other having been partially melted.
Next to the batteries are two of the air tanks, which should be bled to remove the water. It has been found that the Hinos accumulate quite a lot of water in their systems, and since no air dryer or alcohol reservoir is provided, care should be taken to bleed them regularly. On the nearside of the vehicle there is one further air tank which should also be bled. Alongside this are two fuel filters and a water trap for the fuel system (as shown). The two fuel filters are of the same type as the oil filters, with an element contained in a metal casing. There are small nuts to drain the casings before removing them, and the new filter elements are supplied with the necessary 0-rings. When replacing the casings it is important to ensure that they are seated correctly. If this is not the case, it is impossible to prime the fuel system again, since air will be' drawn in at the seal. Having replaced the two fuel filters, any water should be drained from the water trap. There is a red float in the trap which should indicate if any water is present.
To the rear of the fuel filters is a cartridge-type filter for the gearbox oil, which should be replaced. With this filter it is important to make sure it is full of oil when fitted, which is best done by allowing the fluid to soak into the element before topping up.
If this is not done properly, the air in the oil can upset the system and cause a warning light to be triggered in the cab for no apparent reason. Tilting the cab on the 1-lino is particularly easy, as it raises itself at the touch of a button using an electro-hydraulic pump, accompanied by a chery bleeping from a warning buzzer.
In addition to the two fuel filters mentioned, there are two more under the cab. These are found on the nearside of the engine block, with one being a large paper element similar to the two nearer the tank, and the other being incorporated into a bolt on the input side of the lifter pump. Having returned these two filters, the system can be primed using the plunger provided and the bleeder pipe on the housing of the larger filter. Also on the nearside of the engine, right at the front, is the top end of the air filter housing. A restriction indicator is provided, but this is difficult to get at, and our fitter preferred to make a visual check on the filter element. There is no cover over the air intake to the filter, so a check should be made for any rubbish caught in the inlet.
Alongside the filter housing is the spring bar which activates the bleeper for the cab-tilt mechanism. This must he kept greased, for there is a cut-out switch on the motor which ensure that the cab cannot tilt unless the bleeper is sounding. On top of the engine block at the front is the reservoir for the power-steering fluid, which is hidden under a rubber cover. The level is checked with a small dipstick.
Behind this reservoir is the engine oil filter cap. There is no other way of filling the engine with oil, and Hino could do well to copy European manufacturers in giving another spout at the rear of the cab or in the cab grill.
The engine takes a substantial 27 Litres of oil, and the level is checked using the dipstick mounted on the nearside of the engine block. At the rear of the engine block there is a manual starter button which can be used to turn the engine over when adjusting the tappets, or to start the engine when the cab is tilted. Engine accessibility for most jobs is very good, since the engine is mounted quite high relative to the chassis.
For better access, however, the panels alongside the engine which protect it from dirt must be removed, allowing most jobs to be done in situ. The engine itself is extremely oil tight, and appears to resemble a Cummins engine in the way it keeps itself clean.
There are quite a number of greasing points under the cab, including the steering column universal joints and slider, and the gear shift cross-shaft. Operators have reported a few problems with the gear shift on the Hino, one of which is easily remedied from under the cab. If the lever will not shift into a set of gears, it may well be that the lock nut holding the gearshift mechanism (on the rear offside of the engine block) has moved out of position and needs re-setting to the correct length. Other gearchange difficulties have been solved by a small change to the rangechange gear selector fork. 'Ile header tank for the coolant system is mounted at the gear of the cab on the offside, and is made from metal rather than the trans lucent plastic which is more normal these days. Checking the coolant level or antifreeze content is done through the filler spout.
There is also a low-level warning light in the cab.
The water pump itself is gear driven off the timing gear, while the fan is hydraulic. If the fan coupling fails, however, the fan can be mechanically connected to operate all the time by using a lock nut to the rear of the fan. As mentioned earlier, the load-sensing 'valve is mounted in a vulnerable position and can easily be knocked out of adjustment. To see if the mechanism is set right, there is a pointer located inside the chassis rails on the rear nearside of the vehicle. Unladen, the pointer should be a little forward from the vertical position (unlike our vehicle, which needed adjustment). When the compensator is correctly set, brake wear is reported to be excellent to the Hino, which must be partly due to the ease of adjustment of the brake shoes. If the compensator is out of position, wear increases dramatically.