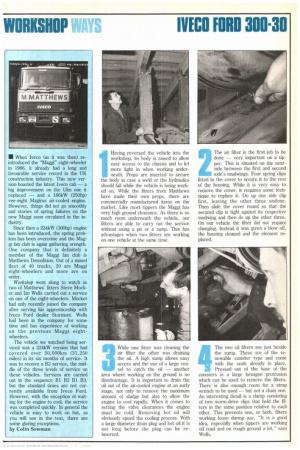
 1
1 2
2 3
3 4
4 5
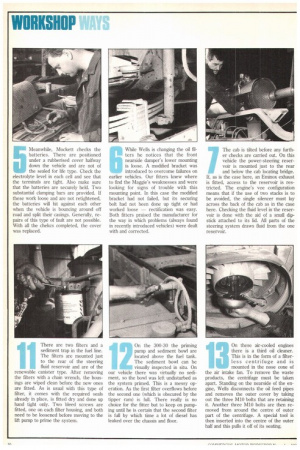
5 6
6 7
7 8
8 9
9 10
10 11
11 12
12 13
13 14
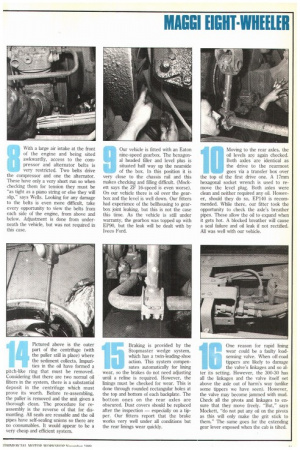
14 15
15 16
16 17
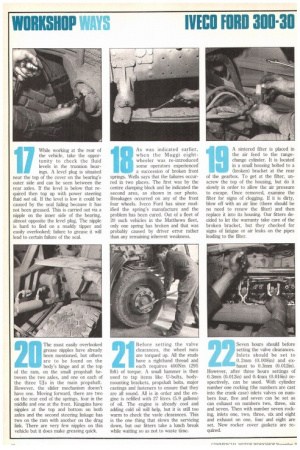
17 18
18 19
19 20
20 21
21 22
22 23
23 24
24 25
25 26
26 27
27 28
28 29
29 30
30 31
31 32
32 33
33 34
34 35
35 36
36 37
37 38
38 39
39 40
40 41
41 42
42 43
43 44
44 45
45 46
46 47
47 48
48 49
49 50
50 51
51 52
52 53
53 54
54 55
55 56
56 57
57 58
58 59
59 60
60 61
61 62
62 63
63 64
64 65
65 66
66 67
67 68
68 69
69 70
70 71
71 72
72 73
73 74
74 75
75 76
76 77
77 78
78 79
79 80
80 81
81 82
82 83
83 84
84 85
85 86
86 87
87 88
88 89
89 90
90 91
91 92
92 93
93 94
94 95
95 96
96 97
97 98
98 99
99 100
100 101
101 102
102 103
103 104
104 105
105 106
106 107
107 108
108 109
109 110
110 111
111 112
112 113
113 114
114 115
115 116
116 117
117 118
118 119
119 120
120 121
121 122
122 123
123 124
124 125
125 126
126 127
127 128
128 129
129 130
130 131
131 132
132 133
133 134
134 135
135 136
136 137
137 138
138 139
139 140
140 141
141 142
142 143
143 144
144 145
145 146
146 147
147 148
148 149
149 150
150 151
151 152
152 153
153 154
154 1 Having reversed the vehicle into the workshop, its body
Page 127
Page 128
Page 129
Page 130
If you've noticed an error in this article please click here to report it so we can fix it.
is raised to allow easy access to the chassis and to let more light in when working underneath. Props are inserted to secure the body in case a weld or the hydraulics should fail while the vehicle is being worked on. While the fitters from Matthews have made their own props, there are commercially manufactured items on the market. Like most tippers the Maggi has very high ground clearance. As there is so much room underneath the vehicle, our fitters are able to carry out the service without using a pit or a ramp. This has advantages when two fitters are working on one vehicle at the same time. 2 The air filter is the first job to be done — very important on a tipper. This is situated on the nearside between the first and second axle's mudwings, Four spring clips fitted to the cover to secure it to the rest of the housing. While it is very easy to remove the cover, it requires some technique to replace it. Do up one side clip first, leaving the other three undone. Then slide the cover round so that the secured clip is tight against its respective mudwing and then do up the other three, On our vehicle the filter did not require changing. Instead it was given a blow off, the housing cleaned and the element replaced.
3 While one fitter was cleaning the air filter the other was draining the oil. A high sump allows easy access and the use of a large vessel to catch the oil — another area where working on the ground is no disadvantage. It is important to drain the oil out of the air-cooled engine at an early stage, not only to remove the maximum amount of sludge but also to allow the engine to cool rapidly. When it comes to setting the valve clearances the engine must be cold. Removing hot oil will obviously speed the cooling process. With a large diameter drain plug and hot oil it is not long before the plug can be reinserted. 4 The two oil filters are just beside
the sump. These are of the renewable canister type and come with the seals already in place. Pressed out of the base of the canisters is a large hexagon protrusion which can be used to remove the filters. There is also enough room for a strap wrench to be used — but not a chain one. An interesting detail is a clamp consisting of two worm-drive clips that bold the filters in the same position relative to each other. This prevents one, or both, filters working loose during use. "It is a good idea, especially when tippers are working off road and on rough ground a lot," says Wells. Meanwhile, Mockett checks the batteries. There are positioned Ander a rubberised cover halfway down the vehicle and are not of the sealed for life type. Check the electrolyte level in each cell and see that the terminals are tight. Also make sure that the batteries are securely held. Two substantial damping bars are provided. If these work loose and are not retightened, the batteries will hit against each other when the vehicle is bouncing around off road and split their casings. Generally, repairs of this type of fault are not possible. With all the chekcs completed, the cover was replaced. While Wells is changing the oil filters he notices that the front nearside damper's lower mounting is loose. A modified bracket was introduced to overcome failures on earlier vehicles. Our fitters knew where to find the Maggie's weaknesses and were looking for signs of trouble with this mounting point. In this case the modified bracket had not failed, but its securing bolt had not been done up tight or had worked loose — rectification was easy. Both fitters praised the manufacturer for the way in which problems (always found in recently introduced vehicles) were dealt with and corrected.
7 The cab is tilted before any further checks are carried out. On this vehicle the power-steering reservoir is mounted just to the rear and below the cab locating bridge. If, as is the case here, an Eminox exhaust is fitted, access to the reservoir is restricted. The engine's vee configuration means that if the use of two stacks is to be avoided, the single silencer must lay across the back of the cab as in the case here. Checking the fluid level in the reservoir is done with the aid of a small dipstick attached to its lid. All parts of the steering system draws fluid from the one reservoir.
With a large air intake at the front of the engine and being sited awkwardly, access to the compressor and alternator belts is very restricted. Two belts drive the compressor and one the alternator. These have only a very short run so when checking them for tension they must be "as tight as a piano string or else they will slip," says Wells. Looking for any damage to the belts is even more difficult, take every opportunity to view the belts from each side of the engine, from above and below. Adjustment is done from underneath the vehicle, but was not required in this case. Our vehicle is fitted with an Eaton nine-speed gearbox. The hexagonal headed filler and level plus is situated half way up the nearside of the box. In this position it is very close to the chassis rail and this makes checking and filling difficult. (Mockett says the ZF 16-speed is even worse). On our vehicle there is oil over the gearbox and the level is well down. Our fitters had experience of the bellhousing to gearbox joint leaking, but this is not the case this time. As the vehicle is still under warranty, the gearbox was topped up with EP90, but the leak will be dealt with by Iveco Ford. Moving to the rear axles, the oil levels are again checked. Both axles are identical as the drive to the rearmost goes via a transfer box over the top of the first drive one. A 17mm hexagonal socket wrench is used to remove the level plug. Both axles were clean and neither required any oil. However, should they do so, EP140 is recommended. While there, our fitter took the opportunity to check the axle's breather pipes. These allow the oil to expand when it gets hot. A blocked breather will cause a seal failure and oil leak if not rectified. All was well with our vehicle.
There are two filters and a sediment trap in the fuel line. The filters are mounted just to the rear of the steering fluid reservoir and are of the renewable canister type. After removing the filters with a chain wrench, the housings are wiped clean before the new ones are fitted. As is usual with this type of filter, it comes with the required seals already in place, is fitted dry and done up hand tight only. Two bleed screws are fitted, one on each filter housing, and both need to be loosened before moving to the lift pump to prime the system. On the 300-30 the priming pump and sediment bowl are located above the fuel tank. The sediment bowl can be visually inspected in situ. On our vehicle there was virtually no sediment, so the bowl was left undisturbed as the system primed. This is a messy operation. As the first filter overflows before the second one (which is obscured by the tipper ram) is full. There really is no choice for the fitter but to keep on pumping until he is certain that the second filter is full by which time a lot of diesel has leaked over the chassis and floor. On these air-cooled engines there is a third oil cleaner. This is in the form of a filterless centrifuge and is mounted in the nose cone of the air intake fan. To remove the waste products, the centrifuge must be taken apart. Standing on the nearside of the engine, Wells disconnects the oil feed pipes and removes the outer cover by taking out the three M10 bolts that are retaining it. Another three M10 bolts are then removed from around the centre of outer part of the centrifuge. A special tool is then inserted into the centre of the outer half and this pulls it off of its seating. Pictured above is the outer part of the centrifuge (with the puller still in place) where the sediment collects. Impurities in the oil have formed a pitch-like ring that must be removed. Considering that there are two normal oil filters in the system, there is a substantial deposit in the centrifuge which must prove its worth. Before re-assembling, the puller is removed and the unit given a thorough clean. The procedure for reassembly is the reverse of that for dismantling. All seals are reusable and the oil pipes have self-sealing unions so there are no consumables. It would appear to be a very cheap and efficient system. Braking is provided by the Stopmaster wedge system, which has a twin-leading-shoe action. This system compensates automatically for lining wear, so the brakes do not need adjusting until a reline is required. However, the linings must he checked for wear. This is done through rounded rectangular holes at the top and bottom of each backplate. The bottom ones on the rear axles are obscured. Dust covers should be replaced after the inspection — especially on a tipper. Our fitters report that the brake works very well under all conditions but the rear linings wear quickly. One reason for rapid lining wear could be a faulty loadsensing valve. When off-road tippers are likely to damage the valve's linkages and so al ter its setting. However, the 300-30 has all the linkages and the valve itself set above the axle out of harm's way (unlike some tippers we have seen). However, the valve may become jammed with mud. Check all the pivots and linkages to ensure that they move freely. "But," says Mockett, "do not put any oil on the pivots as this will only make the grit stick to them." The same goes for the extending gear lever exposed when the cab is tilted.
1
While working at the rear of the vehicle, take the opportunity to check the fluid levels in the trunnion bearings. A level plug is situated near the top of the cover on the bearing's outer side and can be seen between the rear axles. If the level is below that required then top up with power steering fluid not oil. If the level is low it could be caused by the seal failing because it has not been greased. This is carried out via a nipple on the inner side of the bearing, almost opposite the level plug. The nipple is hard to find on a muddy tipper and easily overlooked; failure to grease it will lead to certain failure of the seal. As was indicated earlier, when the Maggi eightwheeler was re-introduced, itosome operators experienced a succession of broken front springs. Wells says that the failures occurred in two places. The first was by the centre clamping block and he indicated the second area, as shown in our photo. Breakages occurred on any of the front four wheels. Iveco Ford has since modified the spring's manufacture and the problem has been cured. Out of a fleet of 20 such vehicles in the Matthews fleet, only one spring has broken and that was probably caused by driver error rather than any remaining inherent weakness.
A sintered niter is placed in the air feed to the rangechange cylinder. It is located in a small housing bolted to a (broken) bracket at the rear of the gearbox. To get at the filter, unscrew the top of the housing, but do it slowly in order to allow the air pressure to escape. Once removed, examine the filter for signs of clogging. If it is dirty, blow off with an air line (there should be no need to renew the filter) and then replace it into its housing. Our fitters decided to let the warranty take care of the broken bracket, but they checked for signs of fatigue or air leaks on the pipes leading to the filter.
The most easily overlooked grease nipples have already been mentioned, but others are to be found on the body's hinge and at the top of the ram, on the small propshaft between the two axles, and one on each of the three UJs in the main propshaft. However, the slider mechanism doesn't have one. Moving forward, there are two on the rear end of the springs, four in the middle and one at the front. Kingpins have nipples at the top and bottom on both axles and the second steering linkage has two on the ram with another on the drag link. There are very few nipples on this vehicle but it does make greasing quick. Before setting the valve clearances, the wheel nuts are torqued up. All the studs have a righthand thread and each requires 400Nm (295 lbft) of torque. A small hammer is then used to tap items like U-bolts, bodymounting brackets, propshaft bolts, major castings and fasteners to ensure that they are all sound. All is in order and the engine is refilled with 27 litres (5.9 gallons) of oil. The engine is already cool and adding cold oil will help, but it is still too warm to check the vavle clearances. This is the one thing that slows the servicing down, but our fitters take a lunch break while waiting so as not to waste time. Seven hours should before setting the valve clearances. Inlets should be set to 0.2mm (0.008in) and exhaust to 0.3mm (0.012in). However, after three hours settings of 0.3mm (0.012in) and 0.4nun (0.016in) respectively, can be used. With cylinder number one rocking (the numbers are cast into the crank case) inlets valves on numbers four, five and seven can be set as can exhaust on numbers two, three, six and seven. Then with number seven rocking, inlets one two, three, six and eight and exhaust on one, four and eight are set. New rocker cover gaskets are required.