 1
1 2
2 3
3 4
4 5
5 6
6 7
7 8
8 9
9 10
10 11
11 12
12 13
13 14
14 15
15 16
16 17
17 18
18 19
19 20
20 21
21 22
22 23
23 24
24 25
25 26
26 27
27 28
28 29
29 30
30 31
31 32
32 33
33 34
34 35
35 36
36 37
37 38
38 39
39 40
40 41
41 42
42 43
43 44
44 45
45 46
46 47
47 48
48 49
49 50
50 51
51 52
52 53
53 54
54 55
55 56
56 57
57 58
58 59
59 60
60 61
61 62
62 63
63 64
64 65
65 66
66 67
67 68
68 69
69 70
70 71
71 72
72 73
73 74
74 75
75 76
76 77
77 78
78 79
79 80
80 81
81 82
82 83
83 84
84 85
85 86
86 87
87 88
88 89
89 90
90 91
91 92
92 93
93 94
94 95
95 96
96 97
97 98
98 99
99 100
100 101
101 102
102 103
103 104
104 105
105 106
106 107
107 108
108 109
109 110
110 111
111 112
112 113
113 114
114 115
115 116
116 117
117 118
118 119
119 120
120 121
121 122
122 123
123 124
124 125
125 126
126 127
127 128
128 129
129 130
130 131
131 132
132 133
133 134
134 135
135 136
136 137
137 138
138 139
139 140
140 141
141 142
142 143
143 144
144 145
145 146
146 147
147 148
148 149
149 150
150 151
151 152
152 BALANCING
Page 42

Page 43
If you've noticed an error in this article please click here to report it so we can fix it.
TYRE 1111
GETS
Under-inflation generally leads to excessive tyre wear, blowouts and increased operating costs too. So if you find it nigh-on impossible to carry out regular pressure checks, why not consider an automatic monitoring system? Bryan Jarvis has been to watch an ArvinMeritor service engineer fit a tyre inflation system.
Tyre costs can be a large part of any fleet's operating costs and, says ArvinMeritor, on continual long-haul work just a 20% reduction in air pressures will take a quarter slice off the life of a tyre. If there's a 30% drop in pressure, operating life will be reduced by more than half.
There's also an adverse effect on fuel economy and where steering axles are concerned, road handling will also be affected. So, if under-inflation is a problem, then Mentor's Tyre Inflation System (MTIS) could be the answer.
Originating out of the US trucking industry, this automatic sensing and balancing device is available to both OE and aftermarket clients.
Fitting agents will equip trailers either at a user's own premises or at a nearby workshop, but to reduce costs, trained mechanics can also be shown how to fit the system. Mentor has fitted around 400 of the kits to date.
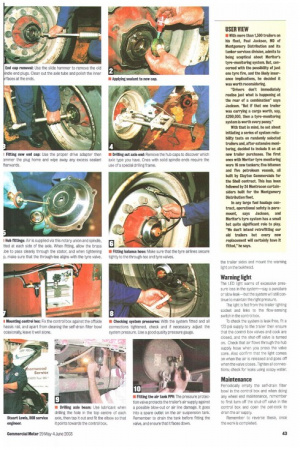
CM travelled to Foden dealer Charnwood Truck Services, near Nottingham, where Mentor HVS service engineer Stuart Lewis showed how easy it is to equip a triaxle semi-trailer.
The system can be retrofitted to nonROR axles like BPW, SAF or SMB and takes between four and six hours to fit, depending on whether they have plugged or solid axle spindle ends. Costs also vary according to how many trailers you plan to convert, but prices start from around £1,500 for a one-off triaxle set, and there's an initial £200 fitting fee.
For operators with their own repair set-up, a skilled mechanic will need the installation booklet and one or two special tools. These include a slide hammer, a steel drift with the correct adapter and, if the axles have solid spindle ends, a special drilling frame.
As the system can be switched from one trailer to another, anyone planning to have a large fleet converted for the longterm would be advised to invest £2,000 in a tool set.
System supply
Using the trailer air supply, the system is routed through a control box, into each axle, then linked via a rotary union and spindle fitted into the axle ends. This supplies each tyre with the correct amount of air. Virtually maintenance-free, the system automatically maintains the correct pressure but should a puncture occur, a light on the front bulkhead warns of a sudden air demand. Alerted to the tyre problem, the driver can then obtain a suitable repair and thus avoid a possible blow-out.
The only moving part is a 2:1 step-up compressor in the control box and when it's operating, you'll hear or feel it working inside. Before fitting a system, you must identify the type of axle to be converted before ordering a kit. Each kit holds everything needed to convert a tri-axle trailer, including cleaning wipes, markers and sealant.
ROR axles have solid spindle ends that need drilling, or hollow-ended ones Tyre inflation kit All MTIS kits will equip a tri-axle bogie, but which need pre check to see if the axles have plu ed or solid axle spindle ends. drilled replacement end-caps. Remove the hub caps to discover which axle type you have.
Axle conversion
Drill an 11/32 inch hole in the top centre of each axle, then using a lubricant, tap it out using a 1 VBNPT tap. Tighten it so that it ends up facing the control box's mounting point, normally behind the offside chassis rail.
Remove the hub caps and cover bearings, then with a slide hammer pierce and remove both end plugs. Clean out the axle beam and cap ends; use an air supply and the wipes provided. Clean both new plugs and '0' rings, apply Loctite 620 to the outer surfaces and push them in until just 1/4 inch protrudes.
Using a suitable drive adapter, hammer the plug home and then remove any excess sealant. Screw the stator in tightly, assemble the through-tee onto the supplied pre-drilled hub cap. Ensure that the brass tube passes cleanly through the stator and refit the hub cap assembly.
When tightening, make sure that the through-tee aligns with the tyre valve.
Attach hoses to the valve stems only, for now.
System plumbing
To protect the trailer's air supply against a possible blow-out or air line damage, a pressure protection valve (PPV) is fitted to the air suspension tank. Drain the tank before fitting the valve and ensure that it faces down. The trailer needs at least 80 psi before it can supply the tyre inflation system.
With the control box mounted to the frame, route one air line from the PPV to the box's input port, and another from its outlet port to a T-piece, mounted on a central cross-member.
The three axle outlets are then piped to elbow unions on each axle beam but leave enough slack to cope with suspension flexing and secure them underneath with the tie-wraps provided.
Finally, attach the tyre airlines to the through-tee and tyre valves.
Adjustment
With 120 psi supplied and the shutoff valve turned on, undo the lyre supply hoses and deflate the tyres at least 15 psi below the normal settings.
Reconnect the air supply to one tyre and when the pressure has stabilised, undo its hose and check its pressure—it should be at the pre-set, system pressure. Should the system level need altering, use the adjuster knob in the control box.
Once the test tyre reaches the correct level, the system is correctly set and you can reconnect the other tyres. Lastly, fix the decals to
nil [LER A
• Drilling axle beam: Use lubricant when drilling the hole in the top centre of each axle, then tap it out and fit the elbow so that it points towards the control box. • Fitting the air tank MN: The pressure protection valve protects the trailer's air supply against a possible blow-out or air line damage. It goes into a spare outlet on the air suspension tank. Remember to drain the tank before fitting the valve, and ensure that it faces down. the trailer sides and mount the warning light on the bulkhead.
Warning light
The LED light warns of excessive pressure loss in the system—say a puncture or slow leak—hut the system will still continue to maintain the right pressure.
The light is fed from the trailer lighting socket and links to the flow-sensing switch in the control box.
To check the system is leak-free, fit a 120 psi supply to the trailer then ensure that the control box valves and cock are closed, and the shut-off valve is turned on. Check that air flows through the hub supply hose when you press the valve core. Also confirm that the light comes on when the air is released and goes off when the valve closes. Tighten all connections; check for leaks using soapy water.
Maintenance
Periodically empty the self-drain filter bowl in the control box and when doing any wheel end maintenance, remember to first turn off the shut-off valve in the control box and open the pet-cock to drain the air supply.
Remember to reverse these, once the work is completed.