


• Fodens has a long and strong tradition in the
Page 113
Page 114
Page 115
Page 116
If you've noticed an error in this article please click here to report it so we can fix it.
eight-wheel tippermarket. Following Paccar's purchase of the Sandbatch-based truck manufacturer in 1981, the announcement was made that Caterpillar engines, so common in the parent company's American-built trucks, would be available in Fodens.
Since that time Fodens has introduced its new 4000-Series cab and now Caterpillar engines are fitted to hail of its eight-wheelers. The options of Cummins, Perkins and Gardner engines have been retained and they account for the remaining half of eight-wheeler engines.
The vehicle we watched being serviced was a Foden 4300 eight-by-four tipper, one of 28 belonging to a company called Ladkarn. It is worked hard moving some of the spoil coming from the Channel tunnel excavations. Fitted with a 224kW (300hp) Caterpillar engine, Spicer clutch, Fuller 13speed gearbox and Eaton axles, the vehicle has clocked up nearly 130,000km (81,250 miles) in its first year.
Service schedules for Fodens vary according to the driveline components used on the vehicle, so not all eightwheelers will be the same as ours. On our vehicle there are four levels of service, A,B,C and D, carried out at 16,0001un (10,000-mile) intervals. Services are carried out in the sequence A,B,C,B,D and their standard times are; A-six hours, B-7.5 hours, C-nine hours and D-10 hours.
Our vehicle was to receive a Cservice and was being prepared for its first MoT test.
On this occasion we had two fitters, Dave Vickery and Robert Shield; working on the vehicle, each has over a decade of experience and has attended various courses at Sandbach. Their employers, where the service was carried out, is SE Trucks, a Foden and Gardner main agent based in Rochester, Kent.
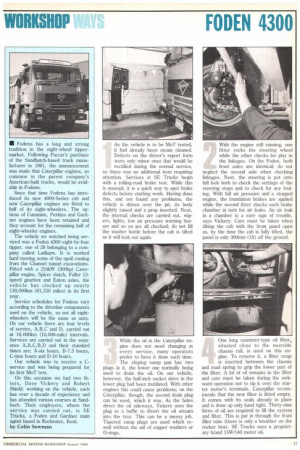
by Colin Sowman As the vehicle is to be MoT tested, it had already been steam cleaned.
Defects on the driver's report form were only minor ones that would be rectified during the normal service, so there was no additional item requiring attention. Services at SE Trucks begin with a rolling-road brake test. While this is unusual, it is a quick way to spot brake defects before starting work. Having done this, and not found any problems, the vehicle is driven over the pit, its body slightly raised and a prop inserted. Next, the internal checks are carried out, wipers, lights, low air pressure warning buzzer and so on are all checked; do not fill the washer bottle before the cab is tilted as it will leak out again. With the engine still running, one titter rocks the steering wheel while the other checks for play in the linkages. On the Foden, both front axles are identical; do not neglect the second axle when checking linkages. Next, the steering is put onto full lock both to check the settings of the steering stops and to check for any fouling. With full air pressure and a stopped engine, the foundation brakes are applied while the second fitter checks each brake chamber in turn for air leaks. An air leak in a chamber is a sure sign of trouble, says Vickery. Care must be taken when tilting the cab with the front panel open as, by the time the cab is fully tilted, the panel is only 300nun (1ft) off the ground.
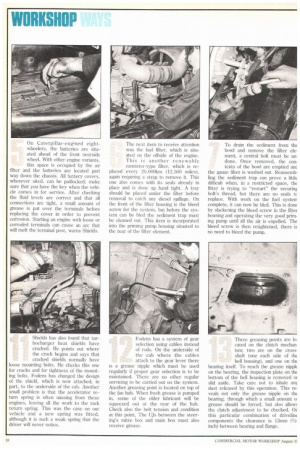
While the oil in the Caterpillar engine does not need changing at every service, many operators prefer to have it done each time. The sloping sump pan has two plugs in it, the lower one normally being used to drain the oil. On our vehicle, however, the half-inch socket drive in the lower plug had been mutilated. With other engines this could cause problems; on the Caterpillar, though, the second drain plug can be used, which it was. As the holes direct the oil sideways, Vickery uses the plug as a baffle to divert the oil stream into the tray. This can be a messy job. Tapered sump plugs are used which reseal without the aid of copper washers or 0-rings. One long cannister-type oil filter, situated close to the nearside chassis rail, is used on this engine. To remove it, a filter strap is inserted between the chassis and road spring to grip the lower part of the filter. A lot of oil remains in the filter and care must be taken during the awkward operation not to tip it over the starter motor's terminals. Caterpillar recommends that the new filter is fitted empty. It comes with its seals already in place and is done up only hand tight. Thirty-nine litres of oil are required to fill the system and filter. This is put in through the front filler tube (there is only a breather on the rocker box). SE Trucks uses a proprietary brand I5W/140 motor oil. On Caterpillar-engined eightwheelers, the batteries are situated ahead of the front nearside wheel. With other engine variants, this space is occupied by the air filter and the batteries are located part way down the chassis. All battery covers, wherever sited, can be padlocked; make sure that you have the key when the vehicle comes in for service. After checking the fluid levels are correct and that all connections are tight, a small amount of grease is put over the terminals before replacing the cover in order to prevent corrosion. Starting an engine with loose or corroded terminals can cause an arc that will melt the terminal post, warns Shields. The next item to receive attention was the fuel filter, which is situated on the offside of the engine. This is another renewable cannister-type filter, which is re placed every 20,000km (12,500 miles), again requiring a strap to remove it. This one also comes with its seals already in place and is done up hand tight. A tray should be placed under the filter before removal to catch any diesel spillage. On the front of the filter housing is the bleed screw for the system, but before the system can be bled the sediment trap must be cleaned out. This item is incorporated into the priming pump housing situated to the rear of the filter element. To drain the sediment from the bowl and remove the filter element, a central bolt must be undone. Once removed, the contents of the bowl are emptied an( the gauze filter is washed out. Reassembling the sediment trap can prove a little difficult when, in a restricted space, the fitter is trying to "restart" the securing bolt's thread, but there are no seals tc replace. With work on the fuel system complete, it can now be bled. This is done by slackening the bleed screw in the filter housing and operating the very good priming pump until all the air is expelled. The bleed screw is then retightened, there is no need to bleed the pump. Replacement of the air filter occurs either every six months or when the restriction indicator shows red. With tippers operating in a dirty environment, it is very important that this filter should be working properly. Our vehicle had an almost new element already fitted. This was removed. cleaned off with an air line and the housing was wiped out before replacing the filter. There is one central retaining stud through the housing; it is fitted with a wing nut that should be done up hand tight. There is not normally any trouble with these nuts working loose, but overtightening can cause problems. Also check the rubber water drain is clear.
In the linkage from the steering wheel there is a small gearbox that turns the drive through 900 and directs it towards the main steering box. This secondary box is called a steering mitre box and is positioned directly ahead of the main steering box. Fluid level in the mitre box is checked at every service by removing the red plastic plug with a screwdriver. Inside the box the fluid, which is the same (A T F Dexron 11) as the in main steering box. should just cover the hearings visible through the inspection/filler hole. It is easy to overlook this check by assuming that the main fluid reservoir feeds the mitre box. It does not.
Charge cooling (intercooling) gives rise to large-diameter air trucking running over the engine to and from a frontmounted air-to-air radiator. It is critical to the correct running of the engine that this trunking should be air tight. There are 10 securing clips on the trunking connections on the offside and another seven on the nearside. Shields has found in the past that some of these clips have worked loose. He checks each in turn to see if it has moved or if it will slip round on itself; any that are suspect are tightened with a spanner. Leaking trunking will cause a massive loss of engine power.
Shields has also found that turbocharger heat shields have cracked. He points out where the crack begins and says that cracked shields normally have loose mounting bolts. He checks this one for cracks and for tightness of the mounting bolts. Fodens has changed the design of the shield, which is now attached, in part, to the underside of the cab. Another small problem is that the accelerator return spring is often missing from these engines, leaving all the work to the rack return spring. This was the case on our vehicle and a new spring was fitted, although it is such a weak spring that the driver will never notice. I iens has a system of gear selection using cables instead of rods, On the underside of the cab where the cables attach to the gear lever there is a grease nipple which must be used regularly if proper gear selection is to be maintained. There are no other regular servicing to be carried out on the system. Another greasing point is located on top of the fan hub. When fresh grease is pumped in, some of the older lubricant will be squeezed out at the rear of the hub. Check also the belt tension and condition at this point, The [Us between the steering's mitre box and main box must also receive grease. Three greasing points are b. cated on the clutch mechan. ism; two are on the cross shaft (one each side of tht bell housing), and one on tilt
bearing itself. To reach the grease nippk on the bearing, the inspection plate on the bottom of the bell housing is removed oi slid aside. Take care not to inhale an dust released by this operation. This re. veals not only the grease nipple on tht bearing, through which a small amount o grease should be forced, but also allowt the clutch adjustment to be checked. Or this particular combination of drivelint components the clearance is 13nun (1/2inch) between bearing and flange.
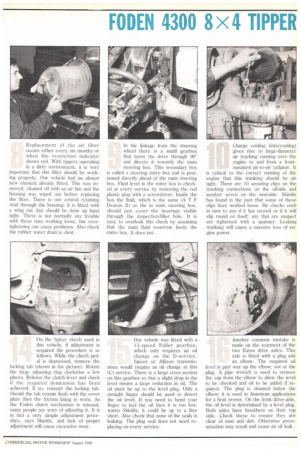
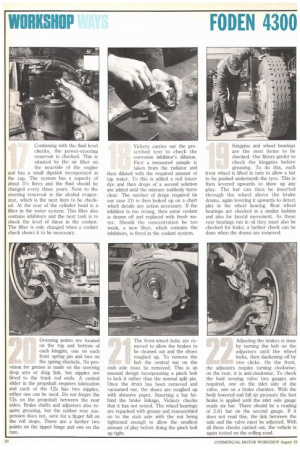
On the Spicer clutch used in this vehicle, if adjustment is required the procedure is as follows. While the clutch pedal is depressed, remove the locking tab (shown in the picture). Rotate the large adjusting ring clockwise a few places. Release the clutch lever and check if the required demension has been achieved. If so, reinsert the locking tab. Should the tab remain flush with the cover plate then the friction lining is worn. As the Foden clutch mechanism is unusual, many people are wary of adjusting it. It is in fact a very simple adjustment procedure, says Shields, and lack of proper adjustment will cause excessive wear. Our vehicle was fitted with a 13-speed Fuller gearbox, which only requires an oil change on the D-service. Spicer or Allison transmissions would require an oil change at this (C) service. There is a large cross-section on this gearbox so that a slight drop in the level means a large reduction in oil. The oil must be up to the level plug. Only a straight finger should be used to detect the oil level. If you need to bend your finger to feel the oil then it is too low. warns Shields; it could be up to a litre short. Also check that none of the seals is leaking. The plug seal does not need replacing on every service. Another conunon mistake is made on the rearmost of the two Eaton drive axles. This axle is fitted with a plug and an elbow. The required oil level is part way up the elbow, not at the plug. A pipe wrench is used to remove the cap from the elbow to allow the level to be checked and oil to be added if required. The plug is situated below the elbow; it is used in American applications for a heat sensor. On the front drive-axle, the oil level is determined by a level plug. Both axles have breathers on their top side. Check these to ensure they are clear of mud and dirt. Otherwise pressurisation may result and cause an oil leak. Continuing with the fluid level checks, the power-steering reservoir is checked. This is situated by the air filter on the nearside of the engine and has a small dipstick incorporated in the cap. The system has a capacity of about 31/2 litres and the fluid should be changed every three years. Next to the steering reservoir is the alcohol evaporator, which is the next item to be checked. At the rear of the cylinder head is a filter in the water system. This filter also contains inhibitors and the next task is to check the level of these in the coolant. The filter is only changed when a coolant check shows it to be necessary. Vickery carries out the prescribed test to check the corrosion inhibitor's dilution. First a measured sample is taken from the radiator and then diluted with the required amount of tap water. To this is added a red tracer dye and then drops of a second solution are added until the mixture suddenly turns clear. The number of drops required (in our case 21) is then looked up on a chart which details any action necessary. If the inhibitor is too strong, then some coolant is drawn off and replaced with fresh water. Should the concentration be too weak, a new filter, which contains the inhibitors, is fitted in the coolant system. Kingpins and wheel bearings are the next items to be checked. Our fitters prefer to check the kingpins before greasing. To do this, each front wheel is lifted in turn to allow a bar to be pushed underneath the tyre. This is then levered upwards to show up any play. The bar can then be inserted through the wheel above the brake drums, again levering it upwards to detect play in the wheel bearing. Rear wheel bearings are checked in a similar fashion and also for lateral movement. As these rear bearings run in oil they must also be checked for leaks; a further check can be done when the drums are removed.
Greasing points are located on the top and bottom of each kingpin, one on each front spring pin and two on the spring shackels. No provision for grease is made on the steering drop arm or drag link, but nipples are fitted to the track rod ends. A central slider in the propshaft requires lubrication and each of the Ujs has two nipples, either one can be used. Do not forget the Ws on the propshaft between the rear axles. Brake shafts and adjusters also require greasing, but the rubber rear suspension does not, save for a finger full on the roll stops, There are a further two points on the tipper hinge and one on the The front-wheel hubs are removed to allow the brakes to be cleaned out and the shoes roughed up. To remove the hub the central nut on the stub axle must be removed. This is an unusual design incorporating a pinch bolt to lock it rather than the normal split pin. Once the drum has been removed and vacuumed out, the shoes are roughed up with abrasive paper. Inserting a bar behind the brake linkage, Vickery checks that it has not seized. The wheel bearings are repacked with grease and reassembled on to the stub axle with the nut being tightened enough to allow the smallest amount of play before doing the pinch bolt up tight. Adjusting the brakes is done by turning the bolt on the adjusters until the wheel locks, then slackening off by two clicks. On the front, the adjusters require turning clockwise; on the rear, it is anti-clockwise. To check the load sensing valve two gauges are required, one on the inlet side of the valve, one on a brake chamber. With the body lowered and full air pressure the foot brake is applied until the inlet side gauge reads six bar. There should be a reading of 2.61 bar on the second gauge. If it does not read this, the link between the axle and the valve must be adjusted. With all these checks carried out, the vehicle is again tested on the rolling road.