


269.—Dismantling the Springs on the J-type Thornycroft.
Page 26
If you've noticed an error in this article please click here to report it so we can fix it.
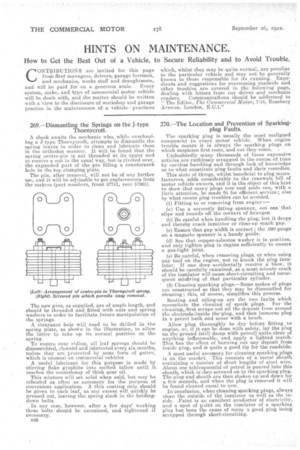
A shock awaits the mechanic who, while overhauling a J-type Thornyeroft, attempts to dismantle the spring leaves in order to clean and lubricate them in the orthodox manner. It will be found that the spring centre-pin is not threaded at its upper end to receive a nut in the usual way, but is riveted over, the expanded part of the pin filling a countersunk hole in the top clamping plate.
The pin, after removal, will not be of any further use, and it will be arivisa.bIe to get replacements from the makers (part numbers, front 57741, rear 57261) The new.pins, as supplied, are of ample length, and should be threaded and fitted with nuts and spring washers in order to facilitate future manipulation of the springs.
A. clearance hole will need to be drilled in the spring plate, as shown in the illustration, to allow the latter to take up its normal position on the spring.
To ensure easy riding, all leaf springs should be disassembled, cleaned and lubricated every six months, unless they are protected by some form of gaiter, which is unusual on commercial vehicles A useful lubricant for this purpose is made by stirring flake graphite into melted tallow until it. reaches the consistency of thick gear oil.
This mixture will set solid when cold, but may be reheated as often as necessary for the purpose of convenient application. A thin coating only should be given to each leaf, as any excess will quickly be pressed out, leaving the spring slack in the holding. down bolts.
In any case, .however, after a few days' working these bolts should be examined, and tightened if necessary.
B42
270.—The Location and Prevention of Sparkingplug Faults.
The sparking plug is usually the most maligned component in every motor vehicle. When engine trouble occurs it is always the sparking plugs on which suspicion first rests, and out they come. .
Undoubtedly many thousands of these expensive articles are ruthlessly sera,pped in the course of time by careless handling and through lack of knowledge as to what constitute plug faults and their remedies.
This state of things, whilst beneficial to.plug manufacturers, adds considerably to the renewals bill of motor vehicle owners, and it is the object of this hint to show that many plugs now cast aside can, with a little attention, be made fit for efficient service ; also by what means plug troubles can be avoided.
(1) Fitting to or removing from engine :— (a) Use a correctly fitting spanner, not one that slips and roundsoff the corners of hexagon.
(b) Be careful when handling the plug; lest it drops and thereby crack insulator or close-up spark gap.
(c) Ensure that gap width is correct; the .020 gauge on a magneto spanner is a handy guide: (d) See that copper-asbestos washer is in position, and only tighten plug in engine sufficiently to ensure a gab-tight joint.
(e) Be careful, when removing plugs, or when using any tool on the engine, not to knock the plug insulator. If one does accidentally receive a blow, it should be carefully examined, as a most minute crack of the insulator will cause short-cireuiting and consequent misfiring of that particular cylinder.
' (2) Cleaning sparking plugs.—Some makes of plugs are constructed so that they may be dismantled for cleaning ; this, of course, simplifies this process.
Sooting and oiling-up are the two faults which necessitate the cleaning of spark plugs. For the eleaning,:first scrape out all the deposit from around the electrode!inside the'plug, and then immerse plug in a petrol bath and scour with a brush.
Allow plug thoroughly to dry before fitting to engine, or, if it can be done with safety, lay the plug on the ground (still damp with petrol) quite clear of anything inflammable, and apply a lighted match. This has the effect of burning out any deposit from inside plug, and is quite a good tip for the roadside.
A most useful accessory for cleaning sparking plugs is on the market. This consists of a metal sheath containing a number of short lengths of steel wire. About one tablespoonful of petrol is poured into this sheath, which is then screwed on to the sparking plug. The plug and sheath are then shaken up and down for a few seconds, and when the plug is removed it will be found cleaned equal to new.
In conclusion, when cleaning sparking plugs, always clean the outside of the insulator as well as the inside. Paint is an excellent conductor of electricity. and a spot of paint on the insulator of asparking plug has been the cause of many a. good plug being scrapped through short-circuiting.