• The Sherpa van is one of the best established vans on the market.
Page 109

Page 110

Page 111

If you've noticed an error in this article please click here to report it so we can fix it.
Others have come and gone, but the Sherpa, continually updated as re quired, has plugged on providing reliable, if unspectacular transport for tonnes of goods over millions of kilometres.
Of the roles played by the Sherpa, few can be as arduous as that inflicted by Thames Water. These vehicles carry a heavy toolkit under their raised roof, which takes the vehicle close to its GITW of 3.5 tonnes, and bolted to the chassis is a high capacity air compressor and its reservoir.
To make sure these vehicles really do work for their living, they also tow a substantial trailer. Much of the servicing of these hard worked vans is done by King and Taylor at Godalming, which allowed us to see which parts need most attention.
The particular vehicle we looked at had covered just over 36,7001= from new, and the hour meter showed that
the motor had been driving the compressor for 230 hours. The van was
brought in for the 38,600km service, which is the intermediate service, the full works occurring at 77,200km.
Both transmission and brakes wear rapidly on the Thames Water vehicles, but the parts that break with most regularity are the plastic switches, door handles and window winders.
Derived from the Austin Rover car range, they are not up to the rigours of a commercial vehicle.
Richard Longworth
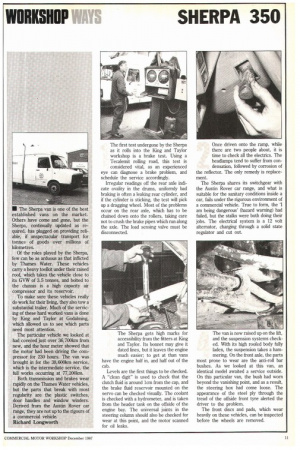
The first test undergone by the Sherpa as it rolls into the King and Taylor workshop is a brake test. Using a Tecalemit rolling road, this test is considered vital, as an experienced eye can diagnose a brake problem, and schedule the service accordingly.
Irregular readings off the rear axle indicate ovality in the drums, uniformly bad braking is often a leaking rear cylinder, and if the cylinder is sticking, the test will pick up a dragging wheel. Most of the problems occur on the rear axle, which has to be chained down onto the rollers, taking care not to crush the brake pipes which run along the axle. The load sensing valve must be disconnected.
The Sherpa gets high marks for accessibility from the fitters at King and Taylor. Its bonnet may give it dated lines, but it leaves the engine much easier; to get at than vans have the engine half in, and half out of the cab.
Levels are the first things to be checked. A "clean digit" is used to check that the clutch fluid is around lcm from the cap, and the brake fluid reservoir mounted on the servo can be checked visually. The coolant is checked with a hydrometer, and is taken from the header tank on the offside of the engine bay. The universal joints in the steering column should also be checked for wear at this point, and the motor scanned for oil leaks. Once driven onto the ramp, while there are two people about, it is time to check all the elechics. The headlamps tend to suffer from condensation, followed by corrosion of the reflector. The only remedy is replacement.
The Sherpa shares its switchgear with the Austin Rover car range, and what is suitable for the sanitary conditions inside a car, fails under the rigorous environment of a commercial vehicle. True to form, the 'I am being dangerous (hazard warning) had failed, but the stalks were both doing their jobs. The electrical system is a 12 volt alternator, charging through a solid state regulator and cut out.
The van is now raised up on the lift, and the suspension systems checked. With its high roofed body fully laden, the suspension takes a hammering. On the front axle, the parts most prone to wear are the anti-roll bar bushes, As we looked at this van, an identical model awaited a service outside. On this particular van, the bush had worn beyond the vanishing point, and as a result, the steering box had come loose. The appearance of the steel ply through the tread of the offside front tyre alerted the driver to the problem.
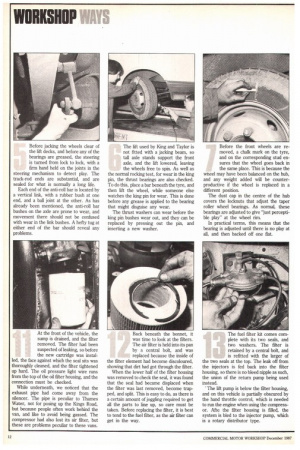
The front discs and pads, which wear heavily on these vehicles, can be inspected before the wheels are removed. Before jacking the wheels clear of the lift decks, and before any of the bearings are greased, the steering is turned from lock to lock, with a firm hand held on the joints in the steering mechanism to detect play. The track-rod ends are substantial, and are sealed for what is normally a long life.
Each end of the anti-roll bar is located by a vertical link, with a rubber bush at one end, and a ball joint at the other. As has already been mentioned, the anti-roll bar bushes on the axle are prone to wear, and movement there should not be confused with wear in the link bushes. A hefty tug at either end of the bar should reveal any problems. The lift used by King and Taylor is not fitted with a jacking beam, so tall axle stands support the front axle, and the lift lowered, leaving the wheels free to spin. As well as the normal rocking test, for wear in the king pin, the thrust bearings are also checked. To do this, place a bar beneath the tyre, and then lift the wheel, while someone else watches the king pin for wear. This is done before any grease is applied to the bearing that might disguise any wear.
The thrust washers can wear before the king pin bushes wear out, and they can be replaced by pressing out the pin, and inserting a new washer.
Before the front wheels are removed, a chalk mark on the tyre, and on the corresponding stud ensures that the wheel goes back in the same place. This is because the wheel may have been balanced on the hub, and any weight added will be counterproductive if the wheel is replaced in a different position.
The dust cap in the centre of the hub covers the locknuts that adjust the taper roller wheel bearings. As normal, these bearings are adjusted to give "just perceptible play" at the wheel rim.
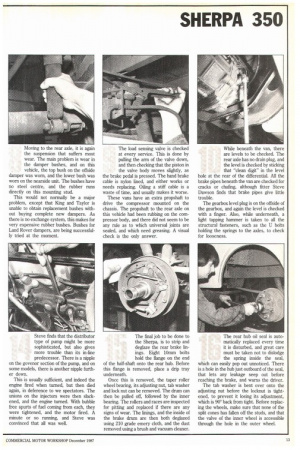
In practical terms, this means that the bearing is adjusted until there is no play at all, and then backed off one flat. Moving to the rear axle, it is again the suspension that suffers most wear. The main problem is wear in the damper bushes, and on this vehicle, the top bush on the offside damper was worn, and the lower bush was worn on the nearside unit. The bushes have no steel centre, and the rubber runs directly on this mounting stud.
This would not normally be a major problem, except that King and Taylor is unable to obtain replacement bushes without buying complete new dampers. As there is no exchange system, this makes for very expensive rubber bushes. Bushes for Land Rover dampers, are being successfully tried at the moment. The load sensing valve is checked at every service. This is done by pulling the arm of the valve down, and then checking that the piston in the valve body moves slightly, as the brake pedal is pressed. The hand brake cable is nylon lined, and either works or needs replacing. Oiling a stiff cable is a waste of time, and usually makes it worse.
These vans have an extra propshaft to drive the compressor mounted on the chassis. The propshaft to the rear axle on this vehicle had been rubbing on the compressor body, and there did not seem to be any rule as to which universal joints are sealed, and which need greasing. A visual check is the only answer. While beneath the van, there are levels to be checked. The rear axle has no drain plug, and the level is checked by sticking that "clean digit" in the level hole at the rear of the differential. All the brake pipes beneath the van are checked for cracks or chafing, although fitter Steve Dawson finds that brake pipes give little trouble.
The gearbox level plug is on the offside of the gearbox, and again the level is checked with a finger. Also, while underneath, a light tapping hammer is taken to all the structural fasteners, such as the U bolts holding the springs to the axles, to check for looseness.
At the front of the vehicle, the sump is drained, and the filter removed. The filter had been suspected of leaking, so before the new cartridge was instal led, the face against which the seal sits was thoroughly cleaned, and the filter tightened up hard. The oil pressure light wire runs from the top of the oil filter housing, and the connection must be checked.
While underneath, we noticed that the exhaust pipe had come away from the silencer. The pipe is peculiar to Thames Water, not for posing up the Kings Road, but because people often work behind the van, and like to avoid being gassed. The compressor had also lost its air filter, but these are problems peculiar to these vans. Back beneath the bonnet, it was time to look at the filters. The air filter is held into its pan by a central bolt, and was replaced because the inside of the filter element had become discoloured, showing that dirt had got through the filter.
When the lower half of the filter housing was removed to check the seal, it was found that the seal had became displaced when the filter was last removed, become trapped, and split. This is easy to do, as there is a certain amount of joggling required to get all the parts to line up, so care must be taken. Before replacing the filter, it is best to tend to the fuel filter, as the air filter can get in the way. The fuel filter kit comes complete with its two seals, and two washers. The filter is retained by a central bolt, and is refitted with the larger of the two seals at the top. The leak off from the injectors is fed back into the filter housing, so there is no bleed nipple as such, the union of the return pump being used instead.
' The lift pump is below the filter housing, and on this vehicle is partially obscured by the hand throttle control, which is needed to run the engine when using the compressor. Afte the filter housing is filled, the system is bled to the injector pump, which is a rotary distributor type. Steve finds that the distributor type of pump might be more sophisticated, but also gives more trouble than its in-line predecessor. There is a nipple on the govenor section of the pump, and on some models, there is another nipple further down.
This is usually sufficient, and indeed the engine fired when turned, but then died again, in deference to we spectators. The unions on the injectors were then slackened, and the engine turned. With bubble free spurts of fuel coming from each, they were tightened, and the motor fired. A minute or so running, and Steve was convinced that all was well.
The final job to be done to the Sherpa, is to strip and deglaze the rear brake linings. Eight lOmm bolts hold the flange on the end of the half-shaft onto the rear hub. Before this flange is removed, place a drip tray underneath_ Once this is removed, the taper roller wheel bearing, its adjusting nut, tab washer and lock nut can be removed. The drum can then be pulled off, followed by the inner bearing. The rollers and races are inspected for pitting and replaced if there are any signs of wear. The linings, and the inside of the brake drum are then both deglazed using 210 grade emery cloth, and the dust removed using a brush and vacuum cleaner. The rear hub oil seal is automatically replaced every time it is disturbed, and great care must be taken not to dislodge the spring inside the seal, which can easily pop out unnoticed. There is a hole in the hub just outboard of the seal, that lets any leakage seep out before reaching the brake, and warns the driver.
The tab washer is bent over onto the adjusting nut before the locknut is tightened, to prevent it losing its adjustment, which is 90° back from tight. Before replacing the wheels, make sure that none of the split cones has fallen off the studs, and that the valve of the inner wheel is accessible through the hole in the outer wheel.


