


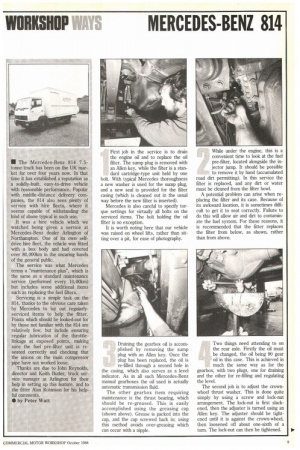
III The Mercedes-Benz 814 7.5tonne truck has been on the
Page 45
Page 46
Page 47
Page 48
If you've noticed an error in this article please click here to report it so we can fix it.
UK market for over four years now. In that time it has established a reputation as a solidly-built, easy-to-drive vehicle with reasonable performance. Popular with middle-distance delivery companies, the 814 also sees plenty of service with hire fleets, where it seems capable of withstanding the kind of abuse typical in such use.
It was a hire vehicle which we watched being given a service at Mercedes-Benz dealer Arlington of Northampton. One of its own selfdrive hire fleet, the vehicle was fitted with a box body and had covered over 80,000km in the uncaring hands of the general public.
The service was what Mercedes terms a "maintenance plus", which is the same as a standard maintenance service (performed every 10,00km) but includes some additional items such as replacing the fuel filters.
Servicing is a simple task on the 814, thanks to the obvious care taken by Mercedes to lay out regularlyserviced items to help the fitter. Points which should be looked-out for by those not familiar with the 814 are relatively few, but include ensuring regular lubrication of the throttlelinkage at exposed points, making sure the fuel pre-filter unit is reseated correctly and checking that the unions on the main compressor pipe have not worked loose.
Thanks are due to John Reynolds, director and Keith Butler, truck service manager at Arlington for their help in setting up this feature, and to the fitter Alan Robinson for his helpful comments.
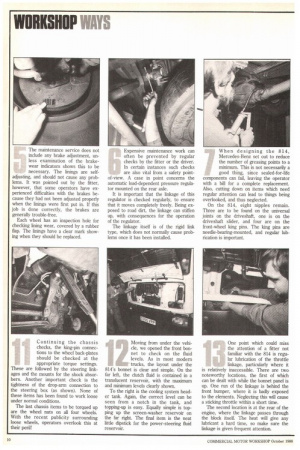
• by Peter Watt First job in the service is to drain the engine oil and to replace the oil filter. The sump plug is removed with an Allen key, while the filter is a stan dard cartridge-type unit held by one bolt. With typical Mercedes thoroughness a new washer is used for the sump plug, and a new seal is provided for the filter casing (which is cleaned out in the usual way before the new filter is inserted).
Mercedes is also careful to specify torque settings for virtually all bolts on the serviced items. The bolt holding the oil filter is no exception.
It is worth noting here that our vehicle was raised on wheel lifts, rather than sitting over a pit, for ease of photography. While under the engine, this is a convenient time to look at the fuel pre-filter, located alongside the injector jump. It should be possible to remove it by hand (accumulated road dirt permitting). In this service the filter is replaced, and any dirt or water must be cleaned from the filter bowl.
A potential problem can arise when replacing the filter and its case. Because of its awkward location, it is sometimes difficult to get it to seat correctly. Failure to do this will allow air and dirt to contaminate the fuel system. For these reasons, it is recommended that the fitter replaces the filter from below, as shown, rather than from above.
Draining the gearbox oil is accomplished by removing the sump plug with an Allen key. Once the plug has been replaced, the oil is re-filled through a second hole in the casing, which also serves as a level indicator. As in all such Mercedes-Benz manual gearboxes the oil used is actually automatic transmission fluid.
The other gearbox item requiring maintenance is the thrust bearing, which should be re-greased. This is easily accomplished using the greasing cap (shown above). Grease is packed into the cap, and the cap screwed back in; using this method avoids over-greasing which can occur with a nipple. Two things need attending to on the rear axle. Firstly the oil must be changed, the oil being 90 gear oil in this case. This is achieved in much the same way as for the gearbox, with two plugs, one for draining and the other for re-filling and regulating the level.
The second job is to adjust the crownwheel thrust washer. This is done quite simply by using a screw and lock-nut arrangement. The lock-nut is first slackened, then the adjuster is turned using an Allen key_ The adjuster should be tightened until it is against the crown-wheel, then loosened off about one-sixth of a turn. The lock-nut can then be tightened. The maintenance service does not include any brake adjustment, unless examination of the brakewear indicators shows this to be necessary. The linings are selfadjusting, and should not cause any problems. It was pointed out by the fitter, however, that some operators have experienced difficulties with the brakes because they had not been adjusted properly when the linings were first put in. If this job is done correctly, the brakes are generally trouble-free.
Each wheel has an inspection hole for checking lining wear, covered by a rubber flap. The linings have a clear mark showing when they should be replaced. Expensive maintenance work can often be prevented by regular checks by the fitter or the driver. In certain instances such checks are also vital from a safety point of-view. A case in point concerns the automatic load-dependent pressure regulator mounted on the rear axle.
It is important that the linkage of this regulator is checked regularly, to ensure that it moves completely freely. Being exposed to road dirt, the linkage can stiffen up, with consequences for the operation of the regulator.
The linkage itself is of the rigid link type, which does not normally cause problems once it has been installed. When designing the 814, Mercedes-Benz set out to reduce the number of greasing points to a minimum. This is not necessarily a good thing, since sealed-for-life components can fail, leaving the operator with a bill for a complete replacement. Also, cutting down on items which need regular attention can lead to things being overlooked, and thus neglected.
On the 814, eight nipples remain. Three are to be found on the universal joints on the driveshaft, one is on the driveshaft slider, and four are on the front-wheel king pins. The king pins are needle-bearing-mounted, and regular lubrication is important. A potential trouble spot can be found on the compressor pipe, between the pump and the air tanks. It occurs at a union in the pipe, near the oil filter on the right-hand side of the engine. The union itself has a tendency to work loose, and should always be tightened using spanners during a service.
It was felt that the length of the pipe may be causing it to vibrate quite strongly, and that this vibration was causing the union to develop some play. This theory was backed up by the fact that we found evidence that the clip which located the pipe to the chassis rail had fractured and had needed replacement. Another vibration-related problem can occur, and is to be found on the left-hand side of the engine. In this case, however, MercedesBenz has taken preventative action, which should have eliminated the trouble. The exhaust pipe is the troublesome fitting, and vibration has caused rattles and the occasional fracture, particularly around the exhaust pipe clamp.
It was determined that the stiffness of the exhaust system was to blame for the difficulties, and recent 814 models have been provided with a more flexible design. As a precaution, it is still advisable to check the pipe and the clamp, particularly on earlier vehicles. Consistent with Mercedes' policy of providing torque settings for most bolts on the vehicle, the next task for the fitter is to torque up the bolts on the suspension components. The first bolts are the U-bolts clamping the leaf springs on the front and rear axles. In practice, these bolts do not normally develop any significant play, but they ought to be checked as a precaution.
Also check at the same time the connections between the roll-bars and the chassis (see above). Play can develop in the rubber bushes which locate the rollbars, particularly in high-mileage vehicles where the rubber can start to deteriorate.
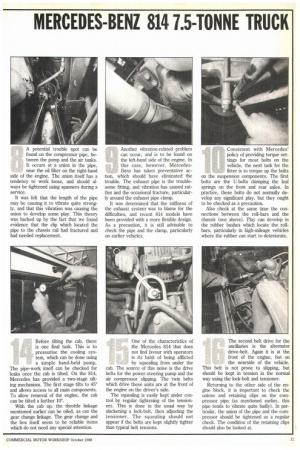
Continuing the chassis checks, the king-pin connections to the wheel back-plates should be checked at the appropriate torque settings. These are followed by the steering linkages and the mounts for the shock absorbers. Another important check is the tightness of the drop-arm connection to the steering box (as shown). None of these items has been found to work loose under normal conditions.
The last chassis items to be torqued up are the wheel nuts on all four wheels. With the recent publicity surrounding loose wheels, operators overlook this at their peril! Moving from under the vehicle, we opened the front bonnet to check on the fluid levels. As in most modern trucks, the layout under the 814's bonnet is clear and simple. On the far left, the clutch fluid is contained in a translucent reservoir, with the maximum and minimum levels clearly shown.
To the right is the cooling system header tank. Again, the correct level can be seen from a notch in the tank, and topping-up is easy. Equally simple is topping up the screen-washer reservoir on the far right. The final item is the neat little dipstick for the power-steering fluid reservoir. One point which could miss the attention of a fitter not familiar with the 814 is regular lubrication of the throttle linkage, particularly where it is relatively inaccessible. There are two noteworthy locations, the first of which can be dealt with while the bonnet panel is up. One run of the linkage is behind the front bumper, where it is badly exposed to the elements. Neglecting this will cause a sticking throttle within a short time.
The second location is at the rear of the engine, where the linkage passes through the block itself. The heat will give any lubricant a hard time, so make sure the linkage is given frequent attention. Before tilting the cab, there is one final task. This is to pressurise the cooling system, which can be done using a simple hand-held pump.
The pipe-work itself can be checked for leaks once the cab is tilted. On the 814, Mercedes has provided a two-stage tilting mechanism. The first stage tilts to 45° and allows access to all main components. To allow removal of the engine, the cab can be tilted a further 10°.
With the cab up, the throttle linkage mentioned earlier can be oiled, as can the gear change linkage. The gear change and the box itself seem to be reliable items which do not need any special attention. One of the characteristics of the Mercedes 814 that does not find favour with operators is its habit of being afflicted by squealing from under the cab. The source of this noise is the drive belts for the power-steering pump and the air compressor slipping. The twin belts which drive these units are at the front of the engine on the driver's side.
The squealing is easily kept under control by regular tightening of the tensioners. This is done in the usual way by slackening a lock-bolt, then adjusting the tensioner. The squealing should not appear if the belts are kept slightly tighter than typical belt tensions. The second belt drive for the ancillaries is the alternator drive-belt. Again it is at the front of the engine, but on the nearside of the vehicle.
This belt is not prone to slipping, but should be kept in tension in the normal way using the lock-bolt and tensioner.
Returning to the other side of the engine block, it is important to check the unions and retaining clips on the compressor pipe (as mentioned earlier, this pipe tends to Vibrate quite badly). In particular, the union of the pipe and the compressor should be tightened as a regular check. The condition of the retaining clips should also be looked at. The main fuel filter is located to the offside of the cylinder head. To change the filter is a simple job on the 814 (a new filter is specified in this service). The casing drops down after a nut at the top of the mounting has been released. The casing is cleaned, and replaced together with a new filter and seal.
To prime the fuel system again, a small manual pump (located next to the injector pump) is used. The cap unscrews upward, allowing the pump to be used. A bleed valve can be used to indicate when the system is primed, or alternatively a trained ear can listen out for a return valve in the system clicking a few times. The rocker cover on the 814 is held down by only four bolts. Once the cover and the gasket are removed, the tappet clearances can be set.
This is done using the standard screw and locknut method, and is straightforward. This operation is speeded-up by using the manual starter button located above the main fuel filter to turn the engine over.
Two checks should be made before returning the rocker cover and the new gasket. The first is to make sure the fuel injector pipes are secured properly (later breakages cause many problems). The second check is to torque-up the tappet lock-nuts to ensure they are all tightened. The air filter is mounted below the chassis rail on the offside of the vehicle. With certain body designs, access to the filter can be obscured by the skleguards, and hinged or detachable guards should be fitted.
The filter's cover is retained by clips, and the filter itself is held in by one nut. Once the filter has been extracted, its condition can be examined and any dirt blown out. Regular cleaning will prolong the life of the (very expensive) filter. When it needs replacing, an indicator in the cab will alert the driver. Care should be taken when replacing the cover to ensure it is mounted the right way up.
Under the chassis rails on the nearside of the vehicle is the support tray carrying the two batteries. The same comments about access apply to the batteries, and some bodies may provide an inspection hole in the floor panels of the body. A sturdy plastic cover protects the batteries from road dirt, and once this is removed the normal maintenance checks can be undertaken — checking the condition and the tightness of the terminals and checking the fluid levels.
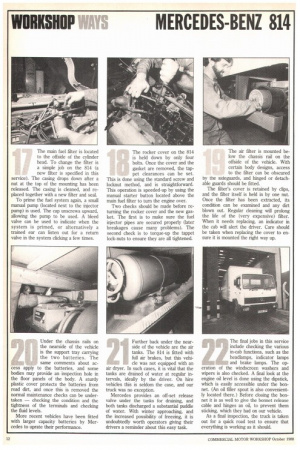
More recent vehicles have been fitted with larger capacity batteries by Mercedes to uprate their performance. Further back under the nearside of the vehicle are the air tanks. The 814 is fitted with full air brakes, but this vehicle was not equipped with an air dryer. In such cases, it is vital that the tanks are drained of water at regular intervals, ideally by the driver. On hire vehicles this is seldom the case, and our truck was no exception.
Mercedes provides an off-set release valve under the tanks for draining, and both tanks discharged a substantial puddle of water. With winter approaching, and the increased possibility of freezing, it is undoubtedly worth operators giving their drivers a reminder about this easy task. The final jobs in this service include checking the various in-cab functions, such as the headlamps, indicator lamps and brake lamps. The operation of the windscreen washers and wipers is also checked. A final look at the engine oil level is done using the dipstick, which is easily accessible under the bonnet. (An oil filler spout is also conveniently located there.) Before closing the bonnet it is as well to give the bonnet release cable and hinges an oil, to prevent them sticking, which they had on our vehicle.
As a final inspection, the truck is taken out for a quick road test to ensure that everything is working as it should.