


The first thing done to a Volvo as it arrives
Page 81
Page 82
Page 83
Page 84
If you've noticed an error in this article please click here to report it so we can fix it.
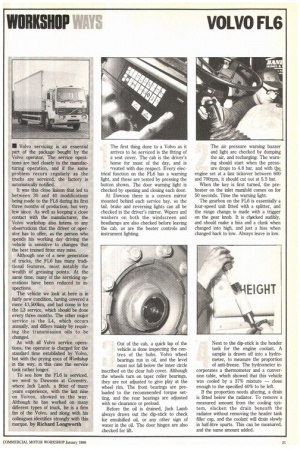
to be serviced is the fitting of a seat cover. The cab is the driver's home for most of the day, and is treated with due respect. Every electrical function on the FL6 has a warning light, and these are tested by pressing the button shown. The door warning light is checked by opening and dosing each door.
At Dawson there is a convex mirror mounted behind each service bay, so the tail, brake and reversing lights can all be checked in the driver's mirror. Wipers and washers on both the windscreen and headlamps are also checked before leaving the cab, as are the heater controls and instrument lighting. The air pressure warning buzzer and light are checked by dumping the air, and recharging. The warning should start when the pressure drops to 4.8 bar, and with the engine set at a fast tickover between 600 and 700rpm, it should cut out at 5.5 bar.
When the key is first turned, the preheater on the inlet manifold comes-on for 50 seconds. Time the warning light.
The gearbox on the FL6 is essentially a four-speed unit fitted with a splitter, and the range change is made with a trigger on the gear knob. It is c4eIcked audibly, and should make a hiss and a clunk when changed into high, and just a hiss when changed back to low. Always leave in low.
Out of the cab, a quick lap of the vehicle is done inspecting the centres of the hubs. Volvo wheel bearings run in oil, and the level must not fall below the inner circle inscribed on the clear hub cover. Although the wheels turn on taper roller bearings, they are not adjusted to give play at the wheel rim. The front bearings are preloaded to the recommended torque setting, and the rear bearings are adjusted with no clearance or preload.
Before the oil is drained, Jack Lamb always draws out the dip-stick to check for emulsified oil, or any other sign of water in the oil. The door hinges are also checked for lift. Next to the dip-stick is the header tank for the engine coolant. A sample is drawn off into a hydrometer, to measure the proportion of anti-freeze. The hydrometer in corporates a thermometer and a conversion table, which showed that this vehicle was cooled by a 37% mixture — close enough to the specified 40% to be left.
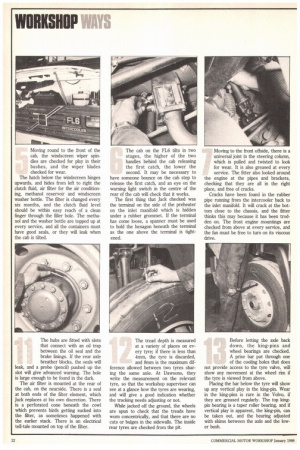
If the proportion needs altering, a drain is fitted below the radiator. To remove a measured amount from the cooling system, slacken the drain beneath the radiator without removing the header tank filler cap, and the coolant will drain slowly in half-litre spurts. This can be measured, and the same amount added. Moving round to the front of the cab, the windscreen wiper spindles are checked for play in their bushes, and the wiper blades checked for wear.
The hatch below the windscreen hinges upwards, and hides from left to right the clutch fluid, air filter for the air conditioning, methanol reservoir and windscreen washer bottle. The filter is changed every six months, and the clutch fluid level should be within easy reach of a dean finger through the filler hole. The methanol and the washer bottle are topped up at every service, and all the containers must have good seals, or they will leak when the cab is tilted. The cab on the FL6 tilts in two stages, the higher of the two handles behind the cab releasing the first catch, the lower the second. It may be necessary to have someone bounce on the cab step to release the first catch, and an eye on the warning light switch in the centre of the rear of the cab will check that it works.
The first thing that Jack checked was the terminal on the side of the preheater on the inlet manifold which is hidden under a rubber grommet. If the terminal has come loose, a spanner must be used to hold the hexagon beneath the terminal as the one above the terminal is tightened. Moving to the front offside, there is a universal joint in the steering column, which is pulled and twisted to look for wear. It is also greased at every service. The fitter also looked around the engine at the pipes and brackets, checking that they are all in the right place, and free of cracks.
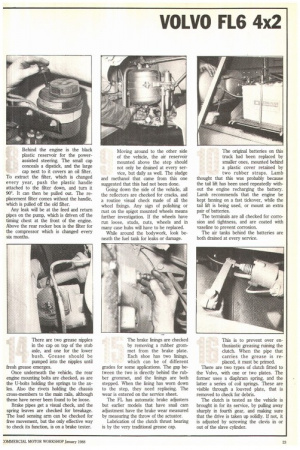
Cracks have been found in the rubber pipe running from the intercooler back to the inlet manifold. It will crack at the bottom dose to the chassis, and the fitter thinks this may because it has been trodden on. The front engine mountings are checked from above at every service, and the fan must be free to turn on its viscous drive. Behind the engine is the black plastic reservoir for the powerassisted steering. The small cap conceals a dipstick, and the large cap next to it covers an oil filter.
To extract the filter, which is changed every year, push the plastic handle attached to the filter down, and turn it 90'. It can then be pulled out. The replacement filter comes without the handle, which is pulled off the old filter.
Any leak will be at the feed and return pipes on the pump, which is driven off the timing chest at the front of the engine. Above the rear rocker box is the filter for the compressor which is changed every six months. Moving around to the other side of the vehicle, the air reservoir mounted above the step should not only be drained at every service, but daily as well. The sludge and methanol that came from this one suggested that this had not been done.
Going down the side of the vehicle, all the reflectors are checked for cracks, and a routine visual check made of all the wheel fixings. Any sign of polishing or rust on the spigot mounted wheels means further investigation. If the wheels have run loose, studs, nuts, wheels and in many case hubs will have to be replaced.
While around the bodywork, look beneath the fuel tank for leaks or damage. The original batteries on this truck had been replaced by smaller ones, mounted behind a plastic cover retained by two rubber straps. Lamb thought that this was probably because the tail lift has been used repeatedly without the engine recharging the battery. Lamb recommends that the engine be kept fanning on a fast tickover, while the tail lift is being used, or mount an extra pair of batteries.
The terminals are all checked for corrosion and tightness, and are coated with vaseline to prevent corrosion.
The air tanks behind the batteries are both drained at every service.
The hubs are fitted with slots that connect with an oil trap between the oil seal and the brake linings. If the rear axle breather blocks, the seals will leak, and a probe (pencil) pushed up the slot will give advanced warning. The hole is large enough to be found in the dark.
The air filter is mounted at the rear of the cab, on the nearside. There is a seal at both ends of the filter element, which Jack replaces at his own discretion. There is a perforated cone beneath the cowl which prevents birds getting sucked into the filter, as sometimes happened with the earlier stack. There is an electrical tell-tale mounted on top of the filter. The tread depth is measured at a variety of places on every tyre; if there is less than ihnin, the tyre is discarded, and 8mm is the maximum difference allowed between two tyres sharing the same axle. At Dawsons, they write the measurement on the relevant tyre, so that the workshop supervisor can see at a glance how the tyres are wearing, and will give a good indication whether the tracking needs adjusting or not.
While jacked off the ground, the wheels are spun to check that the treads have worn concentrically, and that there are no cuts or bulges in the sidewalls. The inside rear tyres are checked from the pit. Before letting the axle back down, the king-pins and wheel bearings are checked. A prise bar put through one of the cooling holes that does not provide access to the tyre valve, will show any movement at the wheel rim if the tyre is viewed from above.
Placing the bar below the tyre will show up any vertical play in the king-pin. Wear in the king-pins is rare in the Volvo, if they are greased regularly. The top kingpin bearing is a taper roller bearing, and if vertical play is apparent, the king-pin, can be taken out, and the bearing adjusted with shims between the axle and the lower bush. There are two grease nipples in the cap on top of the stub axle, and one for the lower bush. Grease should be pumped into the nipples until fresh grease emerges.
Once underneath the vehicle, the rear engine mounting bolts are checked, as are the U-bolts holding the springs to the axles. Also the rivets holding the chassis cross-members to the main rails, although these have never been found to be loose.
Brake pipes get a visual check, and the spring leaves are checked for breakage. The load sensing arm can be checked for free movement, but the only effective way to check its function, is on a brake tester. The brake linings are checked by removing a rubber grommet from the brake plate. Each shoe has two linings, which can be of different grades for some applications. The gap between the two is directly behind the rubber grommet, and the linings are both stepped. When the lining has worn down to the step, they need replacing. The wear is entered on the service sheet.
The FL has automatic brake adjusters but earlier models that have snail cam adjustment have the brake wear measured by measuring the throw of the actuator.
Lubrication of the clutch thrust bearing is by the very traditional grease cap. This is to prevent over enthusiastic greasing ruining the clutch. When the pipe that carries the grease is replaced, it must be primed.
There are two types of clutch fitted to the Volvo, with one or two plates. The former uses a diaphram spring, and the latter a series of coil springs. These are visible through a louvred plate, that is removed to check for debris.
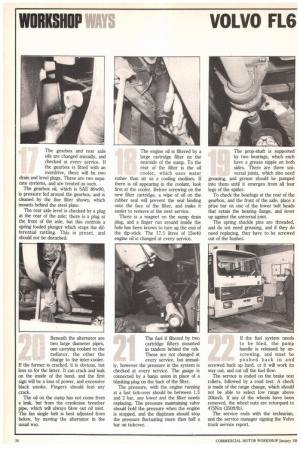
The clutch is tested as the vehicle is brought in for its service, by pulling away sharply in fourth gear, and making sure that the drive is taken up solidly. If not, it is adjusted by screwing the devis in or out of the slave cylinder. The gearbox and rear axle oils are changed annually, and checked at every service. If the gearbox is fitted with an overdrive, there will be two drain and level plugs. These are two separate systems, and are treated as such.
The gearbox oil, which is SAE 80w90, is pressure fed around the gearbox, and is cleaned by the fine filter shown, which mounts behind the steel plate.
The rear axle level is checked by a plug at the rear of the axle; there is a plug at the front of the axle, but this controls a spring loaded plunger which stops the differential rattling. This is preset, and should not be disturbed. The engine oil is filtered by a large cartridge filter on the nearside of the sump. To the rear of the filter is the oil cooler, which uses water rather than air as a cooling medium. If there is oil appearing in the coolant, look first at the cooler. Before screwing on the new filter cartridge, a wipe of oil on the rubber seal will prevent the seal binding onto the face of the filter, and make it easier to remove at the next service.
There is a magnet on the sump drain plug, and a finger run around inside the hole has been known to turn up the end of the dip-stick. The 17.5 litres of 15w40 engine oil is changed at every service. The prop-shaft is supported by two bearings, which each have a grease nipple on both sides. There are three universal joints, which also need greasing, and grease should be pumped into them until it emerges from all four legs of the spider.
To check the bearings at the rear of the gearbox, and the front of the axle, place a prise bar on one of the lower bolt heads that retain the bearing flange, and lever up against the universal joint.
The spring shackle pins are threaded, and do not need greasing, and if they do need replacing, they have to be screwed out of the bushes.
Beneath the alternator are two large diameter pipes, one carrying coolant to the radiator, the other the charge to the inter-cooler. If the former is cracked, it is obvious, but less so for the latter. It can crack and leak on the inside of the bend, and the first sign will be a loss of power, and excessive black smoke. Fingers should feel any crack.
The oil on the sump has not come from a leak, but from the crankcase breather pipe, which will always blow out oil mist. The fan single belt is best adjusted from below, by moving the alternator in the usual way. The fuel if filtered by two cartridge filters mounted in tandem behind the cab. These are not changed at every service, but annually, however the pressure in the system is checked at every service. The gauge is connected by a banjo union in place of a blanking plug on the back of the filter.
The pressure, with the engine running at a fast tick-over should be between 1.5 and 2 bar, any lower and the filter needs replacing. The pressure maintaining valve should hold the pressure when the engine is stopped, and the diaphram should stop the pressure fluctuating more than half a bar on tickover. If the fuel system needs to be bled, the pump handle is released by unscrewing, and must be pushed back in and screwed back up hard, or it will work its way out, and cut off the fuel flow.
The service is ended on the brake test rollers, followed by a road test. A check is made of the range change, which should not be able to select low range above 20km/h. If any of the wheels have been removed, the wheel nuts are retorqued to 475Nm (350ft/lb).
The service ends with the technician, and the service manager signing the Volvo truck service report.