


MAKING BEST USE OF THE FORD.
Page 23
If you've noticed an error in this article please click here to report it so we can fix it.
Valuable Advice on Every Phase of Ford Transport which will Appeal to the Owner, Driver and Repairer.
598.—An Improvised Piston Clamp.
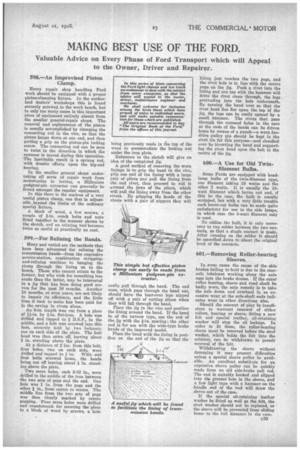
Every repair shop handling Ford work should be equipped with a proper piston-clamping fixture. In the authorised dealers' workshops this is found securely screwed to the work bench, but in only too many cases is this important piece of equipment entirely absent from the smaller general-repair shops. The removal and replacement of the piston is usually accomplished by clamping the connecting rod in the vice, so that the piston hangs down at one end, and then getting a grip on the piston-pin locking screw. The connecting rod can be seen to twist in the direction in which the spanner is moved during this operation. The inevitable result is a sprung rod, with drastic effects upon the big-end bearing.
In the smaller general shops undertaking all sorts of repair work from motorcycles to lorries, a Millenium gudgeoti-pin extractor can generally be found amongst the regular equipment.
In this there is the nucleus of a very useful piston clamp, one that is adjustable ,beyond the limits of the ordinary special fixture.
A block of weed, a few screws, a couple of 1-in. coach bolts and nuts fitted together in the manner shown in the sketch, and an existing tool becomes twice as useful at practically no cost.
599.—For Relining the Bands.
Many and varied are the methods that have been advocated for relining the transmission bands—from the expensive service-station, combination strippingand-relining machine to banging the rivets through -the lining on to the bench. Those who cannot attain to the former, but who wish for something less crude than the latter, may be interested in n jig that has been doing good service for the past 18 mouths. Another 18 months, or even years, are not likely to impair its efficiency, and the little time it took to make has been paid for in the saving in rivets alone.
An 8-in, length was cut from a piece of 11-in, by *-in. fiat-iron. A hole was drilled and tapped to B.S.F., in the middle, and a bolt was screwed into this hole, securely held by two lockouts. one on each side of the plate. The bolt head was then sawn off, leaving about 1 in. standing above the plate.
At a distance of 2 ins, from this bolt, four holes, two on each side, were drilled and tapped to + in. Whit, and four bolts screwed home, the heads being cut off leaving about in. standing above the plate.
Two more holes, each 5-32 in., were drilled in the middle of the iron between the two sets of pegs and the end. One hole was 1 in. from the pegs and the other 1 in., from centre to centre. The middle line from the two sets of pegs was then clearly marked by centre Popping. Four more holes were drilled and countersunk for securing the plate to a block of wood by screws, a hole being previously made in the top of the wood to accommodate the locking nut under the iron plate. Reference to the sketch will give an idea of the completed jig.
A good method of removing the worn linings is to grip the band in the vice, grip one end of the lining with a large pair of pliers and pull the lining from the end rivet, than proceed to roll it around the jaws of the pliers, which will pull the lining away from the other rivets. By gripping the heads of the rivets with a pair of nippers they will
easily pull through the band. The end ones, which pass through the band ear, should have the bent-over legs nipped off with a pair of cutting pliers when they will fall through the band.
Place the jig in the vice and position the lining around the band. If the band be of the narrow type, use the end of the jig with the 1-in, spacing; the other end is for use with the wide-type brake bands of the improved model.
Place the band with the lining in position on the end of the jig so that the lining just touches the two pegs, and the rivet hole is in line with the centre pops on the jig. Push a rivet into the lining and one tap with the hammer will drive the rivet clean through, the legs protruding into the hole underneath. By turning the band over so that the rivet head lies flat upon the top Of the jig, the legs can be easily spread by a small hemmer. The rivets that pass through the recessed holes in the ears at the ends of the bands can be driven home by means of a punch—a worn fandrive pulley pin should be kept in the rivet tin for this purpose—and clenched over by inverting the band and supporting the rivet head upon the bolt in the centre of the jig.
600.—A Use for Old Twinfilament Bulbs.
• Some Fords are equipped with headlamp bulbs of the twin-filament type, one filament taking 18 watts and the other 3 watts. It is usually the 18watt filament which burns out and, if this be the case, the bulb is usually scrapped, but with a very little trouble such burnt-out bulbs can be made quite satisfactory for use in the side lamps, in which case the 3-watt filament only is used.
To utilize the bulb, it is only necessary to run solder between the two contacts, so that a single contact is made. After running on the solder it should be smoothed .down to about the original level of the contacts.
601.—Removing Roller-bearing Sleeves.
In some eases the cause of the side brakes failing to hold is due to the rearaxle lubricant working along the axle case into the brake drums. If the outer roller bearing, sleeve and road shaft be badly worn, the only remedy is to take the axle down and overhaul it, as excessive wear at the axle-shaft ends indicates wear in other directions also.
Should the amount of play be insufficient to warrant renewal of either rollers, bearing or sleeve, fitting a new felt and special leather, oil-retaining washer will stop the oil leakage. In order to fit these, the rpller-bearing sleeve must he removed before the steel washer, which holds the felt into the retainer, can be withdrawn to permit renewal of the felt.
Withdrawing the sleeve without damaging it may present difficulties unless a special sleeve puller be available. An excellent substitute for an expensive sleeve puller can be quickly made from an old side-brake pull rod. The end is suitably hooked and slipped into the greaser hole in the sleeve, and a few light taps with a hammer on the handle end of the tool will draw the sleeve out of the case.
If the special oil-retaining leather washer be fitted as well as the felt, the steel washer should not be replaced, or the sleeve will be prevented from sliding home to the full distance in the ease.