


AIDS TO SOLVING FORD PROBLEMS,
Page 26
Page 27
If you've noticed an error in this article please click here to report it so we can fix it.
Valuable Advice on Every Phase of Ford Transport, which will Appeal to the Owner, Driver and Repairer, IN THIS series of hints concerning the Ford light chassis and ton trucks wherever they are employed for commercial purposes, which commenced recently, we propose to deal with the subject from every viewpoint, so that the advice. given will appeal to the owner, driver, maintenance engineer, or mechanic. Valuable sources of information will be tapped for this purpose, and it should be understood that the information given will all be derived from those with a practical and intimate knowledge of the subject.
We shall welcome for inclusion amongst the hints those which have proved of value to individual users, and will., make suitable remuneration for any published. What we desire are the results of practice, and not so-called improvements, which are but theoretical.
14.—Flush the Radiator and Cylinders.
In hot weather most Fords develop a considerable thirst, and;if the driver or owner does not want to have the trouble of filling the radiator fairly frequently, it is advisable to give both the radiator and cylinder water jackets a thorough wash-out every 800 miles or -so.
To do this, let all the water out of the radiator, and with it the rust and dirt which are bound to be present. Refill with the cock still open and allow the engine to run slowly, thus circulating the water through both radiator and jackets. While doing this it is advisable to let a continual flow of water enter the radiator filling orifice from a hose ; if a hose be not available, then it should be kept filled by buckets. This operation should be carried out for, say, 10 minutes, and will be found to make a very great difference in the running temperature.
15—Adjusting the Hand Brake.
In the case of the 7-cwt. Ford, jack up both rear slieels, throw the brake lever forward so that it is right off, remove the pin from the front fork, or devise, as it is sometimes called, undo the locking nut and turn the devise to the right in order to shorten the rod. Take up both rods evenly and, to test, pull the lever on and try the wheels to see if one can he moved more than the other.
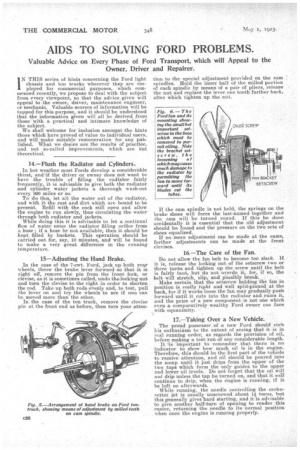
In the case of the ton truck, remove the devise pin at the front end as before, then turn your atten
tion to the special adjustment provided on the cam : spindles. Hold the inner half of the milled portion of each spindle by means of a pair of pliers, release the nut and replace the lever one tooth farther back, after which tighten up the net.
If the cam spindle is not held, the springs on the brake shoes will force the last-named together and the cam will be turned round. If this be done accidentally it is essential that the old adjustment should be found and the pressure on the two sets of shoes equalized. If no more adjustment can be made at the cams, further adjustments can be made at the front d crises.
16.—The Care of the Fan. • Do not allow the fan belt to become too slack. if. it is, release the locking nut of the setscrew two or three turns and tighten up the screw until the belt is fairly taut, but do not overdo it, for, if so, the belt will stretch, slip, and possibly break. Make certain that the setscrew holding the fan in position is really tight and well split-pinned at the back, for if it works loose the fan may gradually push forward until it outs into the radiator and ruins it, and the price of a new component is not one -which even a comparatively wealthy Ford owner can face , with equanimity.
17.—Taking Over a New Vehicle.
The proud possessor of a new Ford should curb his enthusiasm to the extent of seeing that it is in real running order, as regards the provision of oil, before making a test run of any considerable length.
It 'is 'important to remember that there is no indicator to show how much oil is in the engine. Therefore,-this should be the first part of the vehicle to receive attention, and oil should be poured into the sump until it just drips from the upper of the two taps which form the only guides to the upper and lower oil levels. Do not forget that the oil will not drip unless the tap be turned on, and that it will continue to drip, when the engine is running, if it be left on afterwards.
While running, the needle controlling the carburetter jet is usually unscrewed about 11 turns, but this generally gives hard starting, and it is advisable to give another half-turn of opening to render this easier, returning the needle to its normal position when once the engine is running properly.
Always fully retard the giiition lever before starting, open the throttle about half way and then, with the switch off and the flooding lever at the left of the radiator pulled out, give three turns with the starting handle in order to fill the cylinders with a rich mixture, then switch on to battery and crank up in the ordinary way.
In the starter model, the same operation can be performed by pulling out the knob on the dash and then pressing the starter pedal.
• In either case, switch over the magneto directly the engine has started.
18.—Some Causes of Fan Belt Breakage.
A very annoying trouble is that of breakage of the fan belt. This may be due to a loose fan pulley on the crankshaft, the fan being out of line or the fan bracket being bent.
19.—Removing Play in Steering.
Most of the play which occurs in the steering connections will be found in the steering arm and steering connecting rod ball cap. To take up this play, remove the bolts and file sufficient off the faxes to enable these to close in on the ball pins. The pins for the stub axles and steering connecting rods develop vertical play and cause a disagreeable rattling. This play can be taken up by loosening the lower nuts on these pins and tightening the upper, and as the pins are actually screwed into the forks this closes in the fork-ends. Finally, tigliten up the lower nuts.