


road and workshop
Page 43
If you've noticed an error in this article please click here to report it so we can fix it.
Benchwise: lathe sense (18)
ONCE the reclaimed gear shaft fits snugly inside a new companion flange, a slightly more difficult task faces us: this is to uncover and clean out the existing keYway, or to plough a new one should the original have been filled in completely by the welder.
However, this matter will already have been agreed and the whereabouts of the existing keyway indicated by the two punch marks placed at each end, one pair on the butt face of the thin end of the taper, the other two placed beyond the taper on the parallel section; these were set intentionally .010in. inside the true width of the keyway for a particular reason which I will deal with later.
A planing action
Now the lathe must perform a task for which it was not really intended, but which can be carried out with limitations—this is called "shaping" and is in effect a planing action; where there is no slotting cutter and drive this is one way around the problem of providing a keyway.
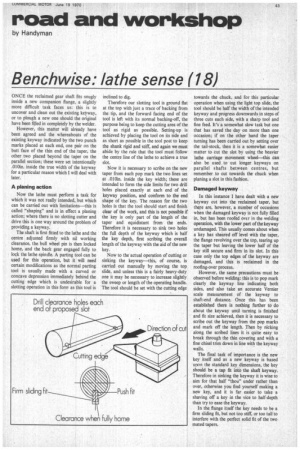
The shaft is first fitted to the lathe and the centre adjusted firmly with nil working clearance, the bull wheel pin is then locked home, and the back gear engaged fully to lock the lathe spindle. A parting tool can be used for this operation, but it will need certain modifications as the normal parting tool is usually made with a curved or concave depression immediately behind the cutting edge which is undesirable for a slotting operation in this form as this tool is inclined to dig.
Therefore our slotting tool is ground flat at the top with just a trace of backing from the tip, and the forward facing end of the tool is left with its normal backing-off, the purpose being to keep the cutting area of the tool as rigid as possible. Setting-up is achieved by placing the tool on its side and as short as possible in the tool post to keep the shank rigid and stiff, and again we must abide by the rule that the tool must follow the centre line of the lathe to achieve a true slot.
Now it is necessary to scribe on the new taper from each pop mark the two lines set at .010in. inside the key width; these are intended to form the side limits for two drill holes placed exactly at each end of the keyway position, and conform to the end shape of the key. The reason for the two holes is that the tool should start and finish clear of the work, and this is not possible if the key is only part of the length of the taper and equidistant from the ends. Therefore it is necessary to sink two holes the full depth of the keyway which is half the key depth, first scribing the overall length of the keyway with the aid of the new key.
Now to the actual operation of cutting or sinking the keyway—this, of course, is carried out manually by moving the top slide, and unless this is a fairly heavy-duty one it may be necessary to increase slightly the sweep or length of the operating handle. The tool should be set with the cutting edge towards the chuck, and for this particular operation when using the light top slide, the tool should be half the width of the intended keyway and progress downwards in steps of three cuts each side, with a sharp tool and fine feed. It's a somewhat slow task but one that has saved the day on more than one occasion; if on the other hand the taper turning has been carried out by setting over the tail-stock, then it is a somewhat easier matter to cut the slot by using the heavier lathe carriage movement wheel—this can also be used to cut longer keyways on parallel shafts between centres, but remember to cut towards the chuck when planing a slot in this fashion.
Damaged keyway In this instance I have dealt with a new keyway cut into the reclaimed taper, but there are, however, a number of occasions when the damaged keyway is not fully filled in, but has been roofed owlin the welding operation, with the lower part of the keyway undamaged. This usually comes about when a key has sheared off level with the taper, the flange revolving over the top, tearing up the taper but leaving the lower half of the key still secure and firm in its slot. In this case only the top edges of the keyway are damaged, and this is reclaimed in the roofing-over process.
However, the same precautions must be observed before welding: this is to pop mark clearly the keyway line indicating both sides, and also take an accurate Vernier scale measurement of the keyway to shaft-end distance. Once this has been established there is nothing further to do about the keyway until turning is finished and fit size achieved, then it is necessary to scribe out the keyway from the pop marks and mark off the length. Then by nicking along the scribed lines it is quite easy to break through the thin covering and with a fine chisel trim down in line with the keyway walls.
The final task of importance is the new key itself and as a new keyway is based upon the standard key dimensions, the key should be a tap fit into the shaft keyway. Therefore in sinking the keyway it is wise to aim for that half "thou" under rather than over, otherwise you find yourself making a new key, and it is far easier to take a shaving off a key in the vice to half-depth than try to ease the keyway.
In the flange itself the key needs to be a firm sliding fit, but not too stiff, or too tall to interfere with the perfect solid fit of the two mated tapers.