


FORD . VAN. POINTERS.
Page 27

Page 28
If you've noticed an error in this article please click here to report it so we can fix it.
\ By' R. T. Nicholson (Author of "The Book of the Ford").
64 ANNOT I FIT solid tyres to .my For,d van and get 'over my tyre troubles:?" writes a correspondent from a district where flints are plentiful. ' .. . .
Yes, my friend, you can—and make way for a lot of other troubles that are far.more .serious than tyre troubles. Probably your back axle will go .first, and there are lots of other points which may give way under excessive read shocks.
No, put up. with your tyre troubles—till they have mended the roads in your -parts: 106.—Solid Tyres.
Positively, the Ford is not built to stand the strain of rough-riding on solids. That back axle, somebody saia, is little thicker than a leadpencil : that is not true, of course, but it certainly is not thick enough to stand the shocks that would be set up by driving on solids. The Ford will stand plenty of fair wear and tear, but is the worst jibber at unfair wear and tear ; and driving on solids really is not fair.
107.—A Cheap Radiator Seal.
Another correspondent writes to say that he has found a simple remedy for a sweating radiator—a 'pennyworth of• pea:flour poured in with the radiator water. He tells me that be scattered the grains of peaflour in the three .gallons of water required for the radiator supply, taking care that the stuff did not collect into lumps, and then replenished the radiator in the ordinary way. He says that that stopped the dribble that had been going on for months—necessitating his filling up every few miles on the road. I give this tip for what it is worth : I have never tried it: but if I had a sweating radiator, I should not hesitate to do" so, for radiator repairs are costly luxuries, and I should not grudge the penny that tha trial would cost me.
108.—Under-oiling. •
Yet another correspondent writes to me in a way that shows he is really hurt, because he got into trouble with a big-end through following a tip of mine as to engine lubrication, I recommended he says—and he says truly—to Use the bottom petcock—not the top one—as his oil gauge : and he went out for a 50-mile round in hilly country, without ever stopping to test the oil level on the journey. The result was that, just short of his 50 miles a big-end went—and he only managed to struggle home on an engine that knocked like a rate-collector.
But, my dear sir, do use common sense. I say it again--There is enough oil in-your engine whenever the oil flows from the lower petcock, but it does not follow that there ig enough for a 50-mile run in hilly country. There ought to be from half-a-pint to a pint above the level of the lower petcock at the start, and if the load is heavy, and the gradients steep, the supply should be tested at, say, 25 miles, by turning on the lower petcock to make sure it is still below the oil level.
Besides, some crankcases positively ooze oil. Unless the crankcase is oiltight, you waste—you do not use—your engine supply ; and then the engine gets starved, and bang goes a big-end (which costs more than "saxpence ") before you can say "knife "—or any other word better suited to the occasion.
109.—Why the Big-end Went.
I Once came across a mysterious case of a ford big-end going, when examination showed that there was plenty of oil in the crankcase—enough to pour out in a goodly stream when the bottom petcock was turned on.
The cause was simple enough when all the facts were known. The oil-circulating pipe from the top of the flywheel to the front of the engine had got stopped up, and the oil-circulation of course ceased. The result was that on every up-grade the oil all collected under the wheel, and there was no way by which it could get back to the front end of the crankcase. So the front cylinder got starved, and the front big-end went.
That circulating pipe must be kept clear. Ordinarily, it gives no trouble at all ; but, unless the engine is flushed out at proper intervals with paraffin and clean oil poured into replace the dirty old oil, stoppage is quite likely to arise. Bits of carbon, bits of fluff from the bands, bits of dirt of all kinds, find a home in old oil ; and they get carried into the circulating-pipe and clog it—ultimately choking it altogether. When you souse out the ota oil with paraffin, and churn the paraffin up by grinding at the starting handle for some minutes, the paraffin gets carried up by the magnets on the flywheel to the funnel leading to the circulating tube, runs clown the circulating tube, and shifts all muck—I beg pardon, all foreign matter.
Therefore, scour well and truly every, thousand miles or so—notwithstanding the wicked price of lubricating oil to-day. (I do assure you I have no friends in the Oil Trust!)
110.—A Handy Little, Fitment.
The filler cap belonging to the petrol tank has a knack of going astray when removed for the neces sary purpose of loading up with petrol (or benzoic, as the case may be). Here is a simple method of stopping this for good and all :- Solder a wire ring to the underside of the cap. To that ring attach a (say) 6-in, length of chain, and through the bottom link of the chain thread a twisted piece of wire like that shown in the drawing. Then, when next you screw out your filler cap, and lift it away from the tank, you will pull the chain with it, and the cross-piece of wire at the bottom end will prevent your withdrawing that, so that you will be able to lay the cap-down anywhere handy, within range of the chain length, and you will be able to find it again without fail when you want to replace it. If ever you want to remove the filler cap right, away from the tank, you can, of course, do so by turning the twisted retainer wire vertical (or nearly so), and so pulling straight up and out. Anybody who can solder can make this contraption. If you cannot solder, simply reamer out the air vent hole in the filler cap slightly (to prevent an air lock) and pass a piece of wire through that, bending it into a ring at the lower end to carry the chain. This wire must, of course, be twisted up at its top end to prevent its slipping through the -hole in 'the filler cap.
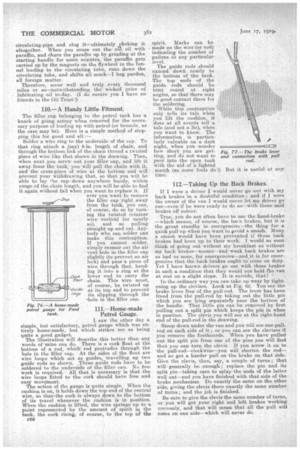
Fig. 76.—A home-made petrol gauge for Ford tank.
111.—Home-made Petrol Gauge.
I saw the other day a simple' 'but satisfactory, petrol gauge which was entirely home-made, but which strikes me as being quite a good gadget.
The illustration will describe this better than any words of -mine can do. There is a cork float at the bottom of a rod, which rod protrudes through the hole in the filler cap. At the sides of the float are wire loops which act as guides, travelling up two guide rods as shown. These guide rods have to be soldered to the underside of the filler can. No fine work is required. All that is necessary is that the wire loops fitted to the cork should have free and easy movement. The action of the gauge is quite simple. When the cushion is on, it holds down the top end of the central wire, so thattthe cork is always down to the bottom of its travel whenever the cushion is in position. When the cushion is lifted, the wire springs up to a point represented by the amount of spirit in the tank, the cork rising, of course, to the top of the c56 spirit. Marks can be made on the wire (or rod) indicating the number of gallons at any particular level.
The guide rods should extend clewn nearly to the bottom of the tank. The top ends of the guide rods should be bent round at right angles, so that there may be good contact there for the soldering.
While this contraption only tells its tale when you lift the cushion, it does at all events tell a -tale (and not alie), when you want to know. The Information is particularly valuable on a dark night, when you wonder how short you are getting, and do not want to peer into the open tank with the aid of a lighted
• match (as some fools do 1) But It is useful at any time.
112.—Taking Up the Back Brakes.
If I were a driver I would never go out with my back brakes-in a doubtful condition ; and if I were the owner of the van I would never let my driver go out—even if he were ready to do so—With these said brakes off colour.
True, you do not often have to use the hand-brake --which means, of course, the bar ic brakes, but it is the great standby in emergencies—the thing for a quick pull up when you want to avoid a smash. Many a smash would have been prevented if those back brakes had been up to their work. I would as soon think of going out without my breakfast as without my back brakes—sooner—and weak back brakes are as bad as none, for emergencies—and it is for emergencies that the back brakes ought to comeon duty. Yet I have known drivers go out with those brakes in such a condition that they would not hold the van at rest on a slight slope. It is suicide, that! • In the ordinary way you can take up wear by tightening up the devises. Look at Fig. 63. You see the brake lever free of the pull-rod. The lever has been freed from the pull-rod by taking out the little pin which you see lying separate?y near the bottom of the handle. That little pin can be removed by first pulling out a split pin which keeps the pin in when in position. The clevis you will see at the right-hand end of the pull-rod in the drawing.
Stoop down under the van and you will see one indirect on each side of it.; or you can see the devises if you remove the footboards. When you have pulled out the split pin from one of the pins you will find that you can turn the ,clevis. If you screw it on to the pull-rod—clockwise—you will shorten the rod— and so get a harder pull on the brake on that side. Give the clevis, then, say, a couple of turns ; that will generally be enough ; replace the pin and its split pin—taking care to splay the ands of the latter well out—and you have finished with that side of the brake mechanism. Do exactly the same on the other side, giving the clevis there exactly the same number of turns ; and the job is finished.
Be sure to give the elevis the same number of turns, or you will get your right and left brakes working unevenly, and that will mean that all the pull will come on one side—which will never do.