


HOW TO BUILD A BUS BODY
Page 54
Page 55
If you've noticed an error in this article please click here to report it so we can fix it.
Our Expert Gives a Concise Outline of Body Construction, from the Plank and Drawing Stage to the Finished Product. Useful Information for the Beginner
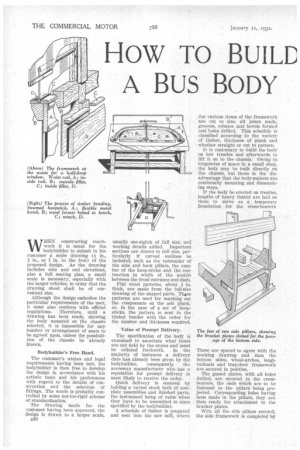
WHEN constructing coachwork it is usual for the bodybuilder to submit to his customer a scale drawing (f in., 1 in., or 1 in. to the foot) of the proposed design. As the drawing includes side and end elevations, also a full seating plan, a small scale is necessary, especially with the larger vehicles, in order that the drawing sheet shall be of convenient size.
Although the design embodies the particular requirements of the user, it must also conform with official regulations. Therefore, until a drawing has been made, showing the body mounted on the chassis selected, it is impossible for any number or arrangement of seats to be agreed upon, unless the possibilities of the chassis be already known.
Bodybuilder's Free Hand.
The customer's wishes and legal requirements having been met, the bodybuilder is then free to develop the design in accordance with his artistic taste and his preferences with regard to the details of construction and the selection of fittings. The wnole is probably controlled by some not-too-rigid scheme of standardization.
The drawing made for the customer having been approved, the design is drawn to a larger scale, 236 usually one-eighth of full size, and working details added. Important sections are drawn to full size, particularly if curved outlines be included, such as the turnunder of the side and back pillars, the camber of the hoop-sticks and the contraction in width of the scuttle between the front entrance and dash.
Flat wood patterns, about f in. thick, are made from the full-size drawing of the shaped parts. These patterns are used for marking out the components on the ash plank, or, in the case of a set of hoopsticks, the pattern is sent to the timber bender with the order for the number and thickness required.
Value of Prompt Delivery.
The specification of the body is examined to ascertain what items are not held by the stores and must be ordered forthwith. In the majority of instances a delivery date has already been given by the bodybuilder, consequently the accessory manufacturer who has a reputation for prompt delivery is most likely to receive the order.
Quick delivery is ensured by holding a varied stock both of complete assemblies and finished parts, the last-named being of value when they have to be assembled to sizes specified by the bodybuilder.
A schedule of timber is prepared and sent into the saw mill, where the various items of the framework are cut to size, all joints made, grooves, rebates and bevels formed and boles drilled. This schedule is classified according to the variety of timber, thickness of plank and whether straight or cut to pattern.
It is customary to build the body on low trestles and afterwards to lift it on to the chassis. Owing to exigencies of space in a small shop, the body may be built directly on the chassis, but there is the disadvantage that the body-makers are continually mounting and dismounting steps.
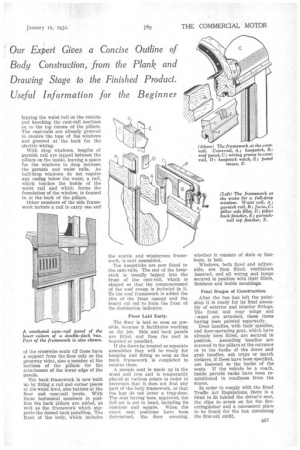
If the body be erected on trestles, lengths of heavy timber are laid on them to serve as a ;temporary foundation for the cross-bearers • These are spaced to agree with the working drawing and then the bottom sides, wheel-arches, longitudinals and trap-door framework are secured in position.
The gusset plates, with all holes drilled, are secured to the crossbearers, the ends which are to he fastened to the pillars being projected. Corresponding holes having been made in the pillars, they are then ready for attachment to the bracket plates.
With all the side pillars erected, the side framework is completed by lapping the waist rail on the outside and knocking the cant-rail mortises on to the top tenons of the pillars. The cant-rails are already grooved to receive the tops of the windows and grooved at the back for the electric wiring.
With drop windows, lengths of garnish rail are lapped between the pillars on the inside, leaving a space for the windows to drop between the garnish and waist rails. As half-drop windows do not require any casing below the waist, a rail, which touches the inside of the waist rail and which forms the foundation of the window, is framed in at the back of the pillars.
Other members of the side framework include a rail to carry one end
of the crosswise seats (if these have a support from the floor only on the gangway side), also a member at the bottoms of the pillars for the attachment of the lower edge of the panels.
The back framework is now built up by fixing a rail and corner pieces at the waist level, also battens at the floor and cant-rail levels. With these horizontal members in position the back pillars are added, as well as the framework which supports the domed back panelling. The front of the body, which includes the scuttle and windscreen framework, is next assembled.
The hoopsticks are now fitted to the cant-rails. The end of the hoopstick is usually lapped into the front of the cant-rail, which is shaped so that the commencement of the roof sweep is included in it. -To the roof framework is added the ribs of the front canopy and the board cut out to form the front of the destination indicator.
Floor Laid Early.
The floor is laid so soon as possible, because it facilitates working on the job. Side and back panels are fitted, and then the roof is boarded or panelled.
If the doors be treated as separate assemblies they will be ready for hanging and fitting so soon as the main framework is completed to receive them.
A sample seat is made un in the wood and iron and is temporarily placed at various points in order to ascertain that it does not foul any part of the body framework, or that the legs do not cover a trap-door. The seat having been approved, the full set is put in hand, including its cushions and squabs. When the exact seat positions have been determined, the floor covering, whether it consists of slats or linoleum, is laid.
Windows, both fixed and adjustable, are then fitted. ventilators inserted, and all wiring and lamps secured in position with their fillets, finishers and inside mouldings.
Final Stages of Construction.
After the bus has left the paintshop it is ready for its final assembly of exterior and interior fittings. The front and rear wings and zonnet are attached, these items having been painted separately.
Door handles, with their spindles, and door-operating gear, which have already been fitted, are secured in position. Ascending handles are screwed to the pillars at the entrance or to the backs of the doors and grab handles, ash trays or match strikers, if these have been specified, are fastened to the backs of the seats. If the vehicle be a coach, inside parcels racks have been requisitioned in readiness from the stores.
In order to comply with the Road Traffic Act Regulations, there is a blind to fit behind the driver's seat, the clips to screw on for the fireextinguisher and a convenient place to be found for the box containing the first-aid outfit.