 1
1 2
2 3
3 4
4 5
5 6
6 7
7 8
8 9
9 10
10 11
11 12
12 13
13 14
14 15
15 16
16 17
17 18
18 19
19 20
20 21
21 22
22 23
23 24
24 25
25 26
26 27
27 28
28 29
29 30
30 31
31 32
32 33
33 34
34 35
35 36
36 37
37 38
38 39
39 40
40 41
41 42
42 43
43 44
44 45
45 46
46 47
47 48
48 49
49 50
50 51
51 52
52 53
53 54
54 55
55 56
56 57
57 58
58 59
59 60
60 61
61 62
62 63
63 64
64 65
65 66
66 67
67 68
68 69
69 70
70 71
71 72
72 73
73 74
74 75
75 76
76 77
77 78
78 79
79 80
80 81
81 82
82 83
83 84
84 85
85 86
86 87
87 88
88 89
89 90
90 91
91 92
92 93
93 94
94 95
95 96
96 97
97 98
98 99
99 100
100 101
101 102
102 103
103 104
104 105
105 106
106 107
107 108
108 109
109 110
110 111
111 112
112 113
113 114
114 115
115 116
116 117
117 118
118 119
119 120
120 121
121 122
122 123
123 124
124 125
125 126
126 127
127 128
128 129
129 130
130 131
131 132
132 133
133 134
134 135
135 136
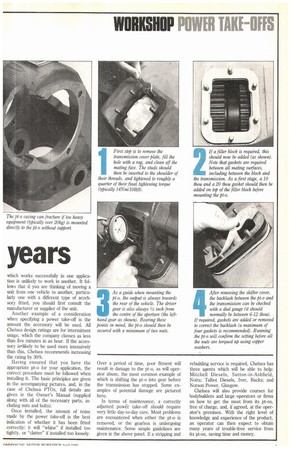
136 First step is to remove the transmission cover plate, fill
Page 109
If you've noticed an error in this article please click here to report it so we can fix it.
the hole with a rag, and clean off the mating face. The studs should then be inserted to the shoulder of their threads, and tightened to roughly a quarter of their final tightening torque (typically 14NinI101bfl).
2 If a filler block is required, this should now be added (as shown). Note that gaskets are required between all mating surfaces, including between the block and the transmission. As a first stage, a 10 thou and a 20 thou gasket should then be added on top of the filler block before mounting the pt-o.
3 As a guide when mounting the pt-o, the output is always towards the rear of the vehicle. The driver gear is also always 1/2 inch from the centre of the aperture (the lefthand gear as shown). Bearing these points in mind, the pt-o should then be secured with a minimum of two nuts. 4 After removing the shifter cover, the backlash between the pt-o and the transmission can be checked with a dial gauge (it should normally be between 6-12 thou). If required, gaskets are added or removed to correct the backlash (a maximum of four gaskets is recommended). Running the pt-o will confirm the setting before all the nuts are torqued uP using copper washers.