 1
1 2
2 3
3 4
4 5
5 6
6 7
7 8
8 9
9 10
10 11
11 12
12 13
13 14
14 15
15 16
16 17
17 18
18 19
19 20
20 21
21 22
22 23
23 24
24 25
25 26
26 27
27 28
28 29
29 30
30 31
31 32
32 33
33 34
34 35
35 36
36 37
37 38
38 39
39 40
40 41
41 42
42 43
43 44
44 45
45 46
46 47
47 48
48 49
49 50
50 51
51 52
52 53
53 54
54 55
55 56
56 57
57 58
58 59
59 60
60 61
61 62
62 63
63 64
64 65
65 66
66 67
67 68
68 69
69 70
70 71
71 72
72 73
73 74
74 75
75 76
76 77
77 78
78 79
79 80
80 81
81 82
82 83
83 84
84 85
85 86
86 87
87 88
88 89
89 90
90 91
91 92
92 93
93 94
94 95
95 96
96 97
97 98
98 99
99 100
100 101
101 102
102 103
103 104
104 105
105 106
106 107
107 108
108 109
109 110
110 111
111 112
112 113
113 114
114 115
115 116
116 117
117 118
118 119
119 120
120 121
121 122
122 123
123 124
124 125
125 126
126 127
127 128
128 129
129 130
130 131
131 132
132 133
133 134
134 135
135 136
136 137
137 138
138 139
139 140
140 141
141 142
142 143
143 144
144 145
145 146
146 147
147 148
148 149
149 150
150 151
151 152
152 153
153 154
154 155
155 156
156 157
157 158
158 159
159 160
160 161
161 162
162 163
163 164
164 165
165 166
166 167
167 168
168 169
169 170
170 171
171 172
172 173
173 174
174 175
175 176
176 177
177 178
178 179
179 180
180 181
181 182
182 183
183 184
184 185
185 186
186 187
187 188
188 189
189 190
190 191
191 192
192 193
193 194
194 195
195 196
196 197
197 198
198 199
199 200
200 201
201 202
202 203
203 204
204 205
205 206
206 207
207 208
208 209
209 210
210 211
211 212
212 213
213 214
214 215
215 216
216 217
217 218
218 219
219 220
220 221
221 222
222 223
223 224
224 225
225 226
226 227
227 228
228 229
229 230
230 231
231 232
232 ALONE I DID IT!
Page 107
Page 108
Page 109
Page 110
If you've noticed an error in this article please click here to report it so we can fix it.
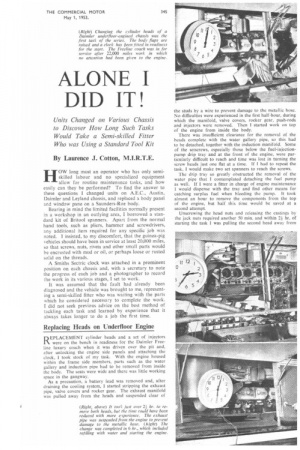
Units Changed on Various Chassis to Discover How Long Such Tasks Would Take a Semi-skilled Fitter Who was Using a Standard Tool Kit By Laurence J. Cotton, M.I.R.T.E.
HOW long must an operator who has only semiskilled labour and no specialized equipment allow for routine maintenance tasks, and how easily can they be performed? To find the answer to these questions I changed units on A.E.C., Austin, Daimler and Leyland chassis, and replaced a body panel and window pane on a Saunders-Roe body.
Bearing in mind the limited facilities normally present in a workshop in an outlying area, I borrowed a standard kit of Britool spanners. Apart from the normal hand tools, such as pliers, hammer and screwdrivers, any additional item required for any specific job was noted. I insisted, to my discomfort, that the guinea-pig vehicles should have been in service at least 20,000 miles, so that screws, nuts, rivets and other small parts would be encrusted with mud or oil, or perhaps loose or rusted solid on the threads.
A Smiths Sectric clock was attached in a prominent position on each chassis and, with a secretary to note the progress of each job and a photographer to record the work in its various stages, I set to work.
It was assumed that the fault had already been diagnosed and the vehicle was brought to me, representing a semi-skilled fitter who was waiting with the parts which he considered necessary to complete the work. I did not seek previous advice on the best method of tackling each task and learned by experience that it always takes longer to do a job the first time.
Replacing Heads on Underfloor Engine
D EPLACEMENT cylinder heads and a set of injectors
were on the bench in readiness for the Daimler Freeline luxury coach when it was driven over the pit and, after unlocking the engine side panels and attaching the clock, 1 took stock of my task. With the engine housed within the frame side members, parts such as the water gallery and induction pipe had to be removed from inside the body, The seats were wide and there was little working space in the gangway.
As a precaution, a battery lead was removed and, after draining the cooling system, I started stripping the exhaust pipe, valve covers and rocker gear. The exhaust manifold was pulled away from the heads and suspended clear of the studs by a wire to prevent damage to the metallic hose. No difficulties were experienced in the first half-hour, during which the manifold, valve covers, rocker gear, push-rods and injectors were removed. Then I started work on top of the engine from inside the body.
There was insufficient clearance for the removal of the heads complete with the water gallery pipe, so this had to be detached, together with the induction manifold. Some of the setscrews, especially those below the fuel-injectionpump drip tray and at the front of the engine, were particularly difficult to reach and time was lost in turning the screw heads just one flat at a time. If I had to repeat the task, I would make two set spanners to reach the screws.
The drip tray so greatly obstructed the removal of the water pipe that I contemplated detaching the fuel pump as well. If I were a fitter in charge of engine maintenance I would dispense with the tray and find other means for catching surplus fuel when bleeding the pump. It took almost an hour to remove the components from the top of the engine, hut half this time would be saved at a second attempt.
Unscrewing the head nuts and releasing the castings by the jack nuts required another 50 min. and within 2i hr. of starting the task I was pulling the second head away from
the studs. With a mate I would expect to complete this task in an hour, using made-up tools to save labour.
Scraping the joint faces clean on the cylinder block, obtaining new gaskets and greasing the new head joint occupied 22 min. and then assistance was needed to lift thc heads back on the studs. By replacing the water gallery and induction pipe before tightening the jack nuts I was able to manipulate the setscrews into place more easily, and quicker progress was made in replacement than when removing these components. Full use was also made of the brace and universal-joint knuckle provided in the Britool tool kit.
In lf hr. the heads were pulled down and the work from inside the body completed. Thirty min. later the exhaust manifold, push-rods and rocker gear were in place and the valve clearances were checked before fitting the injectors. A few minutes were 'wasted when I turned the engine in an anti-clockwise direction to adjust the rocker arms, but generally the job progressed easily and quickly.
The fine threads of the injector dribble pipes on any oil engine always hinder replacement of injectors, and my patience was sorely tried when refitting the pipes on the Daimler. Precious minutes slipped by as 1 endeavoured to align the threads, and refitting the injectors and their pipes occupied half-an-hour.
Replacing hose pipes, recoupling the battery and filling with water followed, and the engine was started 6 hr. 2 min. from the time of driving the vehicle over the pit. A fitter and mate would probably take 4 hr. to change heads for the first time, but when settled to a routine, it should be a 3 hr. job for two men or 4f hr. solo.
Engine Exchanged in 61 Hr.
AN engine change normally requires a fitter and mate, so an assistant was provided at the garage when I changed a power unit on an Austin Series II 5-tonner. Working on the Series II model was a novel experience to both of us, so many mistakes were made.
To save labour, the water cocks were opened outside the garage and, when emptied, the lorry was driven over the pit. Breaking the propeller shaft, removing the lower half of the clutch housing and disconnecting the gearbox were set jobs tackled by the mate, who took 32 mm. I was searching in the mud below the wings for the setscrews which held the wings and front assembly. I at last freed them all and, having recklessly pulled the wires free from the junction points, I lifted off the assembly an hour after starting.
Meanwhile, the exhaust pipe and front and rear engine mountings had been freed, With the front assembly removed, the job was stepped up in tcmpo, the radiator complete coming off in 5 min. and other parts following in quick succession. Lifting eyes were not fitted, but special brackets, with chains and hooks, were attached to the front and rear of the head and the engine was pulled out of the frame in 1 hr. 21 mm.
A replacement unit, devoid of all accessories, was drawn from stores and the components were transferred from the old engine. All went well until it was discovered that the distributor drive was different in. pattern on the new engine and there was no distributor of the right type in stock. It took half an hour to build, from spare parts, a unit with an external vacuum-advance diaphragm and the correctlength drive spindle.
Although there was no great wear on the clutch plate, it was decided to fit a replacement, which was tested on the gearbox splines to ensure free movement. A dummy first-motion shaft was used for alignment, but after assembly I found that the plate was the wrong way round and 7 min. were lost in putting this right. Changing over the bell housing, distributor, fan, dynamo, fuel pump, manifolds, clutch and coil took 1 hr. 25 min., after which the unit was ready to be lifted back into place. A sticking runner on the overhead gantry added to the difficulty of manceuvring the engine steadily into position, but it was lowered without damage.
When linking the throttle controls, I dropped one of the small nuts into the sawdust in the pit. Sifting sawdust to find a small nut is a severe test of patience. Another mishap which cost time was an oil leak from the side of the valve cover, caused by misfitting the gasket. Almost a gallon of oil poured down the side of the engine before the gasket could be changed.
When the engine, gearbox and radiator were installed, the engine was started, but the distributor diaphragm was faulty and to find a replacement and change the unit occupied another 20 mm. Refitting the front superstructure was simplified by putting in all bolts loosely, so that advantage could be taken of clearance in the holes for alignment. It took under half an hour to secure this metalwork, but difficulties arose when I tried to connect the wires for the lighting system in correct sequence. The colour code on the wiring was concealed by mud, and rewiring became a process of trial and error, which took -28 min. for myself and mate.
The complete engine change occupied 61, hr., which might be an average time for a first effort. With a spare engine, complete with all components, it should need about 4 hr. to do the job and, with experience, it would not be difficult for two men to change two Austin engines in one day.
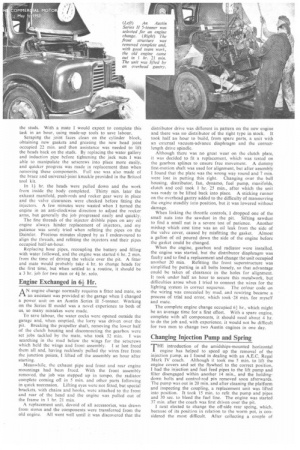
Changing Injection Pump and Spring
THE introduction of the amidships-mounted horizontal engine has helped to speed up the removal of the injection rump, as I found in dealing with an A.E.C. Regal Mark IV coach. Although it took me 5 min. to lift the engine covers and set the flywheel to the correct position, I had the injection and fuel feed pipes to the lift pump and filter disengaged within another 14 min., and the holdingdown bolts and control-rod pin removed soon afterwards. The pump was out in 20 min. and after cleaning the platform and inspecting the coupling, a replacement unit was lifted into position. It took 15 min. to refit the pump and pipes and 30 sec. to bleed the fuel line. The engine was started 37 min. after the coach was first driven over the pit.
I next elected to change the off-side rear spring, which. because of its position in relation to the worm pot, is considered the most difficult. After collecting a couple of hydraulic jacks, wooden blocks and a 4-ft.-long U-bolt spanner from the stores, the clock was started and I set about my task_ The pad provided on the A.E.C. frame for jacking makes For ease and safety of working. After taking the weight of the coach off the spring I disconnected the stabilizer top link and removed the cotter bolts, lubrication pipe and pin from the front shackle, all of which occupied 35 min. Through forgetting that the A.E.C. shackle is adjustable for correct side clearance, I damaged a cotter bolt by attempting to knock it free before releasing the end-pull on the pin and lost time in obtaining a replacement bolt. Of the four split pins securing the U-bolt nuts, only one was obstinate, and I did not have to remove the lop part of the brake-drum dust shield, which might have taken an extra couple of minutes.
The space between the axle and body of the underfloorengined coach enabled me to make good usc of the 4-ft. spanner on the U-bolts. Having shifted the nuts, the large Britool ratchet spanner was employed, and within 13 min. of starting to unpin the U-bolts, they were removed.
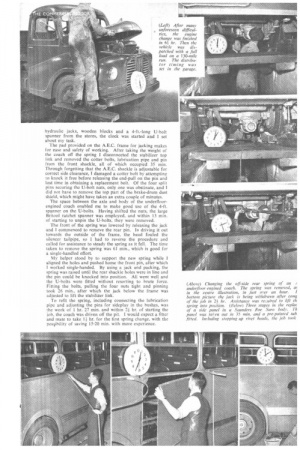
The front of the spring was lowered by releasing the jack and I commenced to remove the rear pin. In driving it out towards the outside of the frame, the head fouled the silencer tailpipe, so I had to reverse the procedure and called for assistance to steady the spring as it fell. The time taken to remove the spring was 61 min., which is good for a single-handled effort.
My helper stood by to support the new spring while 1 aligned the holes and pushed home the front pin, after which worked single-handed. By using a jack and packing, the spring was raised until the rear shackle holes were in line and the pin could be knocked into position. All went well and the U-bolts were fitted without resorting to brute force. Fitting the bolts, pulling the four nuts tight and pinning took 26 min., after which the jack below the frame was adjusted to lift the stabilizer link.
To refit the spring, including connecting the lubrication pipe and adjusting the pins for sideplay in the hushes, was the work of 1 hr. 27 min, and within 24 hr. of starting the job, the coach was driven off the pit. I would expect a fitter and mate to take 14 hr. for the first spring change, with the poslibility of saving 15-20 min. with more experience.
(Above) Changing the off-side rear spring of an / underfloor-mined coach. The spring was removed, as
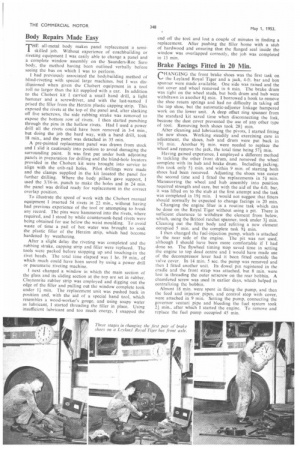
in the centre illustration, in just over an hour. I bottom picture the jack is being withdrawn after con of the job in 2# hr. Assistance was rei;uired to lift tk spring into position. (Helow) Three stages in the replat of a side panel in a Saunders Roe Sara body. Th panel was tat en out in 35 min. and a pre-painted sub. fitted. Including slopping up rivet heads, the job took
Body Repairs Made Easy
THE all-metal body makes panel replacement a semi1 skilled job. Without experience of coachbuilding or riveting equipment I was easily able to change a panel and a complete window assembly on the Saunders-Roc Saw body, the method having been outlined verbally before seeing the bus on which I was to perform.
1 had previously associated the bodybuilding method of blind-riveting with special large machines, but I was disillusioned when given the Chobert equipment in a tool roll no larger than the kit supplied with a car. In addition to the Chobert kit I carried a small hand drill, a light hammer and a screwdriver, and with the last-named 1 prised the filler from the Herzim plastic capping strip. This exposed the rivets at the top of the panel and, after slacking off five setscrews, the side rubbing strake was removed to expose the bottom row of rivets. I then started punching through the pins in the hollow rivets. Had I used a power drill all the rivets could have been removed in 3-4 min., but doing the job the hard way, with a hand drill, took 18 min., and the panel was detached in 35 min.
A pre-painted replacement panel was drawn from stock and I slid it cautiously into position to avoid damaging the surrounding paint. It was first put under both adjoining panels in preparation for drilling and the blind-hole locators provided in the Chobert kit were brought into service to align with the crib-rail holes. Pilot drillings were made and the clamps supplied in the kit located the panel for further drilling. Where the body pillars gave support, I used the 3/16-in, punch to make the holes and in 24 min. the panel was drilled ready for replacement in the correct overlap position.
To illustrate the speed of work with the Chobert manual equipment I inserted 54 rivets in 22 min., without having had previous experience of the tool or attempting to break any record. The pins were hammered into the rivets, where required, and I stood by while countersunk-head rivets were being obtained for use below the waist moulding. To avoid waste of time a pail of hot water was brought to soak the plastic filler of the Herzim strip, which had become hardened by weathering.
After a slight delay the riveting was completed and the rubbing strake, capping strip and filler were replaced. The tools were packed before stopping up and touching-in the rivet heads. The total time elapsed was 1 hr. 59 min.. of which much could have been saved by using a power drill or pneumatic riveting machine.
I next changed a window in which the main section of the glass and its sliding section at the top are set in rubber. Claytonrite rubber strip was employed and digging out the edge of the filler and pulling out the window complete took under I min. The replacement unit was pushed back in position and, with the aid of a special hand tool, which resembles a wood-worker's gouge, and using soapy water as lubricant, I started threading the filler in place. Using insufficient lubricant and too much energy, I snapped the end off the tool and lost a couple of minutes in finding a replacement. After pushing the filler home with a stub of hardwood and ensuring that the flanged seal inside the window was overlapped correctly, the job was completed in 13 min.
Brake Facings Fitted in 20 Min.
(-HANGING the front brake shoes was the first task on
the Leyland Royal Tiger and a jack, 4-ft. bar and box spanner were made available. One side was raised and the nut cover and wheel removed in 6 min. The brake drum was tight on the wheel studs, but both drum and hub were withdrawn in another 8i min. I borrowed a hook to remove the shoe return springs and had no difficulty in taking off the top shoe, but the automatic-adjuster linkage hampered work on the lower unit. A deep offset ring spanner from the standard kit saved time when disconnecting the link, because the dust cover prevented the use of any other type of tool. Removing both shoes took 281 min.
After cleaning and lubricating the pivots, I started fitting the new shoes. Working steadily and exercising care in adjustment, the shoes, hub and drum were put back in 19I min. Another n min. were needed to replace the wheel and remove the jack, the total time being 57i min.
Having gained experience, I employed a different method in tackling the other front drum, and removed the wheel complete with its hub and brake drum. Including jacking, this took only 51min. and within 9 min. of starting both shoes had been removed. Adjusting the shoes was easier the second time and I fitted the replacements in 51min. Marneuvring the wheel and hub assembly into position required strength and care, but with the aid of the 4-ft. bar, it was lifted on to the stub at the first attempt and the task was completed in 19* min. I would not suggest that fitters should normally be expected to change facings in 20 min.
Changing the engine filter is a routine task which can be done on the Royal Tiger without using a pit. There is sufficient clearance to withdraw the element from below, which, using the Britool ratchet spanner, took under 31 min. Cleaning out the filter body and refitting a new element occupied 5 min. and the complete task 91 min,
I then changed the fuel-injection pump, which is attached to the near side of the engine. The pit was not used, although I should have been more comfortable if I had done so. The flywheel timing stop saved time in setting the engine to top dead centre and I would have made use of the decompressor lever had it been fitted outside the valve cover. In 14 min. 5 sec. the pump was removed and then I fitted another unit. Its dowel pin registered in the cradle and the front strap was attached, but 8 min. were lost in threading the outer setscrew on the rear bobbin. A chamfered screw was used in earlier days, which helped in centralizing the bobbin.
Almost 18 min. were spent in fixing the pump, and then the feed and injector pipes, and control stop with cover, were attached in 9 min. Setting the pump, connecting the governor venturi pipe and bleeding the fuel system took 21 min., after which I started the engine. To remove and replace the fuel pump occupied 45 min.