


FORD VAN POINTERS.
Page 17
Page 18
If you've noticed an error in this article please click here to report it so we can fix it.
By R. T. Nicholson (Author of "The Book of the Ford").
IN POINTERS Nos. 84 to 88 I dealt with the need for 'getting the Holley carburetter used on all Ford engines, as I put it, "just so," and I went , on to describe the general principles of its construe
Von, and the need for seeuring the proper level of the petrol in the welt from which the extra fuel is drawn when starting up. I pointed out that the Holley ear buretter calls for very little attention on the whole , and asserted that unless the engine is hard to start it is better not to play about with it.
89.—Alterations and Repairs.
However, the times do come when even the Holley carburetter needs attention--e.g.' when the circumstances are as described in Pointer 88. Here is the way to set about things.
You can do little in the way of adjusting the carburetter unless you get it out of its working position; and the first time you try to get it out, you will wish you had not. The Holley, on the English Ford, is very inacessible, and very hard to get into and out of position. It is hemmed in by the steering. mechanism. In the American Ford, the steering mechanism is on the . other side of the engine, and the carburetter has all the room it wants—and gives you all he room you want. I daresay you have often wondered what doggone idiot assembled the Ford like that. Now you know. He really was not such an idiot—in his own country.
90.—Getting the Carburetter Out, When you first look at the job, your notion will be that the best plan is to take the carburetter off the inlet manifold, and so get it out alone. But the trouble is that ,you cannot readily get at the back bolt of the pair that clamp the carburetter to the inlet manifold. If you could, you would find it almost impossible to tighten it up later on in replacement. It is best, therefore, to remove the carburetter together with the inlet manifold, and not to loosen the bolts in question. Another reason for doing that is that when the carburetter is out, attached to the inlet manifold, you can handle it more easily than you could handle it alone. So make up your mind to take the cdrburetter out bolted to the inlet manifold, and proceed as follow :—
91.—Preliminaries.
Turn off the petrol. Unhook the air-throttle pullwire—the one that works from the front of the radiator. Lift up and out the carburetter adjusting rod— the one with a fork at its lower end, and with the disc on the dash at its upper end Take out the carburetter pull-rod—that which operates the throttle when you move the proper lever on the steering wheel (It is best to detach this from the 'back end—not the front.) Treat this gently, or you may break the neck of the ball-socket. Screw right back and off the petrol-pipe pack-nut—the nut that connects the petrol pipe with the carburetter. Now free the inlet manifold from the engine, by loosening the four nuts that hold down the four clamps that attach it. (See that you do not lose the two gaskets—copper asbesL tOs—or the two glands—metal rings—which will come to light, and possibly fall out, as you loosen ihe manifold.)
92.—Your Holley Day.
The carburetter is now clear of everything that prevents its removal with the inlet manifold. But its removal is, in point of fact, a regular Chinese puzzle. Humour it as you will, it always seems to catch somewhere. The searet of the trick lies in getting out the back end (i.e., the left-hand end) of the manifold first—then the carburetter proper—then the other end of the manifold. But the whole thing wants twisting and turning all .the time. Words will not tell you how to manage it : I have told you everything I can put into words.
93.—Taking Apart.
We will 73uppose, however, that you. have the carburetter out. You now want to take it apart. First remove the petrol cock at the bottom. Screw it "out with a' spanner that fits it properly. (In applying tools any carburetter part, remember that you are dealing with brass, or something like brass, and that it is on the soft side, and should be treated tenderly accordingly. Your spanners must fit.) Next screw off the big nut at the bottom—called the mixing chamber nut—about an inch across. This generally binds tightly, owing to the drying action of the petrol. You can perhaps loosen it if somebody will hold the inlet manifold while you use a spanner on the nut. (Paraffin may help you to budge it.) Otherwise clamp the manifold very lightly in a vice (or you may damage it—it -being lightly built), and then go to work with the spanner.
With the nut off, you can bring away the float chamber—the bellied part of the carburetter body. See that you do not lose the little inlet valve (or needle) or the brass *pin that hinges the float. They are apt to go astray when the float chamber comes off. Better remove the float chamber, therefore, with a box under it to catch these small parts.
If the pin does not fall out, you will have to remove it in order to get the float away. You will see at once how to do that. Then the valve will drop out.
94.—Adjusting the Level.
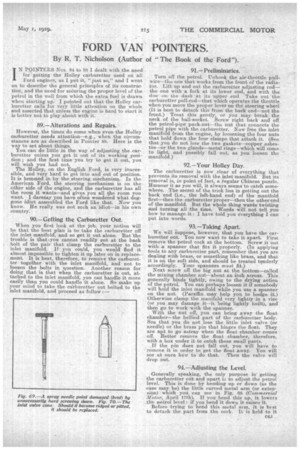
Generally speaking, the only purpose in' getting the carburetter out and apart is to adjust the petrol level. This is done by bending up or down (as the case may be) the little curved metal arm (or exteofdon) which you can see in Fig. 65 (Commerrial MOtor, April lith). If you bend this up, it, lowers the petrol level : if you bend it down it raises it.
Before trying to bend this metal arm, it is best to detach the part from the cork. It is held to it
by -Life small bolts and nuts. Turn off the nuts and you_ can withdraw the screws and free the part. (If yon do not remove the metal from the cork, you are likely to split the cork while trying to bend the metal. That will ruin it for good and all.)
In bending, go gently to work. A very little alteration in the " set will make a good deal of difference in the petrol level later on, every fraition of bending near the hinge being greatly multiplied in effect at the opposite end of the cork.) In replacing the metal on the, cork, do not screw up the nuts at all tightly. The plate should press only lightly against the cork--the springiness of which act S as a lock, even with light pressure. It is unneccessary to tighten much-and, of course, you could go on tightening till you had flattened the cork quite thin.
You cannot tell whether you have bent the metal extension enough -without replacing the carburetter and looking .a.own into the well to see up Lb what point the petrol now rises. You might, it is true, carry but a bench test, but that means pretty fine work and special apparatus.. Generally speaking, the metal arm is set about right if the cork lies horizontal (with the float chamber in correct position) when the• -metal Mresses the just. ust. home. This position was shown in Fig. 60.
95.-Other Jobs.
I have assumed that the job that you wanted to do in taking your carburetter down was to correct the petrol level. That is the only job you are likely to want to do to the Holley. There are, however, other jobs which may be called for at some time or other-. for instance, replacement of the inlet valves, replacement of the seating, replacement of the spray needle, replacement of the seating thereof, or replacement of the float itself. The replacement of the float is quite a simple matter. It is only a. question Sf taking out the old float and putting in .a. new one. (The metal arm is generally bent gn the new float to about the right set, though further " dickering " as above directed may be needed to get it " just so.") This job is needed when the old cork gets spirit-sodden-as it will do in course of time though it take years. The symptom when that happens will be chronic flooding.
Replacement of the inlet valve (or needle) is also a simple matter. That is needed when the point gets ridged badly. Then the point will not fit the seating, and the petrol will dribble into the carburetter all the time, resulting in chronic flooding once more.
Generally, when the inlet valve point is ridged, it is as well also to replace its seatingThis is (in more recent Holley carburetters) removable by screwing out-a slot being provided for the purpose.
I do not recummend grinding the valve into the seating. That is finicking work, and it is cheaper and simpler to buy new parts.
The spray needle point may get blunted or damaged (this being generally' due to its being screwed hard down by hand at some time moral, don't!). The spray needle can be replaced with a new one-either with or without its .seating-its seating being removable by screwing out... The symptoms of trouble at these points are uncertain firing-good at times, bad at times-mostly bad-over-rich mixture, and consequent overheating.
In replacing the carburetter lid, it is always best to do 80 without the, spray needle in position. If you put the lid on with the needle in -position, you are likely to jam the needle point hard down on its seating, and that will spoil the fit, and may Mean your buying a new needle, or a new seating, hr both.
These carburetter adjustments are not difficult, but need care and gentleness