 1
1 2
2 3
3 4
4 5
5 6
6 7
7 8
8 9
9 10
10 11
11 12
12 13
13 14
14 15
15 16
16 17
17 18
18 19
19 20
20 21
21 22
22 23
23 24
24 25
25 26
26 27
27 28
28 29
29 30
30 31
31 32
32 33
33 34
34 35
35 36
36 37
37 38
38 39
39 40
40 41
41 42
42 43
43 44
44 45
45 46
46 47
47 48
48 49
49 50
50 51
51 52
52 53
53 54
54 55
55 56
56 57
57 58
58 59
59 60
60 61
61 62
62 63
63 64
64 65
65 66
66 67
67 68
68 69
69 70
70 71
71 72
72 73
73 74
74 75
75 76
76 77
77 78
78 79
79 80
80 81
81 82
82 83
83 84
84 85
85 86
86 87
87 88
88 89
89 90
90 91
91 92
92 93
93 94
94 95
95 96
96 97
97 98
98 99
99 100
100 101
101 102
102 103
103 104
104 105
105 106
106 107
107 108
108 109
109 110
110 111
111 112
112 113
113 114
114 115
115 116
116 117
117 118
118 119
119 120
120 121
121 122
122 123
123 124
124 125
125 126
126 127
127 128
128 129
129 130
130 131
131 132
132 133
133 134
134 135
135 136
136 137
137 138
138 139
139 140
140 141
141 142
142 143
143 144
144 145
145 146
146 147
147 148
148 149
149 150
150 151
151 152
152 153
153 154
154 155
155 156
156 157
157 158
158 159
159 160
160 161
161 162
162 163
163 164
164 The ABC of Plastics Repair
Page 100
Page 101
If you've noticed an error in this article please click here to report it so we can fix it.
AT-THOUGH glass-reinforced plastics are now in widespread ra use, many fleet operators still hesitate to specify this type of material for new vehicles because of lack of knowledge about repair methods. My own first experiences of it some years ago were none too happy on this score.
With only a short period of training, however, a completely unskilled person can effect repairs to serious accident damage in far shorter periods than those required for pressed-steel or coachbuilt units, and usually can produce a neater and stronger job. It has, in fact, been found in practice, that reductions in time off the road and in actual costs of repairs of up to 50 per cent are .possible when using glass-reinforced plastics bodywork.
For the purpose of receiving some such training, I recently put myself into the hands of Smiths Delivery Vehicles Ltd., a company that has studied most of the implications of glass-reinforced plastics construction, particularly with regard to accident repairs. The company's chief designer, Mr. W. S. Lawson, and glass-fibre shop manager, Gilbert Dunster, have carried out considerable numbers of experiments to do with repairs over a period of some 10 years. They have now got the job down to a fine art and I found that in only four hours I had become proficient enough to carry out an accident repair with an end result that was extremely pleasing.
Constant development in the techniques used in producing the materials that go to make up the glass-reinforced plastics have over the last few years made the job of mixing the ingredients of the resins a much easier one than hitherto.
Originally the basic resin, the accelerator and the catalyst were all mixed on the premises of the person using the material. Owing to the constant danger of fire produced by adding the constituents in the wrong order however, it is now common practice for the resin and accelerator to be supplied ready-mixed so that only the catalyst has to be added on the job. Identifying resin which has accelerator added is easy, for in this condition it has a purple colouring. When the catalyst is added the purple tinge disappears.
The purpose of the accelerator is to assist in promotion of exothermic action necessary in the curing out of the resin. The catalyst sets up reactions and promotes the curing out process, and is added in ratios of 11-13 c.c. per lb. of gel-coat resin, and 3-5 c.c. per lb. of lay-up resin. Exceeding the laid down amounts of catalyst will result in a quicker curing time; but at the same time it will produce an unacceptable brittleness in the finished job.
The first essential is to know the method of building glass-fibre units from new. All components are made from master moulds and because of this are always identical, making it possible for the operator to use exactly the same method when repairing. The face, or negative, surface of the mould is coated with a release agent, polyvinyl alcohol suspended in spirit. This solution is applied by either a sponge or soft camel hair brush and it prevents the bonding together of the mould and the moulding.
Wax polish
A good safeguard for a mould is that of coating with a liberal amount of wax polish—which under no circumstances must be of the silicone variety as this will destroy the adhesive qualities of any paint that might be applied later. Should a part of the mould be missed when the release agent is applied, the finished job will not then be affected.
When the release agent is dry the mould is then given a coating of specially prepared resin containing an aerosil which prevents runs on vertical surfaces. This resin will faithfully reproduce the surface of the mould and, if this has a perfect finish so will the reproduction.
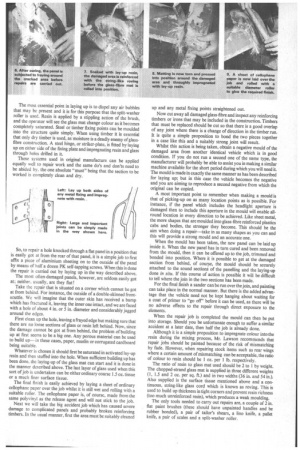
After allowing the first coat, known as the gel coat, to go tacky, the glass-fibre mat can now be laid. The material should be cut roughly to the same size as the mould, leaving enough over the edges to allow trimming. It is now laid on to the mould and pressed into the gel coat, first with a brush and then with a split-washer roller. When the mat is held down all over by the resin, it is then coated with lay-up resin slightly less viscous than the gel coat resin and used to saturate the mat and produce the bonding together of the several layers. This system is repeated, first resin then glass mat, until the required thickness is achieved. The most essential point in laying up is to dispel any air bubbles that may be present and it is for this purpose that the split-washer roller is used. Resin is applied by a stippling action of the brush, and the operator will see the glass mat change colour as it becomes completely saturated. Steel or timber fixing points can be moulded into the structure quite simply. When using timber it is essential that only dry timber is used, as moisture is a deadly enemy of glassfibre construction. A steel hinge, or striker-plate, is fitted by laying up on either side of the fixing plate and impregnating resin and glass through holes drilled in it.
These systems used in original manufacture can be applied equally well to repair work and the same do's and don'ts need to be abided by, the one absolute "must" being that the section to be worked is completely clean and dry.
So, to repair a hole knocked through a flat panel in a position that is easily got at from the rear of that panel, it is a simple job to first affix a piece of aluminium sheeting on to the outside of the panel by means of half a dozen PK self-tapping screws. When this is done the repair is carried out by laying up in the way described above.
The most often-damaged panels, however, are seldom easily got at; neither, usually, are they flat!
Take the repair that is situated on a corner which cannot be got at from behind. For instance, the outside of a double-skinned frontscuttle. We will imagine that the outer skin has received a bump which has fractured it, leaving the inner one intact, and we are faced with a hole of about 4 in. or 5 in. diameter and considerably jagged around the edges.
First clean up the hole, leaving a frayed edge but making sure that there are no loose sections of glass or resin left behind. Now, since the damage cannot be got at from behind, the problem of building up at first seems to be a big one. Any porous material can be used to build up—in these cases, paper, muslin or corrugated cardboard being suitable.
Whatever is chosen it should first be saturated in activated lay-up resin and then stuffed into the hole. When sufficient building up has been done, the laying-up of the glass mat can start and it is done in the manner described above. The last layer of glass used when this sort of job is undertaken can be either ordinary coarse 1.5 oz. tissue or a much finer surface tissue.
The final finish is easily achieved by laying a sheet of ordinary cellophane paper over the job whilst it is still wet and rolling with a suitable roller. The cellophane paper is, of course, made from the same polyvinyl as the release agent and will not stick to the job.
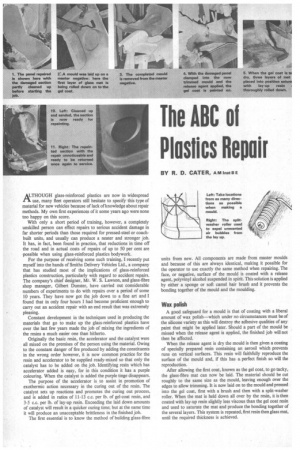
Next we will take the big accident job which has caused severe damage to complicated panels and probably broken reinforcing timbers. In the usual manner, first the area must be suitably cleaned up and any metal fixing points straightened out.
Now cut away all damaged glass-fibre and inspect any reinforcing timbers or irons that may be included in the construction. Timbers that must be replaced should be cut so that there is a good overlap of any joint where there is a change of direction in the timber run. It is quite a simple proposition to bond the two pieces together in a case like this and a suitably strong joint will result.
Whilst this action is being taken, obtain a negative mould of the damaged area from another identical vehicle which is in good condition. If you do not run a second one of the same type, the manufacturer will probably be able to assist you in making a similar machine available for the short period during which you will need it. The mould is made in exactly the same manner as has been described for laying up; but in this case the vehicle becomes the negative and you are aiming to reproduce a second negative from which the original can be copied.
A most important point to remember when making a mould is that of picking-up on as many location points as is possible. For instance, if the panel which includes the headlight aperture is damaged then to include this aperture in the mould will enable allround location in every direction to be achieved. Like sheet metal, the more shapes that are moulded into glass-fibre reinforced plastics cabs and bodies, the stronger they become. This should be the aim when doing a repair—take in as many shapes as you can and this will provide a strong mould and an accurate one.
When the mould has been taken, the new panel can be laid up inside it. When the new panel has in turn cured and been removed from the mould, then it can be offered up to the job, trimmed and bonded into position. Where it is possible to get at the damaged section from behind, of courge, the mould should be securely attached to the sound section g of the panelling and the laying-up done in situ. If this course of action is possible it will be difficult to tell where the join in the two sections has been made.
For the final finish a sander can be run over the join, and painting can take place in the normal manner. But there is the added advantage that the vehicle need not be kept hanging about waiting for a coat of primer to "go off" before it can be used, as there will be no adverse effects to the repair through direct exposure to the elements.
When the repair job is completed the mould can then be put into storage. Should you be unfortunate enough to suffer a similar accident at a later date, then half the job is already done.
Although it is a simple proposition to impregnate colour into the resin during the mixing process, Mr. Lawson recommends that repair jobs should be painted because of the risk of Mismatching by fade. However, when repairing stock items such as rear wings where a certain amount of mismatching can be acceptable, the ratio of colour to resin should be 1 oz. per 1 lb. respectively.
The ratio of resin to glass mat used should be 2 to 1 by weight. The chopped-strand glass mat is supplied in three different weights (1, 1.5 and 2 oz. per sq. ft.) and in two widths (36 in. and 54 in.). Also supplied is the surface tissue mentioned above and a continuous, string-like glass cord which is known as roving. This is used to build up thickness in tight corners and prevent resin richness (too much unreinforced resin), which produces a weak moulding.
The only tools needed to carry out repairs are, a couple of 2 in. flat paint brushes (these should have unpainted handles and be rubber bonded), a pair of tailor's shears, a lino knife, a pallet knife, a pair of scales and a split-washer roller.