


MAKING BEST USE OF THE FORD.
Page 55
If you've noticed an error in this article please click here to report it so we can fix it.
Valuable Advice on Every Phase of Ford Transport which will Appeal to the Owner, Driver and Repairer.
593. — Hints on Re-assembling the Chassis.
When re-assembling a chassis a little mistake may give a large amount of trouble and may involve again dismantling.
When putting the power unit back into the chassis it is advisable to fill the universal-joint housing with a fairly stiff grease, and ordi:_ary grease should be used in all the other cups. The reason for the grease in the housing is to keep the shaft end steady while returning it to its correct position, otherwise it will wobble about and cause great difficulty.
Another point to note when replacing the engine is that no parts of the transmission or its controls are fouling, and the hand brake should always be in the off position.
The ball end of t radius rod often becomes wedged under the transmission case and hinders the correct setting of the unit, but a slight pressure downwards will always release it and allow the work to proceed.
594.—Simplifying the Refitting of Rear-spring Shackle Pins.
On the light-van chassis, after the shackle pins at one side have been fitted, the end of the spring at the other side will be 2 ins. or 3 ins, away from its proper positon, and considerable force will be needed to enter the pins.
An easy way of performing this operation is to place a block of wood of suitable thickness between the axle and the spring and then to lower the chassis so that its weight will make the spring slide along the wood and reach the shackle. Should the spring not travel quite far enough, a sharp pull down on the body at that side while another person pets the pin into position, will probably prove successful.
595. —Reconditioning Ignition Looms.
The useful life of the ignition looms is generally cut short through carelessness when filling up with oil. The commutator, which is placed very near the oil filler and with its wires running practically underneath, gets saturated with oil, which eventually rots the rubber insulation ; troublesome shorts then occur, and, finally, the whole loom has to be replaced by a new one. Obviously, the one way to preserve the ignition loom is to exercise care when filling up with oil, and the special cranked filler and breather cap, obtainable for a few shillings, is well worth the money, both for the oil it saves and for the reason just given. Where a fleet of Fords is maintained, the expenditure for renewing ignition looms will amount to a considerable sum in the course of a year, taking the five-wire (non-starter) loomat 3s. 6d. and the eight-wire (starter) at 6s. 6d. Generally speaking, it is only the commutator ends of the four ignition wires that give any trouble, the rest being quite sound. A considerable saving can be effected by replacing
these worn ends by wires cut from the coil-box end of an ignition loom that has been previously scrapped.
It is only necessary to cut off the wires from the coil-box end of the scrapped loom at a point about a foot from the end of the longest wire—the green one—cutting away the woven loom covering. Cut off the four wires from the loom to be repaired and measure the distance from the cut to the end of the red wire. Cut the new red wire about half an inch longer to allow for joining the two, the black wire 1f in. longer, the green wire ins, longer and the blue wire 41 ins. longer. Solder these to the loom wires and bind the joins with insulation tape. The reconditioned loont will then be as sound as a new one and will have cost nothing beyond a little time.
596.—A Tool for Jet Removal.
A simple and useful tool for the removal of the carburetter jet can easily be made from an old gudgeon pin. Simply soften one end and bore a i-in. diameter hole about in. from this end, the hole being designed to take a tommybar. The slot in the pin will be found accurately to fit the jet or spraying nozzle.
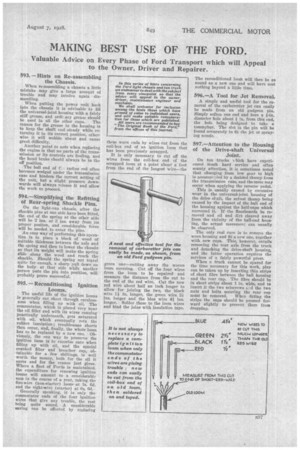
597.—Attention to the Housing of the Drive-shaft Universal Joint.
On ton trucks which have experienced much hard service and often scanty attention, it is sometimes noted that changing from low gear to high is accomptmied by a decided thump from the transmission case, and the some may occur when applying the reverse pedal.
This isusually caused by excessive wear in the universal-joint housing of the drive shaft, the actual thump being' caused by the impact of the ball end of the housing against the half-caps which surround it. If the floorboards be removed and oil and dirt cleared away from the vicinity of the ball-end housing, the actual movement can usually be observed.
The only real cure is to remove the worn housing and fit a new one, together with new caps. This, however, entails removing the rear axle from the truck and detaching the drive-shaft housing, and the Litter operation requires the services of a fairly powerful press.
When a truck cannot be spared for the time necessary for this work, play can be taken up by inserting thin strips of sheet fibre between the hall housing and the rear cap. The fibre should be in short strips about 1 in. wide' and to insert it the two setscrews &::dd the two nuts and bolts securing the rear cap
must be removed. When fitting the strips the caps should be pressed forward slightly to prevent them from dropping.