 1
1 2
2 3
3 4
4 5
5 6
6 7
7 8
8 9
9 10
10 11
11 12
12 13
13 14
14 15
15 16
16 17
17 18
18 19
19 20
20 21
21 22
22 23
23 24
24 25
25 26
26 27
27 28
28 29
29 30
30 31
31 32
32 33
33 34
34 35
35 36
36 37
37 38
38 39
39 40
40 41
41 42
42 43
43 44
44 45
45 46
46 47
47 48
48 49
49 50
50 51
51 52
52 53
53 54
54 55
55 56
56 57
57 58
58 59
59 60
60 61
61 62
62 63
63 64
64 65
65 66
66 67
67 68
68 69
69 70
70 71
71 72
72 73
73 74
74 75
75 76
76 77
77 78
78 79
79 80
80 81
81 82
82 83
83 84
84 85
85 86
86 87
87 88
88 89
89 90
90 91
91 92
92 93
93 94
94 95
95 96
96 97
97 98
98 99
99 100
100 101
101 102
102 103
103 104
104 105
105 106
106 107
107 108
108 109
109 110
110 111
111 112
112 113
113 114
114 115
115 116
116 117
117 118
118 119
119 120
120 121
121 122
122 123
123 124
124 125
125 126
126 127
127 128
128 129
129 130
130 131
131 132
132 133
133 134
134 135
135 136
136 137
137 138
138 139
139 140
140 141
141 142
142 143
143 144
144 145
145 146
146 147
147 148
148 149
149 150
150 151
151 152
152 153
153 154
154 155
155 156
156 157
157 158
158 159
159 160
160 161
161 162
162 163
163 164
164 Pointers to Good Arc Welding
Page 87
Page 88
Page 90
If you've noticed an error in this article please click here to report it so we can fix it.
BY HANDYMAN
IN accepting that arc welding plant is now an indispensable part of vehicle repair, it is also fair comment that not more than one in 20 using the equipment is a fully trained welder, and whereas the large garage or workshop will need and fully employ the trained man, in many garages arc welding will remain a part-time duty shared by many. And with all due respect to those good fitters and mechanics who would add welding to their several other skills, acquiring the right technique and know-how can be a slow and frustrating business. In a single short article such as this, it is impossible to cover the whole subject, and as there are certain basic lines of approach that must be mastered before any satisfactory results can be expected, it will be necessary to cover these in some detail for the benefit of the beginner or part-time welder.
Space does not permit a long study of the electrical circuits needed to provide a metal melting current, and as we are discussing the subject with men already skilled in mechanics, we will accept the garage arc welding machine to be a portable welding transformer with infinitely variable current adjustment. The following models have served well in the vehicle repair trade and are still going strong.
Phillips Type E 1381/1 portable transformer. This machine is good for medium heavy work; it has an output of 15 to 200 amp. and can be used continuously on electrodes from 16 down to 10 s.w.g., but it is advisable to give it rest periods if using El s.w.g. My favourite from the Phillips firm is the type 1368/01. This model ranges from 70 to 350 amp. and will stand up to any hard driving—by which I mean really heavy, continuous duty.
I have three Triangle machines still at work after many years' service, one the Oil 200 model and the other two, Oil 300s; the latter are really tough machines, giving a range from 20 to 315 amp., and they can work any electrode from 16 down. to 4 s.w.g., and will tackle 2 s.w.g. if given a periodic break. Also, by playing with the two stages of secondary voltage, a combination of more than 90 output values is available—very useful on vehicle repair. These are just a few of the machines I have in regular use, but each has earned its place many times over, and forms a good standard to aim for in other makes.
Safety Now to protective clothing and safety precautions. These are quite important factors, as the ill-clad operator will rarely produce good quality work. Therefore, prepare for the job in boiler suit, good pliable leather gloves and boots (not shoes) and avoid at all costs an open-necked shirt or rolled-up sleeves. Eye protection is most important of all, against both flash or flying metal or slag, and although hair will grow again there is no second issue of eyes.
For head and eye protection, I prefer the face mask rather than the hand shield, as this leaves 'both hands free. Once correctly clothed, there is a greater confidence in tackling the job. Be careful to check the machine lens. •For Light work the C-type lens is quite safe, but for currents above 75 amp., it is necessary to use the D lens. Watch the outer, plain glass lens, as this will become blurred and dull with use and will interfere with good vision.
Now what about others on the site? There is no quicker job-stopper than the chap who will start to weld in a blaze of blue light, regardless of others around, and although he is hard at it, six others may be standing idle with their• backs turned. So think of these things and arrange to screen off carefully all jobs on the shop floor. Curved shields Mounted on light frames and thumb-screw operated, are well worth making up for shop floor jobs, although the man on full-time unit recovery obviously will have his own corner fully screened. The painful effects of an arc flash can catch the trainee operator who is probing around with his electrode whilst still unscreened. This is a common and, at the same time, a silly practice, and if in doubt where to touch down with the live electrode, make a chalk mark or line. Remember, too, the " nosy " type who will insist in looking over your shoulder to see how you do it. Chase him at once, otherwise he will be off work also. If caught by a flash, apply the correct eye lotion at once; do not wait even to complete a long run. This lotion should be in the first-aid kit, but if not, obtain the correct material as indicated in Home Office Memo 329. It can, in most cases, save you the painful effects of "arc eye ", which is delayed in action and will quite often give you trouble afterwards.
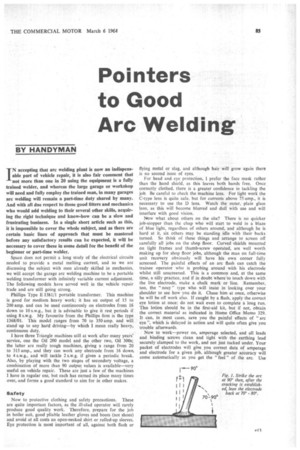
Now to work—power on, amperage selected, and all leads and binding screws clean and tight with the earthing lead securely clamped to the work, and not just tucked under. Your packet of electrodes will give you correct data of amperage and electrode for a given job, although greater accuracy will come automatically as you get the " feel " of the arc. Use a 10 or 8 s.w.g. electrode to start with, and set the machine accordingly. There are two ways to strike the arc. One is to strike the work at 900 and pull up to 0125 in. gap. The other way, often more suited to the beginner, is to trail or scratch with the rod, leaning it back to around 70°40° asthe arc starts, and moving the electrode at this angle on its own flux as a steady.
As can be expected, the electrode will quite often stick or weld to the work, and a quick twist or lean to the right or left will usually break it free. If this does not work, release the electrode at once from the holder and knock it off the work with a chipping hammer. The most important task at this stage is to establish the correct arc, and this will be found by experience and checking results. The correct arc is very short and gives a distinct penetrating crackle, which indicates good penetration. A long arc however, will hiss only, and the smoothness of this noise may mislead the beginner. In fact, this arc is wrong for several reasons: lack of penetration; failure of the flux coating to protect the metal electrode from the air; and (because of this) a brittle weld. Therefore, strike 'the arc at 90°, establish the crackle and at once lean the electrode back to the more natural position of 70-80° (see Fig. 1). But avoid allowing the electrode to sink down to 45° as the work will be affected by slag infiltration.
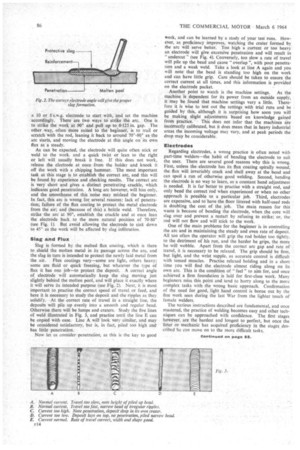
Slag and Flux Slag is formed by the melted flux coating, which is there to shield the molten metal in its passage across the arc, and the slag in turn is intended to protect the newly laid metal from
the air. Flux coatings vary—some are light, others heavy; some are fluid or quick freezing, but whatever the type of flux it has one job—to protect the deposit. A correct angle of electrode will automatically keep the slag moving just slightly behind the molten pool, and will place it exactly where it will serve its intended purpose (see Fig. 2). Next, it is most important to practise the correct speed of travel or feed, and here it is necessary to study the deposit and the ripples as they. solidify. At the correct rate of travel in a straight line, the deposits will pile up evenly into a smooth and regular bead. Otherwise there will be lumps and craters. Study the five lines of weld illustrated in Fig. 3, and practise until the line E can be copied with ease. Line A will look very similar, and may be considered satisfactory, but is, in fact, piled too high and
has little penetration. • Now let us consider penetration, as this is the key to good work, and can be learned by a study of your test runs. However, as proficiency improves, watching the crater formed by the arc will serve better. Too high a current or too heavy an electrode will give excessive penetration and will result in " undercut " (see Fig. 4). Conversely, too slow a rate of travel will pile up the bead and cause "overlap ", with poor penetration and a weak weld. Take a look at line A again and you will note that the bead is standing too high on the work and can have little grip. Care should be taken to ensure the correct current at all times, and this information is provided on the electrode packet.
Another point to watch is the machine settings. As the machine 'is dependent for its power from an outside supply, it may be found that machine settings vary a little. Therefore it is wise to test out the settings with trial runs and be guided by this, although it is surprising how soon you will be making slight adjustments based on knowledge gained from practice. This does not infer that the machines are incorrectly calibrated, but it does mean that in heavy industrial areas the incoming voltage may vary, and at peak periods the drop may be considerable.
alectrodes Regarding electrodes, a wrong practice is often noted with part-time welders—the habit of bending the electrode to suit the user. There are several good reasons why this is wrong. First, unless the electrode has its flux coating spirally wound, the flux will invariably crack and shell away at the bend and can spoil a run of otherwise good welding. Second, bending the electrode is no way to learn, as a constant hand adjustment is needed. It is far better to practise with a straight rod, and only bend the correct rod when experienced or when no other approach is possible to a particular job. Third, electrodes are expensive, and to have the floor littered with half-used rods is doubling the cost of the job. The main reason for this waste is because of bending the electrode, when the core will slag over and prevent a restart by refusing to strike; or, the rod will not flow and will stick to the work.
One of the main problems for the beginner is in controlling the arc and in maintaining the steady and even rate of deposit. All too often the operator will grip the rod holder too tightly, to the detriment of his run, and the harder he grips, the more he will wobble. Apart from the correct arc gap and rate of travel, it is necessary to be relaxed. The grip should be firm, but light, and the wrist supple, as accurate control is difficult with tensed muscles. Practise relaxed holding and in a short time you will find the electrode almost riding along on its own arc. This is the condition of " feel " to aim for, and once achieved a firm foundation is laid for first-class work. Many beginners miss this point and tend to hurry along to the more complex tasks with the wrong basic approach. Confirmation of the need for good, light hand control is borne out by the fine work seen during the last War from the lighter touch of female welders.
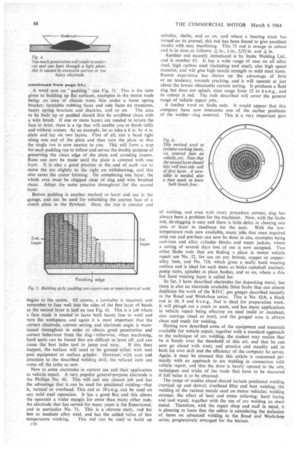
The various instructions described are fundamental, and once mastered, the practice of welding becomes easy and other techniques can be approached with confidence. The first stages however, are the hardest and longest to perfect, but once the fitter or mechanic has acquired proficiency in the stages described he can move on to the more difficult tasks. A word now on "padding" (see Fig. 5). This is the term given to building up flat surfaces, examples in the motor trade being: an area of chassis worn thin under a loose spring bracket; turntable rubbing faces and side faces on trunnions, heavy spring brackets and shackles, and so on. The area to be built up or padded should first be scrubbed clean with a wire brush. If one or more layers are needed to return the face to level, there is a tip that will enable you to finish tidily and without craters. As an example, let us take a 6 in. by 4 in. plate and lay on two layers. First of all, run a bead right along one end of the plate and then turn the plate so that the single run is now nearest to you. This will form a stop for each padding run to follow and serves the double purpose of preserving the clean edge of the plate and avoiding craters. Runs can now be made until the plate is covered with one layer. It is also a good practice at the end of each run to move the arc slightly to the right on withdrawing, and this also saves the crater forming. On completing one layer, the whole area must be chipped clear of slag and wire brushed clean. Adopt the same practice throughout for the second layer.
Button padding is another method to learn and use in the garage, and can be used for rebuilding the uneven face of• a clutch plate in the flywheel. Here, the run is circular and begins in the centre. Of course, a turntable is required, and remember to fuse well into the sides of the first layer of beads as the second layer is laid on (see Fig. 6). This is a job where a face mask is needed to leave both hands free to weld and turn the workpiece, and again it is most important that the correct electrode, current setting and electrode angle is maintained throughout in order to obtain good penetration and correct behaviour from the slag—otherwise, when machining, hard spots can be found that are difficult to level off, and can cause the best lathe tool to jump and miss. If this does happen, the surface will need to be ground either with tool post equipment or surface grinder. However, with care and attention to the described welding drill, the refaced item can come off the lathe as new.
Now to some electrodes in current use and their application to vehicle repair. A very popular general-purpose electrode is the Phillips No. 48. This will suit any chassis job and has the advantage that it can be used for positional welding—that is, vertical or overhead. This rod at 10 s.w.g. can be used on any mild steel operation. It has a good flux and this allows the operator a wider margin for error than many other rods. An electrode that has served for many years is the Eutecticrod, and in particular No. 71. This is a chrome •rrioly. rod for low or medium alloy steel, and has the added value of low temperature working. This rod can be used to build up F16
spindles, shafts, and so on, and where a bearing track has turned on its journal, this rod has been found to give excellent results with easy machining. This 71 rod is orange in colour and is in sizes as follows: Ain., i in., 5/32 in. and 114 in.
Another rod recently introduced is by Stubs Welding Ltd., and is number 65. It has a wide range of uses on all alloy steel, high carbon steel (including tool steel), also high speed material, and will give high tensile strength to mild steel items. Recent experience has shown up the' advantage of little or no tendency towards cracking, and it will operate at, just about the lowest obtainable current setting. It produces a fluid slag but does not splash, sizes range from 12 to 6 s.w.g., and its colour is red. The rods described will cover the general range of vehicle repair jobs.
A further word on Stubs rods. It would appear that this company have now overcome one of the earlier problems of the welder—slag removal. This is a very important part of welding, and even with every procedure correct, slag has always been a problem for the machinist. Now, with the Stubs rod, de-slagging is easy and there is little delay in clearing one
area or layer in readiness for the next. With the lowtemperature rods now available, many jobs that once required strip out and pre-heat can now be done in situ, examples being cast-iron and alloy cylinder blocks and water jackets, where .a saving of several days loss of use is now accepted. Two other Stubs rods that are finding a place in motor vehicle repair are No. 32, for use on any bronze, copper or copperalloy item, and No. 710, which gives a really hard wearing surface and is ideal for such items as brake camshaft journals. pump rams, spindles in plain bushes, and so on, where a thin hut hard wearing layer is called for.
So far, I have described electrodes for depositing metal, but there is also an electrode available from Stubs that can almost duplicate the work of the B.O.C. gas gouger described recently in the Road and Workshop series. This is No. 82A, a black rod in 10, 8 and 6 s.w.g., that is ideal for preparation work. It will plough out a crack or seam, and has many applications in vehicle repair being effective on steel (mild or stainless), also castings (steel or iron), and the gouged area is always clean and ready for welding.
Having now described some of the equipment and materials available for vehicle repair, together with a standard approach to the technique of arc welding, the student may realize that he is barely over the threshold of this art, and that he can now go ahead with study and practice and steadily add to both his own skill and the efficiency of the company he serves. Again, it must be stressed that this article is concerned primarily with an approach to arc welding in connection with vehicle repair, and that the door is barely opened to the arts, techniques and tricks of the trade that have to be mastered if full value is to be obtained.
The range of studies ahead should include positional welding (vertical up and down); overhead fillet and butt welding; the welding of the various metals used on motor vehicles; welding stresses; the effect of heat and stress relieving; hard facing and tool repair, together with the use of arc welding on shed metal. Therefore, with the repair shop and staff in mind, it is pleasing to learn that the editor is considering the inclusion of items on advanced welding in the Road and Workshop series, progressively arranged for the trainee.