


FORD VAN POINTERS.
Page 27
Page 28
If you've noticed an error in this article please click here to report it so we can fix it.
, By R. T. Nicholson (Author of "The Book of the Ford").
WHEN THE big-end bearings are very far gone —that is, when the wear at the lower end of the connecting-rod bearings,, is great—the t9 n 1 y way to fix things up, is to give the garage can a job. Fixing things up in that cast means taking
the engine out. . But when the -wear is only slight any handy man can 'do the job. . _
143.—Symptoms of Slack Big-end Bearings.
The chief symptom is a "flappetylflop".knock when the engine is running free—that is, tinder little power; say, when you throttle down with plenty of way on, i . for instance, in running down a slight hill, starting at
'a good pace. ,Then the van is really driving the en: gine, rather than the other way round. • At such a time the " flappetY-flop " knock asserts itself.
• How Often Should Bearings be Tightened ?
Connecting-rod big-end bearings ought to . be tightened about once in every ,5,009 Miles running. A good deal of wear and tear comes on the big-ends. Thee small .ends—through Which the gudgeon pins pass inside the pistons—wear far less, and can be trusted to -go On for a very long mileage,tif proper attention has been given to engine lubricatio-la. •
The Way to Start on the Job.
Remove crankcase lower cover. (It is not necessary to drain the oil out of the crankcase first, as very little oil lodges in the sumps in the lower cover.) I have described the way in which this is done in previous "Pointers," but I will briefly go over the ground again. Get under. the van, so that you can get at the cover easily. Take out the 14 cap screws in the cover with a fixed 5.-16-in. wrench. (An adjustable spanner is an abomination for this job.) It is best to xernoveall the cap screws' except one at the back and one at the front. These will hold the cover up. Then loosen those two with the wrench so that you can easily finger them out. Then, holdink the cover up. .with one hand, turn each screw out with a finger and thumb of the other hand, and so lower the cover in a level position. This will prevent the oil in the sumps pouring cut over you—up your sleeves, into youi eyes, or elsewhere. But it you do not mind what happeru3 to your clothes or your complexion, go ahead any old way-with the cap screws. I was only thinking of your comfort and cleanliness.
Just inside the crankcase you will be able to feel two U-shaped metal strips. (The cap screws, when in position, are really held up by these strips—not by the crankcase itself.) Better pull the strips out, or they may fall 'back into the rounded portion of the crankcase, and will be no end of a trouble to get out. In removing the cover be tender with the felt gasket, which will probably come away with the cover. On the other hand, it may stick to the erankcase itself. If so, better remove it. And go tenderly : do not tear it.
To release compression better take out the sparking • plugs, so that you may be able to turn the starting handle easily later on, and be able also to leave the pistons and connecting rods at any position in which you want them. Better still, remove the cylinder head altogether. You will then, of course, have no compression at all—which is exactly what you want for the time being. I have elsewhereeclescribed the way in which the cylinder head is removed.
Tools Needed for the Operation.
You want some special tools now. Again, avoid all adjustable wrenches : they are useless for the job in hand—worse than useless—mischievous.
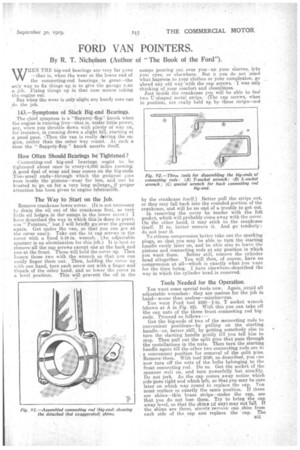
You want Ford tool 2320—i-in. T socket wrench (shown at A in. Fig. 92). With this you can take off the cap nuts of the three front connecting rod bigends. Proceed as follows :— Get the big-ends of two of the connecting rods to convenient positions—by pulling on the start-mg handle—or, better still, by getting somebody else to turn the starting handle gently. till you tell him to stop. Then pull out the split pins that pass through the castellations in the nuts. Then turn the starting handle again till the ,other two connecting rods are in . a convenient position for removal of the split pins. Remove-them. With tool 2320, as described, you can now turn off the nuts of the bolts belonging to the front connecting rod. Do so. Get the socket of the spanner well on, and turn powerfully but steadily. 'Do not jerk. As the cap comes away notice which sidegoes right and which left, so that,you may be sure later on which way round to replace the cap. You must replace in exactly the same position. If there are shims—thin brass strips—under the cap, see that you do not lose them. Try to bring the cap away level, so that the shins (if any) may norfall. If the shims are there, sitenly remove one _shim from each side of the cap arsa replace the cap. The 3351 •
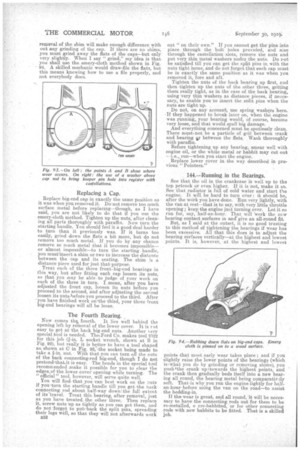
removal of the shim will make enough difference with out any grinding of the cap. If there are no shims, you must grind away the flats of the caps—but only very slightly. When I say " grind," my idea is that you shall use the emery-cloth method shown in Fig.
94. A skilled mechanic would draw-file the fiats, but this means knowing how to use a. file properly, and not everybody does.
Replace big-end cap in exactly the same position as it was when you removed it. Do-not remove too much surface metal before replacing—though, as I have said, you are not likely to do that if you use the emery-cloth method. Tighten up the nuts, after clean -. ing all parts thoroughly with paraffin. Now turn the starting handle. You should feel it a good deal harder to turn than it previously was. If it turns too easily, grind down the flats a bit more, but do not remove too much metal. If you do by any chance remove so much metal that it becomes impossible— or almost impossible—to turn the starting handle, you must'insert a shim or. two to increase-the distance between the eap and its seating. The shim is a distance piece used for just that-purpose. Treat each of the three front-big-end bearings in this way, but after fitting each cap loosen its nuts, so that you may he able to judge of your work on each of the three in turn. I,mean, after you have adjusted the front cap, loosen its nuts before you proceed to the second, and after adjusting the second loosen its nuts :before-you proceed to the third. After you have finished work onithe.third, your three tront big-end bearings will all be loose.
The Fourth Bearing. ,
Now comes 01% fourth. It lies well behind the opening left by removal of the lower cover. It is rot easy to get at the back big-end nuts. Another ery special tool is needed. Thed'ord Co. makes tool 2322 for this job (i-in. L socket wrench, shown at B in Fig. 92), but really it is better to have a tool shaped as. shown at C in Fig. 92, the socket being made to take a Fin. nut. With that you can turn off the nuts of the back connecting-rod big-end, though I do not
th pretendrat.it is easy. The bends in the special ttiol recommended make it possible for you to dear the edges, of the lower cover opening •while turning. The "official" tool, however, will serve quite well.
You will find, that you can best work on the nuts if yowl-urn the starting handle till you get the back connecting rod about half-way down:the full extent of its'travel. Treat this bearing, after removal, just as you have treated, the other three. Then replace it, screw nuts up as tightly as you can get them, and do not -forget to put' back the split pins, spreading their legs well, so that they will not afterwards work
out "on their own." If you cannot get the' pins into place through the bolt holes provided, and also through the castellation slots, remove the nuts and put very thin metal washers under the nuts. Do not be satisfied till you can get the split pins in, with the nuts tight home, and do not forget that each cap must be in exactly the same pogition as it was when you removed it, fore and aft. Tighten the nuts of the back bearing up first, and then tighten up the nuts of the other three, getting them really tight, as in the case of the back bearing, using very thin washers as distance pieces, if necessary, to enable you to insert the snlit pins when the nuts are tight up. . Do not, on any account, use spring washers here. If they happened to break later on, when the engine was running, your bearing would, of course, become very loose, and that would spell big damage. And everything concerned must be spotlessly clean. There must•not be a particle of grit between crank and bearing r between the flats. Wash thoroughly with paraffin. Before tightening up any bearing, smear well with engine oil, or the white metal or babbit may cut out ---i.e., run—when you start the engine. Replace lower cover in the way described in previous "Pointers."
144.—Running in the Bearings.
See that the oil in the crankcase is well up to the top petcock or even higher. If it is not, make it so. See that radiator is full of cold water and start the engine. It will be hard to turn over : it should be, after the work you have done. Run very lightly, with the van at rest—that is to say, with very little throttle opening ; keep the engine just turning over. Let it PO run for, say, half-an-hour. That will 'work the new bearing contact surfaces in andgive an all-round fit.
But, as I said at the outset, it is no good trusting to this method of tightening the bearings if wear has been excessive. All that this does is to adjust the bearing surfaces vertically—at the highest and lowest points. It is, however, at the highest and lowest points that most early wear takes place; and if you slightly raise the lower points of the bearing (which is what you do by grinding or removing shims), you push 'the crank up towards the highest points, and the crank then gradually beds itself into a new bearing all round, the bearing metal being comparativgy soft.. That-is why you run the engine-lightly for halfan-hour-before using the van on the road—to assist the bedding-in.
If the wear is great, and all round, it will be necessary to havethe connecting rods out for them to be re-metalled, o rre-babbited,or for other connecting rods with new babbits to be fitted. That is a skilled job.