


FORD VAN POINTERS.
Page 17
Page 18
If you've noticed an error in this article please click here to report it so we can fix it.
By R. T. Nicholson (Author of "The Book of the Ford ").
THE LOW-TENSION wires are, of course, those that run from the back of the coil to the commutator (or contact breaker). There are four of them, enclosed in an outer cover, or sheath, and the whole collection is called by the Ford Co. a "loom!' (There is a fifth wire that is concerned with the electric lighting, running from the magneto to the light switch, but we are not dealing with that here, though some of the advice to be given will apply to that also)."
65.—Care of the Low-tension Wires.
If you have read my previous Pointers, you will know the difference between these low-tension wires and the high-tension wires that run (from a lower level) to the sparking plugs. The sparking plug wires (or cables) are thicker.
All four low-tension wires are covered with insulating material. You cannot see the wires themselves, except, perhaps, at their ends : they are 'hidden by the insulating material. The wires are soldered up at each end to eyelets or are twisted into eyelets. ,
66.—Keep the Insulation Good.
It is important that the insulation should be gOod right from one end to the other. There should be no trays, breaks, or cuts in it. At the contact breaker (or commutator) end the insulation should reach as far as possible towards the binding-screw there. Further, it is important that it should not get soddened with oil or water—particularly water—as it is apt to do at the contact breaker end.
If the insulation gets stripped at any point, or if it gets badly saddened with oil or water, and the stripped or sodden part comes into contact with any metal, or other electrical conductor, there will be a short circtit at that point, and you will either get no firing from that particular wire or you will get wrong firing—firing out of proper time in one of the cylinders. .
To prevent the insulation getting stripped, treat the wires tenderly when you handle them. See that they cannot chafe on anything. See particularly that they cannot get cut by the rotating fan.
67.—'Ware Oil
To prevent their getting oil-soddened near the contact breaker, be careful when you are pouring engine oil through the breather pipe. Do not slop oil about —and it is easy to do so unless you are careful. Always use a funnel for the job. In lubricating the contact breaker itself, try to prevent oil overflowing from it.
While it takes a lot of oil soaking to make the wires electrically useless, there is no doubt that they work better if kept reasonably free from oil. An oilsoddened wire leaks electricity, and, while it may still serve to conduct most of it, it works best when it conducts all of it. it is, however, difficult to keep the oil away fronl the wires near the contact breaker, as a good deal of oil gets thrown out from the engine itself in that neighbourhood. When the insulation gets oily, it is a good thing to give it a wipe with a rag containing a little petrol. For this purpose, take the contact breaker cover off—simply swinging back the spring that keeps it in working position, and not removing its pull-rod. (In doing this, do, not be brutal with the pull-rod, or you may snap it). The spring can he swung back if its nut is first loosened. You will then be able to apply the petrol rag to the wires .easily.
68.—Wet Wires.
You cannot treat wet wires in that way—wires soaked with water. You must just keep the water off the wires, and it is quite easy to do so. When hosing the van, for instance, do not squirt water in such a wayas to let it get into the neighbourhood of the contact breaker ; do not, above all things, squirt at the radiator, or the water will get through the fins and lodge on the wires or on the -contact breaker cover, and then you may have a puzzling case of misfiring, no firing, or back-firing, when you next' try to start. The water will get dried out later when the engine gets warm, and good firing will then return-
but you do not want to have to wait for that! Therefore, keep water away from the contact breaker. A slopping or leaky radiator or water joints may cause temporary trouble of the same kind.
If the insulation is badly frayed, or rotten-looking at the commutator end, it is best to bandage it with insulating tape (to be bought of any motor accessory dealer) or to run on a short length of rubber tubing. This will restore the insulation. Insulating tape is the plaster for such wounds.
69.—The Colour Scheme for the Ignition Wires.
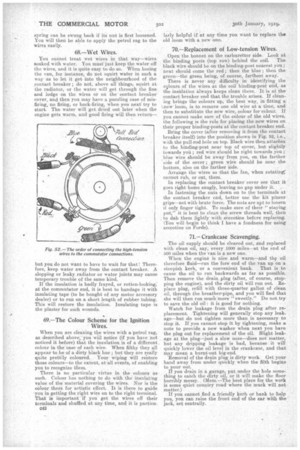
When you are cleaning the wires with a petrol rag, as described abeve,'you will notice (if you have not noticed it before) that the insulation is of a different . colour in the case of each wire. When filthy they all appear to be of a dirty black hue ; but they are really quite prettily coloured. . Your wiping will restore those colours—to the extent, at all events, of enabling you to recognize them.
There is no particular virtue in the colours as such. Colour has nothing to do with the insulating value of the material covering the wires. Nor is the colour there for artistic effect. It is there to guide you in getting the right wire on to the right terminal. That is important if you get the wires off their terminals and shuffled at any time, and it is particu
042 larly helpful if at any time you want to replace the old loom with a new one.'
70.—Replacement of Low-tension Wires.
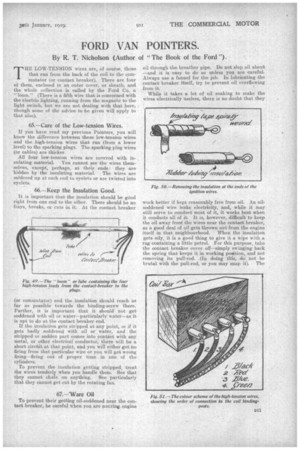
Open the bonnet on the carburetter side. Look at the binding posts (top row) behind the coil. The black wire should be on the binding-post nearest you ; next should come the red ; then the blue ; then the green—the green being, of course, farthest away. There is never any difficulty in identifying the cgiours of the wires at the coil binding-post end, as the insulation always keeps clean there. It is at the contact breaker end that the trouble arises. If cleaning brings the colours up, the best way, in fitting a ',new' loom, is to remove one old wire at a time, and then to substitute the new wire, colour for colour. If you cannot make sure of the colour of the Old wires, the following is the rule for placing the new wires on their proper binding-posts at the contact breaker end. Bring the cover (after removing it from the contact breaker itself) into the position shown in Fig. 52, i.e., with the pull-rod hole on top. Black wire then attaches to the binding-post near top of cover, but slightly towards you; red wire should be right towards you ; blue wire should be away from you, on the farther 'side of the cover; green wire should be near the bottom, also on the farther side. . Arrange the wires so that the fan, when rotatine cannot rub, or cut, them. In replacing the contact breaker cover •see that it goes right-home sriuglY, leaving no gap under it.
In fastening the nuts down on to the terminals at the contact breaker end, better use the kit pincer grips—not with brute force. The nuts are apt to loosen if only finger tight. To make sure of their "staying put," it is best to clean the screw threads well, then to dab them lightly with seceotine befcre replacing. You will begin to think I have a fondness for using seecotine on Fords).
71.— Crankcase Scavenging.
The oil supply should be cleared out, and replaced with clean oil, say, every 1000 iniles—at the end of 500 miles when the van is a new one.
When the engine is nice and warm—and th9 oil therefore fluid—run the fore end of the van up on a
steepish kerb, or a convenient bank. That is to cause the oil to run backwards as far as possible. Then remove the drain, plug (after, of course, stopping the engine), and the dirty oil will run out. Replace plug, refill with three-quarter gallon of clean oil, through the breather-pipe, and you will find that she will then run much more "sweetly." Do not try to save the old oil it is good for nothing.
Watch for leakage from the drain plug after replacement. Tightening will generally stop any leakage—hut do not tighten more than is necessary to stop it. If you cannot stop it by tightening, make a note to provide a new washer when next you have the plug out for replacement of the oil. Slight leakage at the plug—just a slow ooze—does not matter, but any dripping leakage is bad, because it will quickly lower the oil level in the crankcase, and that may mean a burnt-out big-end. "Removal of the drain plug is dirty work. Get your hand away from under quickly when the filth begins to pour out.
If you drain in a.garage, put under the hole something to catch the dirty oil, or it will make the floor horribly messy. (Mem.—The best place for the work is some quiet country road where the muck will not matter.)
If you cannot find a friendly kerb or bank to help you, you can raise the front end of the car with the Jack, set centrally.