


FORD VAN POINTERS.
Page 16
Page 17
If you've noticed an error in this article please click here to report it so we can fix it.
By R. T. Nicholson (Author of "The Book of the Ford ").
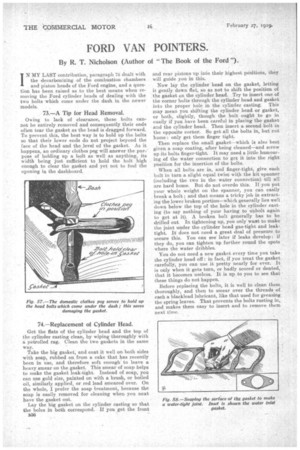
IN MY LAST contribution paragraph 7.2 dealt with the decarbonizing of the combustion chambers and piston heads of the Ford engine, and a question has been raised as to the best means when removing the Ford cylinder heads of dealing with the two bolts which come under the dash in the newer models.
73.—A Tip for Head Removal.
Owing to lack of clearance, these bolts cannot be entirely removed and consequently their ends often tear the gasket as the head is dragged forward. To prevent this, the best way is to hold up the bolts so that their lower ends do not project beyond the face of the head and the level of the gasket. As it happens, an ordinary clothes peg will answer the purpose of holding up a bolt as well as anything, its width being just sufficient to hold the bolt high enough to clear the gasket and yet not to foul the opening in the dashboard.
74.—Replacement of Cylinder Head.
Get the flats of the cylinder head and the top of the cylinder casting clean, by wiping thoroughly with a petrollecl rag. Clean the two gaskets in the same way.
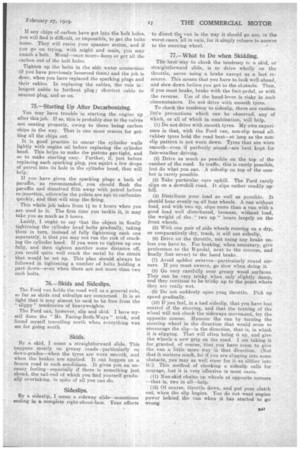
Take the big gasket, and coat it well on both sides with soap, rubbed on from a cake that has recently been in use, and therefore soft enough to leave a heavy smear on the gasket. This smear of soap helps to make the gasket leak-tight. Instead of soap, you can use gold size, painted on with a brush, or boiled oil, similarly applied, or red lead smeared over. On the whole, I prefer the soap treatment, because the soap is easily removed for cleaning when you next have the gasket out.
Lay the big gasket on the cylinder casting so that the holes in both correspond. If you get the front 536 and rear pistons up into their highest positions, they. will guide you in this.
Now lay the cylinder head on the gasket, letting it gently down flat, so as not to shift the position of the gasket on the cylinder head. Try to insert one of the corner bolts through the cylinder head and gasket into the proper hole in the cylinder casting. This may mean you shifting the cylinder head or gasket, or both, slightly, though the bolt ought to go in easily if you have been careful in placing the gasket and the cylinder head. Then insert a second bolt in the opposite corner. So get all the bolts in, but not home : only get them finger tight.
Then replace the small gasket—which is also best given a soap coating, after being cleaned—and screw up its bolts finger-tight. It may need a little humouring of the water connection to get it into the right position for the insertion of the bolts.
When all bolts are in, and finger-tight, give each bolt in turn a slight equal twist with the kit spanner (including the two in the water connection) till all are hard home. But do not overdo this. If you put your whole weight on the spanner, you can easily break a bolt ; and that means a tricky job in extracting the lower broken portion—which generally lies well down below the top of the hole in the cylinder casting (to say nothing of your having to unbolt again to get at it). A broken bolt generally has to be drilled out. In tightening up, you only want to make the joint under the cylinder head gas-tight and leaktight. It does not need a great deal of pressure to secure this. YOU can see later if leaks develop if they do, you can tighten up further round the spots where the water dribbles.
You do not need a new gasket every time you take the cylinder head off : in fact, if you treat the gasket carefully, you can use it pretty nearly for ever. It is only when it gets torn, or badly scored or dented, that it becomes useless. It is up to you to see that these things do not happen.
Before replacing the bolts, it is well to clean them thoroughly, and then to smear over the threads of each a blacklead lubricant, like that used for greasing_ the spring leaves. That prevents the bolts rusting in, and makes them easy to insert and to remove them next time. If any chips of carbon have got into the bolt holes, you will find it difficult, or impossible, to get the bolts home. They will resist your spanner action, and ifyou go on trying, with might and main, you may smash a bolt. Moral—once more—keep or get all the carbon out of the bolt holes.
Tighten up the bolts in the side water connection (if you have previously loosened them) and the job is done, when you have replaced the sparking plugs and their cables. In replacing the cables, the rule is : longest cable to farthest plug ; shortest cable to nearest plug, and so on.
75.—Starting Up After Decarbonizing.
You may have trouble in starting the engine up after this job. If so, this is probably due to the valves not seating properly, owing to there being carbon chips in the way. That is one more reason for getting all the chips out.
It is good practice to smear the cylinder walls lightly with engine oil before replacing the cylinder head. This helps to make the pistons gas-tight, and so to make starting easy. Further, if, just before replacing each sparking plug, you squirt a few drops of petrol into its hole in the cylinder head, that will help.
If you have given the sparking plugs a bath of paraffin, as recommended, you should flush the paraffin and dissolved filth away with petrol before re-insertion, otherwise the points are apt to carbonize quickly, and that will stop the firing.
This whole job takes from lei to 2 hours when you are used to it. The first time you tackle it, it may take you as much as 3 hours.
Lastly, I ought to say that the object in finally tightening the cylinder head bolts gradually, taking them in turn, instead of fully tightening each one separately, is that you may not run the risk of cracking the cylinder head. If you were to tighten up one fully, and then tighten another some distance off, you could quite well crack the metal by the strain that would be set up. This plan should always be followed in tightening a number of bolts holding a part down—even when there are not more than two such bolts.
76.—Skids and Sideslips.
The Ford van holds the road well as a general rule, so far as skids and sideslips are concerned. It is so light that it may almost be said to be free from the " slippy " tendencies of heavyweights.
The Ford can, however, slip and skid. I have myself done the "Mr. Facing-Both-Ways" trick, and found myself travelling north when everything was set for going south.
Skids.
By a skid, I mean a straightforward slide. This happens. mostly on greasy roads—particularly on down-grades—when the tyres are worn smooth, and when the brakes are applied. It can happen on a frozen road in such conditions. It gives you an uncanny feeling—especially if there is something just ahead, the tail-end of which you find yourself gradually overtaking, in spite of all you can do.
Sideslips.
By a sideslip, I mean a sideway slide—sometimes ending in a complete right-about-face. Your efforts to direct the van in the way it should go are, in the worst cases, all in vain, for it simply refuses to answer to the steering wheel.
77.—What to Do when Skidding.
The best way to cheek the tendency te a skid, or straightforward slide, is to drive wholly on the throttle, never using a brake except as a last re source. This means that you have to look well ahead, and slow down before you get to the obstacle. Then, if you must brake, brake with the foot-pedal, or with the reverse. Use of the hand-lever is risky in such circumstances. Do not drive with smooth tyres.
To check the tendency to sideslip, there are various little precautions which can be observed, any of which, or all of which in combination, will help.
(1) Do not drive with smooth tyres. My own experience is that, with the Ford van, non-slip tread all rubber tyres hold the road best—so long as the nonslip pattern is not worn down. Tyres that are wOrn smooth—even if perfectly sound—are best kept for fair-weather driving.
(2) Drive as much as possible on the top of the camber of the road. In traffic, this is rarely possible, but do what you can. A sideslip on top of the camber is rarely possible.
(3) Take particular care uphill. The Ford rarely slips on a downhill road. It slips rather readily uphill.
(4) Distribute your load as well as possible. It should bear evenly on all four wheels. A van without load, and with two up, slips more than a van with a good load well °distributed, because, without load, the weight of the :` two up" bears largely on the front wheels.
(5) With one pair of side wheels running on a dry, or comparatively dry, track, it will not sideslip.
(6) Drive on the throttle, not using any brake unless you have. to. For braking, when necessary, give preference to the B-pedal, next to the reverse, and finally (but never) to the hand brake.
(7) Avoid sudden swerves—particularly round corners. If you must swerve, go slow when doing it.
(8) Go very carefully over greasy wood surfaces. They can be very tricky when only slightly damp, and they continue to be tricky up to the point where they are really wet.
(9) Do not suddenly open your throttle. Pick up speed gradually.
(10) If you feel, in a bad sideslip, that you have lost control of the steering, and that the turning of the wheel will not check the sideways movement,, try the opposite course. Humour the van by turning the steering wheel in the direction that would seem to encourage the slip—in the direction, that is, in which . it is slipping. That will often bring it up, and give the wheels a new grip on the road. I am taking it for granted, of course, that you have room to give the van a little moreway, in that direction. (Not that it matters much, for if you are slipping into some.
obstacle, you may as well steer for it as slither 'into it!) This method of checking a sideslip calls for courage, but it is very 'effective in most eases.
(11) Non-skid chains on wheels at opposite corners —that 'is, two in all—help.
(12) Of course, throttle down, and put your clutch out, when the slip begins. You do not want engine power behind the van when it has started to go wrong.