


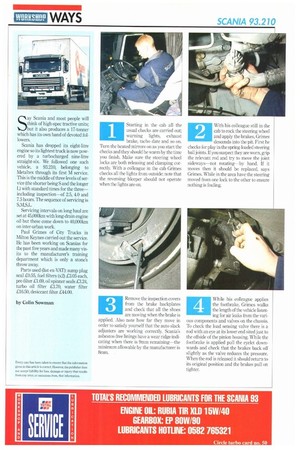
Starting in the cab all the usual checks are carried
Page 115
Page 116

Page 117
Page 118

If you've noticed an error in this article please click here to report it so we can fix it.
out; warning lights, exhaust brake, tacho date and so on. Turn the heated mirrors on as you start the checks and they should be warm by the time you finish. Make sure the steering wheel locks are both releasing and clamping correctly. With a colleague in the cab Grimes checks all the lights from outside: note that the reversing bleeper should not operate when the lights are on.
1
With his colleague still in the cab to rock the steering wheel and apply the brakes, Grimes descends into the pit. First he checks for play in the spring-loaded steering ball joints. If you suspect they are worn, grip the relevant rod and try to move the joint sideways—not rotatingby hand. If it moves then it should be replaced, says Grimes. While in the area have the steering moved from one lock to the other ID ensure nothing is fouling.
2
Remove the inspection covers from the brake backplates and check that all the shoes are moving when the brake is applied. Also note how far they move in order to satisfy yourself that the auto slack adjusters are working correctly. Scania's asbestos-free linings have a wear ridge indicating when there is 9min remaining—the minimum allowable by the manufacturer is 8mm.
3
While his colleague applies the footbrake, Grimes walks the length of the vehicle listening for air leaks from the various components and valves on the chassis. To check the load sensing valve there is a rod with an eye at its lower end sited just to the offside of the pinion housing. While the footbrake is applied pull the eyelet downwards and check that the brakes back off slightly as the valve reduces the pressure. When the rod is released it should return to its original position and the brakes pull on tighter.
4
While in the area carry out a test on the shuttle valve— called by some the anti-compounding valve. With the footbrake still applied look at the brake chambers while the handbrake is operated. Again the brakes should back off slightly and may then re-apply as the valve operates. This completes all the two-man checks. Back on ground level give the vehicle a general check round looking at items such as the battery fixing and electrolyte levels. The rubber seals and mountings on the air trunking up the back of the cab should be checked. Make sure that all items like air and fuel tank mountings are secure. Look at the rear shackle pins to check that the gap between it and the saddle has not closed up at the bottom (where shown). If it has, the cure is a new saddle. Check also the tell-tale holes in the rear hub for any sign of an oil leak.
6
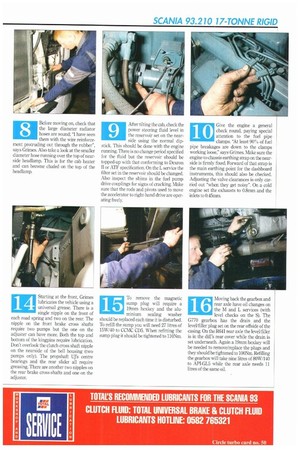
The front grille is lifted to reveal the clutch fluid reservoir set high on the offside. While there is no change period specified, topping up should be done with fluid to DOT 3 specification. While in the area take hold of the steering shaft near the universal joint and twist it to detect any lift or play. The antifreeze level in the cooling system should be checked to ensure it gives protection down to -15°C (-20°C on the Continent). Scania says the coolant can continue to be used as long as it is "clear and clean". Before moving on, check that the large diameter radiator hoses are sound; "I have seen them with the wire reinforcement protruding out through the rubber", says Grimes. Also take a look at the smaller diameter hose running over the top of nearside headlamp. This is for the cab heater and can become chafed on the top of the headlamp.
8
After tilting the mb, check the power steering fluid level in the reservoir set on the nearside using the normal dipstick. This should be done with the engine running. There is no change period specified for the fluid but the reservoir should be topped-up with that conforming to Dexron II or ATF specification. On the L service the filter set in the reservoir should be changed. Also inspect the shims in the fuel pump drive couplings for signs of cracking. Make sure that the rods and pivots used to move the accelerator to right-hand drive are operating freely.
9
10 Give the engine a general
check round, paying special attention to the fuel pipe clamps. At least 90% of fuel pipe breakages are down to the clamps working loose," says Grimes. Make sure the engine-to-chassis earthing strap on the nearside is firmly fixed. Forward of that strap is the main earthing point for the dashboard instruments, this should also be checked. Adjusting the valve clearances is only carried out "when they get noisy". On a cold engine set the exhausts to 0.8mm and the inlets to 0.45mm.
onds to check that the gear lever, its associated ball joints and pivots, are moving freely and without excess play. He also makes sure the fan cowling is secure and that the fanbelts are not damaged. There should be 25mm of play on the longest run of the belts. Also on the M and L services, provided 45,000km has been covered, the desiccant filter should be changed. The air drier is positioned just ahead of the front nearside wheel and the filter is removed with a strap wrench.
12 After elevating the front axle
Grimes moves back up to ground level to check the kingpin lift and wheel bearing play. Kingpin lift is determined by placing a bar underneath the tyre and levering upwards. To check the bearings Grimes spins the wheel and listens for the tell-tale rumbling. Having lowered the axle again the wheels nuts can be torqued up. All the studs have a right-hand thread and require 600Nm of tightening.
13 Clutch wear is checked by
measuring the actuating lever from the boss to where the two locknuts touch. With a new clutch the distance is 64-66mm but when it drops below 48mm the clutch plate should be replaced. Check the propshaft U.js for play and the rear pinion for lift in the bearing. Give the underside of the vehicle a general once over using a small hammer to "sound" items like engine and gearbox mountings and all retaining bolts you can get to. With the spring hangers "if you can't get your hand through there is a problem", says Grimes.
14 Starting at the front, Grimes
lubricates the vehicle using a universal grease. There is a single nipple on the front of each road spring and two on the rear. The nipple on the front brake cross shafts require two pumps but the one on the adjuster can have more. Both the top and bottom of the kingpins require lubrication. Don't overlook the clutch cross shaft nipple on the nearside of the bell housing (two pumps only). The pmpshaft Urs centre bearings and the rear slider all require greasing, There are another two nipples on the rear brake cross-shafts and one on the adjuster,
15 To remove the magnetic sump plug will require a
19mm hexkey and the alu minium sealing washer should be replaced each time it is disturbed. To refill the sump you will need 27 litres of 15W/40 to CCMC CD5. When refitting the sump plug it should be tightened to 110Nm. Moving back the gearbox and rear axle have oil changes on the M and L services (with level checks on the S). The G770 gearbox has the drain and the level/filler plug set on the rear offside of the casing. On the R641 rear axle the level/filler is in the diff's rear cover while the drain is set underneath. Again a 19mm hexkey will be needed to remove/replace the plugs and they should be tightened to 100Nm. Refilling the gearbox will take nine litres of 80W/140 to API-GL5 while the rear axle needs 11 litres of the same oil.
16 17 Back above ground the fuel
filters set on the nearside of the engine have to be changed. Scania specify the twin fillers be changed on the M and L service but some operators preferred them changed on the S as well. Remove the disposable canister type filters in the normal way using a strap wrench or similar. Smear a drop of oil onto the new filters seals before fitting. Screw each one on until the seal contacts the housing and then tighten a further half turn.
There is a pre-filter fitted to the Scania's fuel system. It is attached to the underside of the priming pump and should be cleaned out or changed on the M and L services. Undo the thumbscrew, slide the wire off and take the glass bowl off. After cleaning (replacing) the filter, insert it spring end first into the bowl and replace the assembly. To bleed the system loosen the screw on top of the twin filters' housing and use the priming pump. Having retightened the screw give a further half-dozen strokes and the engine should fire straight away. 18 19 Set on the offside of the engine
is a centrifugal oil filter which must be cleaned regularly when the oil is changed. Unfortunately it does not look like an oil filter and is often overlooked. Having located the unit remove the Chinese-hat-shaped cover by undoing the central nut and lift the spinner out. Undo the knurled nut, take the spinner apart and use a knife or screwdriver to clean the congealed muck from the inside.
Clean all the components thoroughly before reassembling and put a new 0-ring on the base of the centre to seal the outer and inner sections of the spinner. Reassemble the unit and put the knurled nut back on but don't overtighten it. Drop the spinner back into its housing and make sure it is free to rotate without excessive free play. Change the 0-ring on the cover, replace it and tighten the nut.
20 21 Set below the spinner and
tucked inside the offside chassis rail is the small oil fil ter for the turbocharger. This disposable canister type filter should be changed at the same intervals as the oil and is removed with the aid of a strap wrench. Access is somewhat restricted and Grimes finds it easier to get at from floor level. Simply remove the old filter, smear some oil round the seal of the new one and put it on. As with the other filters screw it on until the seal contacts the housing and then give a further half turn.
22 The final job is to change the
water filter which should be done on the M and L services.
Set just ahead of the turbo oil filter, this is another item that is often overlooked. Before removing the disposable element type filter with a strap wrench, turn the water tap (indicated) off. The filter is isolated when the tap is horizontal. Having put a smear of oil on the seal replace the filter with the usual touch plus half a turn. Don't forget to turn the tap back on. The service is now finished.