


FORD VAN POINTERS.
Page 19
Page 20
If you've noticed an error in this article please click here to report it so we can fix it.
By R. T. Nicholson (Author of "The Book of the Ford").
THE RE-LINING of the bands is a biggish job, and takes time. Two to three hours should be enough—though it will not be enough the first time you tackle it.
128.—When Does a Band Want Re-lining ?
A band wants re-lining whenever pressure on its pedal does not do what .yoa want it to do,. and when further taking up of the adjustments will not make things any better. Though I may say, here and now, that I do not believe in postponing replacement of a band till the last moment. When the adjustment is getting towards its limits, it is best to replace the band at the first convenient opportunity, even though it might hold on for a bit longer. It is a mistake to drive with the bands too thin—too near their last shreds, as it were. If you do, you are apt to wear them: right through and to get the metal part of the band hearing on the metal of the drum—and that means scoring and rapid wear, which is bad for the parts concerned.
Replace all Three.
' And I will repeat. what I have said before. When. you are replacing one band, it is a comparatively simple matter to replace all three. If you have distributed your braking over all three, as I have recommended over and over again, all three will be more or less worn, so that you may as well replace them all at tu. same time, and not have to open up again in
the ncar future for the same purpose. .
it is the opening up that takes the time---or rather, the opening up and the closing down afterwards. For "opening up" means taking off the transmission cover—not merely the small transmission cover door, but the whole cover. And that cover is held down by any number of bolts and nuts, and the nuts are all split-pinned on ; and you know what it means to shift a large number of split-pins—to say nothing of inserting a corresponding number of new split-pins later I say new split-pins because it is not good practice to use the old ones again—even if they look serviceable.
129.—Preliminaries in Re-lining the Brakes.
(1) Sla,cken back the big exhaust pipe pack nut, so that it is clear of its threads. Sometimes it is a bit of a job to budge this. In any case, a big spanner (not in the standard kit) will be wanted to start it. If • it will not start, let paraffin trickle down the threads under the nut. (When this is used, it is best to wait till everything is thoroughly cold.) Then fellow with
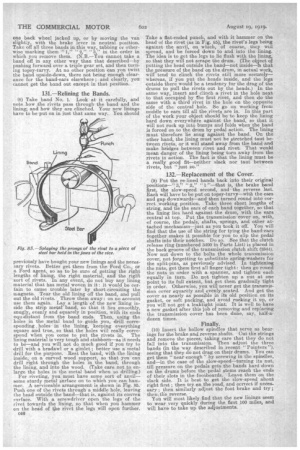
Fig. 84.—The best position of one of the tripte gear sets for facilitating removal of the brake bands.
• 'oil. Yoli may find it necessary to start the nut by .hammering the spanner. In any case, be careful in .,.puIling on the spanner, for it is possible to get a very nasty jag if the thing slips. Having got the nut off its threads, turn the exhaust pipe itself aside—out of the way as much as possible. (2) Remove magneto cable.
(3) Take off the transmission cover door.
(4) Slacken back the lock-nut of the spindle that adjusts the :brake (the back one on the left) and screw back the spindle itself till its spring is quite loose on its shaft. Do the same with the reverse adjusting not,and spindle. •Then slacken back the slow-speed nut till its spring is also quite loose. • (5) Remove all the nuts and bolts that hold the transmission cover on..This is the his business. It is 'madly a two-man job—one man turning the nuts off, and the other holding the bolt heads to prevent them from turning. As the split-pins are taken out, throw them away : you have no further use for them.
(6) The transmission cover can now be lifted right off, together with the pedals and other attachments. Lift it, and set it carefully aside. You have now the whole of the transmission exposed, and can get to work.
130.—Removal of Bands. •
(7) You next have to remove the metal bands with the old worn linings. Push forward, towards the radiator, that is, and over the triple gears (Fig. 84), the front band—the one nearest to the flywheel. Then twist the band sideways, so that its ears will point downwards towards the bottom of the flywheel. (You can spring the bands open slightly to make it easier to twist them.) You will then find that, with perhaps a little humouring, you can pull the band right out upwards_ It will come awayall the more readily if you torn the engine till one of the three triple gea,r sets (Fig. 84) stands at a little more than" five minutes past," that is, just beyond the upright, and away from you, as you stand by the front door of the van. You can get a triple gear set into proper position by turning the starting-handle with the clutch in, and with one back wheel jacked up, or by moving the van slightly, with the brake lever in neutral position. Take off all three bands in this way, tabbing or otherwise marking them "1," "2" "3" in the order in which you remove them. (N.B.—You cannot take a band off in any other way than that described—by pushing forward over a triple gear set, and then turning topsy-turvy. At no other position can you twist the band upside-down, there not being enough clearance for the band-ears elsewhere ;. and clearly, you cannot get the band out except in that position.
131.--Relining the Bands.
(8) Take band No. 1. Look at it carefully, and note. how the rivets pass through the band and the lining; and how they are clinched. Your new linings have to be put on in just that same way. You should previously have bought your new linings and the necessary rivets. Better get them from the Ford Co., or a Ford agent, so as to be sure of getting the right lengths of lining, the right material, and the right sort of rivets. In. any event, do not buy any lining material that has metal woven in. it : it would be certain to cause trouble later by short-circuiting the magneto. Tear the old lining off the band, and pull out the old rivets. Throw them away : on no account use them again. Lay a length of the new lining inside the strip metal band, so that it lies smoothly, snugly, evenly and squarely in position, with its ends oqudista,nt from the band ends. Then, using the holes in the metal band to guide you, drill corresponding, holes in the lining, keening everything square and true, so that the holes will really correspond when you come to put the rivets in. The lining material is very tough and stubborn—as it needs to be—and you will not do much good if you try to drill with a bradawl or a gimlet ; better use a metal drill for the purpose. Rest the hand, with the lining inside, on a curved wood support, so that you can drill right through the holes in the band; through the lining, and into the wood. (Take care not to enlarge the holes in the metal band when so drilling.)
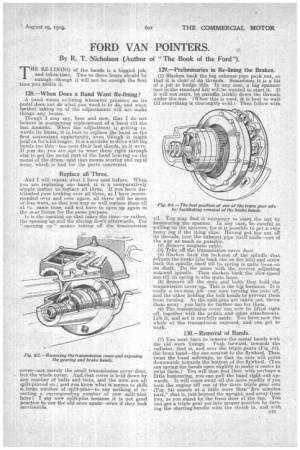
For riveting, you must have some sort of anvil— some sturdy metal surface on to which you can hammer. A serviceable arrangement is shown in Fig. 85.. Push one of the rivets through a middle hole, leaving the head outside the band—that is, against its convex surface. With a screwdriver Opeh the legs of the rivet towards the lining, so that when you hammer on the head of tale rivet the legs will open further.
046 Take a flat-ended punch, and with it hammer on the head of the rivet (as in Fig. 85), the rivet's legs being against the anvil, on which, of course, they will spread, and be forced down to and into the lining. The idea is to get the legs to lie flush with the lining, so that they will not scrape the drum. (The object putting the head outside the band—not inside—Ts that the pressure of the band on the drum, in actual work, will tend to clinch the rivets still more securely— whereas, if you put the heads inside, and the legs outside there would be a tendency for the drag of the drums to pull the rivets out by the heads.) In the same way, insert and Clinch a rivet in the hole next to that occupied by the first rivet, and then do the same with a third rivet in the hole on the opposite side of the central hole. So go on working from middle to ears till all the rivets are in. In this part of the work your object should be to keep the lining hard down everywhere against the band, so that it will not ruck up into bumps and folds when the band is forced on-to the drum by pedal action. The lining must therefore lie snug against the band. On the other hand, the lining must not be stretched taut between rivets, or it will stand away from the band and make bridges between rivet and rivet. That would mean danger of the lining being tarn away from the rivets in action. The fact is that the lining must be a really good fit—neither slack nor taut between rivets, but "just so."
132.—Replacement of the Cover.
(9) Put the re-lined bands back into their original
.positions 3,7' "2," "1 "—that is, the brake band first, the slow-speed second, and the reverse last. Each will have to be put on topsy-turvy—with the ears and gap downwards—and then turned round into correct .working position. Take three short lengths of string, and tie the ears of each band together, so that the lining lies hard against the drum, with the ears central at top.. Put the transmission cover on, with, of course, the pedals, shafts, springs, and other attached mechanism—just as you took it off. You will find that the use of the string for tying the band-ears together makes it possible for you to, slip the pedal shafts into their notches. Do so. See that the clutch release ring (numbered 3400 in Parts List) is placed in the back groove of the transmission clutch shift (3344). Now nut down to the bolts the whole transmission cover, not forgetting to substitute spring-washers for the split-pins as previously advised, in tightening the nuts, get Lem first all finger tight : then go round the nuts in order with a spanner, and tighten each equally in turn. Do not tighten up a nut at one point to its full extent, but get them gradually tight in order. Otherwise, you will never get the transmission cover squarely and evenly seated. And get the cover as nearly as possible in its old position on its gasket, or soft packing, and avoid rucking it up, or you will not get a leaktight joint. It is well to have a new gasket after this job of removing and replacing the transmission cover has been done, say, half-adozen. times.
Finally.
(10) Insert the hollow spindles that serve as bearings for the brake and reverse shafts. Cut the strings and remove the pieces, taking care that they do not fall into the transmission. Then adjust the three bands (in the way described in recent " Pointers"), seeing that they do not drag on their drums. You can get them "near enough ' by screwing in the spindles, and—in the case of the slow-speed—turning its nut, till pressure on the pedals gets the bands hard clown on the drums before the pedal stems reach the ends of their slots in the foo‘boards. Leave them on the slack side. It is best to get the slow-speed about right first ; then try on the road, and correct if necessary; then similarly adjust the foot brake and try ; then \ the reverse. You will most likely find that the new linings seem to wear very quickly during the first 100 miles, and will have to take up the adjustments.