


HINTS ON MAINTENANCE.
Page 30
Page 31
If you've noticed an error in this article please click here to report it so we can fix it.
How to Get the Best Out of a Vehicle, to Secure Reliability and to Avoid Trouble.
CONTRIBUTIONS are invited for this page from fleet managers, drivers, garage foremen, and mechanics, works staff and draughtsmen, and will be paid for on a generous scale. Every system, make, and type of commercial motor vehicle will be dealt with, and the matter should be written with a view to the disclosure of workshop and garage practice in the maintenance of a vehicle—practices which, whilst they may be quite normal, are peculiar to the particular vehicle and may not be generally known to those responsible for its running. Expedients and suggestions for overcoming roadside 'aid other troubles ere covered in the following page, dealing with letters from our driver and mechanic readers. Communications should be addressed to "The Editor, The Commercial Motor, 7-16, Rosebery Avenue, London, E.C.1."
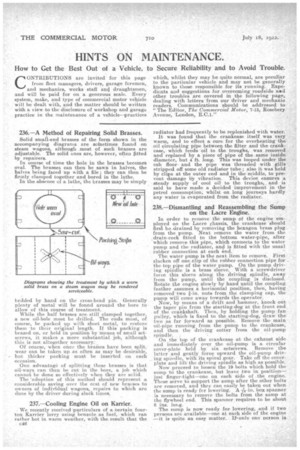
236.—A Method of Repairing Solid Brasses.
Solid striall-end brasses of the form shown in the accompanying diagrams are soinetimes found on steam wagons, although most of such brasses are adjustable. The solid ones are, however, often fitted by repairers.
In course of time the hole in the brasses becomes oval. The brasses can then be sawn in halves, the halves being faced up with a file ; they can then be firmly clamped together and bored in the lathe.
In the absence of a lathe, the brasses may be simply bedded by hand en the cross-head pin. Generally plenty of metal will be found around the bore to allow of this course of treatment.
While the half brasses are still clamped together, a new oil-hole must be drilled. The ends must, of course, be packed up with sheet metal, to restore them to their original length. If this packing is brazed on, or held in position by means of small setscrews, it makes a more substantial job, although this is not altogether necessary: Of course, when once the braises have been split, wear can be taken up as often as may be desirable, but thicker packing must be inserted on each occasion.
One advantage of splitting these brasses is that oil-ways can then be cut in the bore, a job which cannot be done so effectively when they are solid.
The -adoption of this method should represent a considerable saving over the cost of new braises to owners of individual wagons repairs to which are done by the driver during slack tunes.
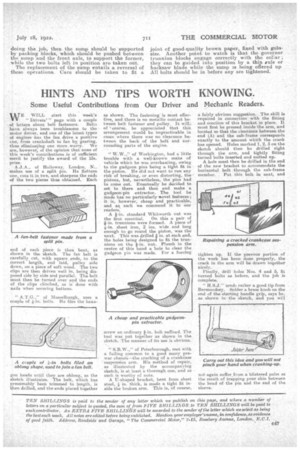
237.—Cooling Engine Oil on Karrier.
We recently received particulars of a 'Certain fourton Karrier lorry using benzole as fuel, which ran rather hot in warm weather, with the result that the c49 radiator had frequently to be replenished with water.
It was found that the crankcase itself was very warm, and to effect a cure for the overheating the oil circulating pipe between the filter and the crankcase, which feeds oil to the troughs, was removed and replaced by a piece of pipe of the same inside diameter, but 4 ft. long. This was looped under the cab floorand the pipe was threaded with gills stripped off some old radiator tube; also it was held by clips at the outer end and in the middle, to prevent damage by vibration. This device ensures a steady supply of cool oil to the troughs, , and is said to have made a decided improvement in the petrol consumption, whilst on long journeys hardly any water is evaporated from the radiator.
238.—Dismantling and Reassembling the Sump on the Lacre Engine.
In order to remove the sump of the engine employed on the Laere chassis, the crankcase should first be drained by removing the hexagon brass plug from the pump. Next remove the water from the ,drain-cock fitted to the bottom water-pipe after which remove this pipe, which connects to the water PUP and the radiator, and is fitted with the usual rubber connection at each end.
The water pump is the next item to remove. First slacken off one,ciip of the rubber connection. pipe for the top pipe of the water pump. On the pump driving spindle is a brass sleeve. With a screwdriver force this sleeve along the driving spindle, away from the• pump, until the coupling is disclosed. Rotate the engine slowly by hand until the coupling feather assumes a horizontal position, then, having removed two fin, nuts from the clamping cap, the pump will come away towards the operator. Now, by means of a drift and hammer, knock out the taper pin from the starting-dog at the front end of the crankshaft. Then, by holding the pump fan pulley, which is fixed to the starting-dog, draw the two as far forward as possible. Remove the main oil-pipe running from the pump to the crankcase, and then the driving cotter from the oil-pump spindle. On the top of the crankcase at the exhaust side and immediately over the oil-pump is a circular cover-plate held by six setscrews. Remove the latter and gently force upward the oil-pump driving spiedle, with its spiral gear. Take off the coverplate and lift the driving spindle as high as possible.
Now proceed to loosen the 19 bolts which hold the sump to the crankcase, but leave two in position— just finger-tight--one on each side of .the engine. These serve to support the sump after the other bolts are removed, and they can easily be taken out when the sump is ready for lowering. A box spanner is necessary to remove the bolts from the sump at the flywheel end. This manner requires to be about ins. long.
The sump is now ready for lowering, and if two persons are .available—one at each side of the engine —it is quite an easy matter. only one person is doing the job, then the sump should be supported by packing blocks, which should be pushed !between the sump and the front axle, to support the former, while the two bolts left in position arc taken out. The replacement of the sump entails a reversal of these operations. Care should be taken to fit a joint of good-quality brown paper, fixed with golasize. Another point to watch is that the governor trunnion blocks engage correctly with the collar ; they can be guided into position by a thin rule or hacksaw blade while the sump is being offered up All bolts should be in before any are tightened.