


249. — Oil Leakage on the Karrier.
Page 26
If you've noticed an error in this article please click here to report it so we can fix it.
A certain number of 1921 3-4-ton Karrier chassis was accidentally allowed to leave the works with the air vent plug in the gearbox lid of each iecompletely drilled, thus preventing the intended benefit being derived from this fitting.
If, on examination, it is found that the plug has only a blind hole drilled up from the underside, an additional 2-‘-in. diameter hole should be drilled right across the plug, to communicate with the existing one.
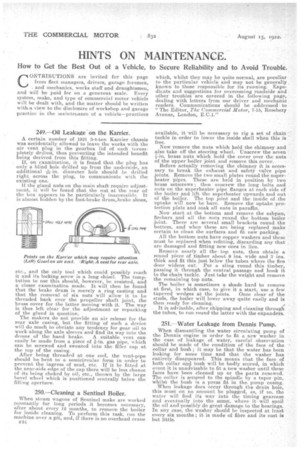
If the gland nuts on the main shaft require adjustment, it will be found that the nut at the rear of the box appears to be particularly inaccessible. It is almost hidden by the foot-brake druna,brake shoes, etc., and the only tool which could possibly reach it and its locking screw is a long chisel. The temptation to use this should, however, be resisted, and a closer examination made. It will .then be found that the brake drum is merely a ring casting and that the removal of six nuts will allow it to he threaded back over the propeller shaft joint, the brass cover for the latter moving with it. The way is thus left clear for the adjustment or repacking of the gland in question.
The makers do not provide an air release for the rear axle casing, but the fitting of such a device will do much to obviate any tendency for gear oil to work along the axle sleeves and find its way into the drums of the hand brake. A suitable vent can easily be made from a piece of i-in, gas pipe, which can be screwed and sweated into the filler cap at the top of the casing. After being threaded at one end, the vent-pipe should be bent to a semicircular form in order to prevent the ingress of mud, etc. If it be fitted at the near-side edge of the cap there will be less chance of its being choked by oil, etc., thrown by the large bevel wheel which is positioned centrally below the filling aperture.
250.—Cleaning a Sentinel Boiler.
When steam wagons of Sentinel make are worked constantly for long periods it beeomes necessary, alter about every 12 months, to remove the boiler for inside cleaning. To perform this task, run the machine over a pit, and, if there is no overhead crane n14 available, it 'will be necessary to rig a set of chain tackle in order to lower the inside shell when this is free.
Now remove the nuts which hold the chimney and also take off the steering wheel. Unscrew the seven 4-in, brass nuts which hold the cover over the nuts of the upper boiler joint and remove this cover. Before actually removing the chimney it is necessary to break the exhaust and safety valve pipe joints. Remove the two small plates round the superheater pipes. These are held in position by two brass setscrews; then unscrew the long bolts and nuts on the superheater pipe flanges at each side of the boiler and lift the superheater upwards and out of the boiler. The top joint and the inside of the uptake will now be bare. Remove the uptake protection plate and soak all nuts in paraffin.
Now start at the bottom and remove the ashpan, firebars and all the nuts round the bottom boiler joint. There are several small brackets round the bottom, and when these are being replaced make certain to clean the surfaces and fit new packing.
All the bottom nuts have copper washers and these must be replaced when refitting, discarding any that are damaged and fitting new ones in lieu.
Remove nearly all the top nuts, then obtain a sound piece of timber about 9 ins, wide and 3 ins. thick and fit this just below the tubes where the fire door widens out. Put a sling round this timber, passing it through the central passage and hook it to the chain tackle. Just take the weight and remove the remaining top nuts.
The boiler is sometimes a shade hard to remove at first, in which case, to give it a start, use a few tapered wedges at the joints. Once clear of the studs, the boiler will lower away quite easily and is then ready for cleaning.
It is advisable, after chipping and cleaning through the tubes, to run round the latter with the expanders.
251.—Water Leakage from Dennis Pump.
When dismantling the water circulating pump of the Dennis engine in order to fit a new washer in the ease of leakage of water, careful observation should be made of the condition of the face of the collar and bush ; it may be that the water has been leaking for some time end that the washer has entirely disappeared. This means that the face of both collar and bush will be badly scored, in which event it is unadvisable to fit a new washer until these faces have been cleaned up or the parts renewed. The collar is secured to the spindle by a taper pin, whilst the bush is a press fit in the pump casing.
When leakage does occur through the drain hole, this must on no account be plugged, as, if so, the water will find its way into the timing gearcase and eventually into the sump, where itwill spoil the oil and possibly do great damage to the bearings. In any case, the washer should be inspected at least every six months ; it is made of fibre and its east is hut little.