


MAKING BEST USE OF THE FORD.
Page 21
If you've noticed an error in this article please click here to report it so we can fix it.
Valuable Advice on Every Phase of Ford Transport which will appeal to the Owner, Driver and Repairer.
421.—Relining Transmission Bands.
Unless a special service jig be employed, the relining of transmission hands is usually a somewhat tedious job, resulting in loss of time, temper and rivets. The usual procedure is to place the lining in position on the band supported by a black of wood or the corner of the bench, and to drive rivets through with a hammer. Should the rivet require a second blow, the prongs almost always fold up between the band and the lining, so that they cannot be clenched over.
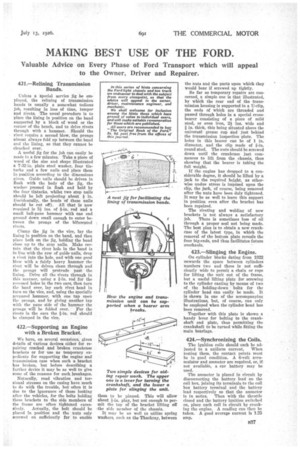
A useful jig for the job can easily be made in a few minutes. Take a piece of wood of the size and shape illustrated a 7-32-in, plain steel washer, four tintacks and a few nails and place them in position according to the dimensions given. Guide nails should be driven in flush with the body of the jig, the washer pressed in flush and held by the four tintacks, whilst two stop nails should be left projecting about / in. '(incidentally, the heads of these nails should be cut off). An that is DOW required is 34. ins. of Fin, rod and a small ball-pane hammer with one end ground down small enough to enter between the prongs of the bifurcated ri vets.
Clamp the jig in the vice, lay the lining in position on the band, and then place both on the jig, holding the band close up to the stop nails. Make certain that the rivet hole in the band is in line with the row of guide nails, drop a rivet into the hole, and with one good blow with a fairly heavy hammer the rivet will be driven clean through and the prongs will protrude past the lining. Drive all the rivets through in this manner, using a f-in, rod for the recessed holes in the two ears, then turn the band over, lay each rivet head in turn on the vice, and, using the specially prepared hammer, with one tap open the prongs, and by giving another tap with the pane side of the hammer the prongs will be folded over. For the rivets in the ears the f-in, rod should be damned in the vice.
422.—Supporting an Engine with a Broken Bracket.
We have, on several occasions, given details of various devices either for repairing cracked and broken crankcase brackets or for use as temporary expedients for supporting the engine and transmission case when such a bracket has broken, but before describing a further device it may be as well to give some of the reasons for such breakages Naturally, road vibration and torsional stresses on the casing have much to do with the trouble, but often it is due to the ignorance of those looking after the vehicles, for the bolts holding these brackets to the side members of the frame are often tightened exces
sively. Actually, the bolt should be placed in position and the nuts only screwed on sufficiently far to enable them to be pinned. This will allow about I-in. play, but not enough to permit the top of the bracket lifting off -the side member of the chassis.
It may be as well to utilize spring washers, such as the Thackray, between
the nuts and the parts upon which they would bear if screwed up tightly.
So far as temporary repairs are concerned, a simple one is that illustrated, by which the rear end of the transmission housing is supported in a U-clip, the ends of which are threaded and passed through holes in a special crossbearer consisting of a piece of mild steel, or even iron, 21 ins, wide and
in. thick, this being situated above the universal grease cup and just behind the transmission inspection plate. The holes in this bearer can be of 1 in. diameter, and the clip made of ft-in. round steel. The nuts should be screwed down until the crankcase just commences to lift from the chassis, thus showing that the bearer is taking the full weight.
If the engine has dropped to a considerable degree, it should be lifted by a jack to the required height, as otherwise undue stress is imposed upon the clip, the jack, of course, being removed after the nuts have been duly tightened. It may be as well to leave this support In position even after the bracket has been repaired.
The riveting and welding of new brackets is not always a satisfactory job. There is sometimes loss of oil through a proper seal not being made. The best plan is to obtain a new crankcase of the latest type, in which the removal of the bottom plate reveals the four big-ends, and thus facilitates future overhauls.
423.—Slinging the Engine.
On cylinder blocks dating from 1922 onwards the space between cylinders numbers two and three is not sufficiently wide to permit a chain or rope for lifting the unit out of the frame, but a useful lifting plate for screwing to the cylinder casting by means of two of the holding-down bolts for the cylinder head can easily be made. It is shown in one of the accompanying illustrations, but, of course, can only be employed when the cylinder head has been removed.
Together with this plate is shown a handy lever for bolting to the crankshaft end plate, thus permitting the crankshaft to be turned while fitting the main bearings.
424.—Synchronizing the Coils.
The ignition coils should each be adjusted to a uniform current. When testing them, the contact points must be in good condition. A 6-volt accumulator and ammeter are required, or, if not available, a car battery may be used.
The ammeter is placed in circuit by disconnecting the battery lead on the coil box, joining its terminals to the coil box battery terminal mid the battery lead respectively so that the ammeter is in series. Then with the throttle closed and the battery ignition switched on, place each coil in circuit by cranking the engine. A reading can then be taken. A good average current is 1.25 amp.