


ASSEMBLING A MOTOR COACH WIRELESS SET.
Page 21
Page 22
If you've noticed an error in this article please click here to report it so we can fix it.
Instructions for Assembling the Set Considered Most Suitable for Motor Coach Work.
IN the previous article of this series we gave a complete list of the components necessary to construct a radio receiver suitable for employment on a motor coach. This week we intend to say a word or two about the actual work of assembling.
To make a start on the job, the ebonite panel should be taken in hand. One edge must be carefully trued up and tried with a straightedge to see that it is quite straight. ' This operation is best carried out by clamping the ebonite to a piece of board of about the same thickness, and fastening the two in a carpenter's vice, or the board and the ebonite may be fastened down to the bench with two or three battens, allowing the edge of the ebonite which is to be operated upon to project over the edge of the bench about half an inch. The files used should be those know as cross-cut and should not be too fine. The operation should be done carefully and the worker accustomed to working with metals should avoid taking off too much without applying the straightedge to see how matters are progressing. Having got one edge straight and true, a polish may be obtained by first smoothing it with
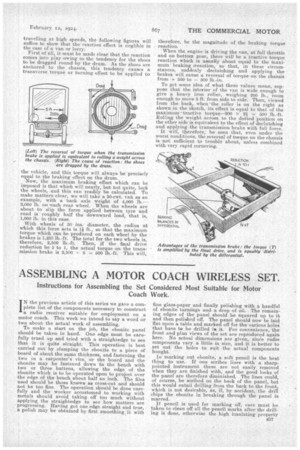
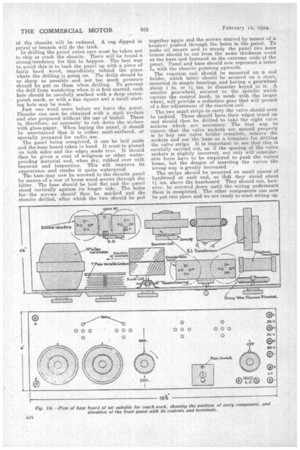
fine glass-paper and finally polishing with a handful of ebonite turnings and. a drop of oil. The remaining edges of the panel should be Squared up to it and then polished off. The panel should now be laid flat upon a table and marked off for the various holes that have to be drilled io it. For convenience, 'the front and plan views of the set are reprodueed again here. No actual -dimensions are given, since radio components vary a little in size, and it is better to set out the holes to suit the actual components bought.
In marking out ebonite, a soft pencil is the best thing to use. If one scribes lines with a. sharppointed instrument these are not easily removed when they are finished with, and the good looks of the panel are therefore diminished. The lines could, of course, be scribed on the back of the panel, but this would entail drilling from, the back to the front, which is not desirable, as, if, by accident, the drill chips the ebonite in breaking through the panel is marred.
If pencil is used for marking off, care must be ta-ken to clean off all the pencil marks after the drilling is done, otherwise the high insulatingproperty B37 of the ebonite will be reduced. A rag dipped in petrol or benzole will do the trick. In drilling the panel extra care must be taken not to chip or crack the ebonite. There will be found a strong tendency for this to happen. The best way to avoid this is to back the panel up with a piece of fairly hard wood, immediately behind the place where the drilling is going on. The drills should be as sharp as possible and not too much pressure should be put on them when drilling. To prevent the drill from wandering when it is first started, each hole should be carefully marked with a deep centrepunch mark, or with a fine square awl a small starting hole may be made.
Just one word more before we leave the panel. Ebonite can now be obtained with a matt surface and also prepared without the use of tinfoil. There is, therefore, no necessity to rub down the serface with glass-paper. When buying the panel, it should be ascertained that it is either matt-surfaced, or specially prepared for radio use.
The panel being completed, it can be laid aside and the base board taken in hand. It must be planed on both sides and the edges made true. It should then be given a coat of solignum or other waterproofing material and, when dry, rubbed over with beeswax and turpentine. This will improve its appearance and render it quite waterproof.
The base may now be screwed to the ebonite panel by means of a row of brass wood screws through the latter. The base should be laid fiat and the panel stood vertically against its longer side. The holes for the screws should then be marked and the ebonite.dri fled, after which the two should be put together again and the screws started by means of a bradawl pushed through the holes in the panel.. To make all secure and to steady the panel two knee braces should be cut from the same thickness wood as the base and fastened at the extreme ends of the panel. Panel and base should now represent a letter L, with the ebonite pointing upwards.
The reaction coil should be mounted on -a coil holder, which latter should' be secured on a shatt, mounted in simple bearings and having a gearwheel about 1 in. or 1-1 ins, in diameter keyed to it. Asmaller gearwheel, secured to the spindle which carries the control knob, in mesh with the larger wheel, will provide a reduction par that will permit of a fine adjustment of the reaction coil.
The two small strips to carry the valve should next be tackled. These should have their edges trued up and should then be drilled to take the eight valve sockets which are necessary. The best way to ensure that the valve sockets are spaced properly is to buy one valve holder complete, remove • the sockets and use the base as a template for drilling the varve strips. It is important to see that this is carefully carried out, as, if the spacing of the valve sockets is slightly incorrect, not only will considerable force have to be employed to push the valves home, but -the danger of inserting the valves the wrong way is greatly increased. •
The strips should be mounted on small pieces' of hardwood at each end, so -tTigt they stand about 11 ins, above the baseboard. They should not, however, be screwed down until the wiring underneath them is completed.. The other components can now be put into place and we are ready to start wiring up.