


DRY LINER CHANGES LIKE PULLING TEEM?
Page 80
Page 81
If you've noticed an error in this article please click here to report it so we can fix it.
Repairing dryliner engines is not as daunting as it might first appear.
Apiston failure on an engine that is otherwise in good condition is extremely annoying and potentially very expensive. Most workshops can replace wet liners: there is a clearance between mating parts with only the resistance from the water seals to overcome. Dry liners however, usually have an interference fit where the liner is bigger than the hole in the block. These then require a press of some sort to fit and extract them from the parent block.
To find out what is possible and how the process is carried out we revisited engine rebuilding specialist and FER member Price Brothers of Avonmouth. Last year we watched Price's Alan Parsons installing new wet liners into a vee-eight Scania, this time he has to repair a Perkins and Leyland engine both fitted with dry liners .
Dry liners come as fully finished or partially machined. Fully finished 'liners are thin walled and have a hard bore: over-sized pistons are not usually available. Partially machined liners have a much thicker wall. The outside diameter is pre-machined to fit the block but the bore is unfinished and over-sized pistons are usually available. Often the liners can be replaced and bored while the engine is still in the chassis but where the cab will not tilt far enough to give access the block must be removed. This is why the fourcylinder Perkins engine was in Price's workshop. One of the gudgeon pin circlips had fallen out and ruined the piston and liner: the other cylinders were also well worn. The remedy is to replace the damaged liner and bore it and the others out to +0.020in (+0.508mm). When we arrived the head, sump, pistons, con-rods and the damaged liner had been removed and Parsons was waiting for the new parts to be delivered from KS Winston.
A boring bar is used to remove the majority of the material from the undamaged liners. This unit is usually clamped to the top of the block but as the liners protrude by almost lmm, parallel bars are used to pack the machine off the block face. To attach the boring machine a clamp is passed down an adjacent bore and hooked to the bottom of the block. A rounded arm is then adjusted by means of a small screw to press on the opposite side of the bore.
Cats paws
Next the machine has to be centred over the bore it is to cut. This is achieved by a device called "cats paws". There are four specially machined blocks around the bar that can be moved in and out concentrically. By lowering the bar into the bore and moving the cats paws out until they all touch the liner the tool will automatically be centred. The machine is then secured by the clamp.
A tungsten carbide-tipped tool is used to cut the bore as the bar rotates and travels down the liner. A guard round the tool collects the swarf as it is produced and a vacuum sucks it up through the centre of the bar. By this means the swarf is kept off the crank although exposed journals are taped up as a precaution.
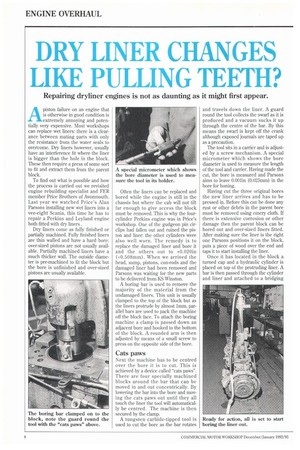
The tool sits in a carrier and is adjusted by a screw mechanism. A special micrometer which shows the bore diameter is used to measure the length of the tool and carrier. Having made the cut, the bore is measured and Parsons aims to leave 0.001in (0.025mm) in the bore for honing.
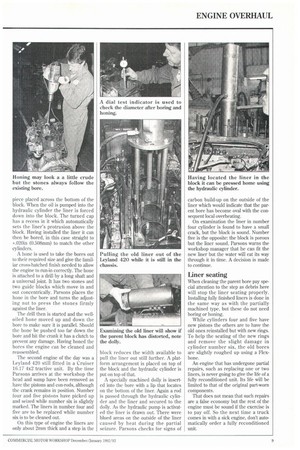
Having cut the three original bores the new liner arrives and has to be pressed in. Before this can be done any rust or other debris in the parent bore must be removed using emery cloth. If there is extensive corrosion or other damage then the parent block can be bored out and over-sized liners fitted. After making sure the liner is the right one Parsons positions it on the block, puts a piece of wood over the end and taps it to start installing the liner.
Once it has located in the block a turned cap and a hydraulic cylinder is placed on top of the protruding liner. A bar is then passed through the cylinder and liner and attached to a bridging piece placed across the bottom of the block. When the oil is pumped into the hydraulic cylinder the liner is forced down into the block. The turned cap has a recess in it which automatically sets the liner's protrusion above the block. Having installed the liner it can then be bored, in this case straight to +.020in (0.508mm) to match the other cylinders.
A hone is used to take the bores out to their required size and give the familiar cross-hatched finish needed to allow the engine to run-in correctly. The hone is attached to a drill by a long shaft and a universal joint. It has two stones and two guide blocks which move in and out concentrically. Parsons places the hone in the bore and turns the adjusting nut to press the stones firmly against the liner.
The drill then is started and the welloiled hone moved up and down the bore to make sure it is parallel. Should the hone be pushed too far down the bore and hit the crank it has a clutch to prevent any damage. Having honed the bores the engine can be cleaned and reassembled.
The second engine of the day was a Leyland 420 still fitted in a Cruiser 16.17 4x2 tractive unit. By the time Parsons arrives at the workshop the head and sump have been removed as have the pistons and con-rods, although the crank remains in position. Number four and five pistons have picked up and seized while number six is slightly marked. The liners in number four and five are to be replaced while number six is to be cleaned out.
On this type of engine the liners are only about 2mm thick and a step in the block reduces the width available to pull the liner out still further. A platform arrangement is placed on top of the block and the hydraulic cylinder is put on top of that.
A specially machined dolly is inserted into the bore with a lip that locates on the bottom of the liner. Again a rod is passed through the hydraulic cylinder and the liner and secured to the dolly. As the hydraulic pump is activated the liner is drawn out. There were blued areas on the outside of the liner caused by heat during the partial seizure. Parsons checks for signs of carbon build-up on the outside of the liner which would indicate that the parent bore has become oval with the consequent local overheating.
On examination the liner in number four cylinder is found to have a small crack, but the block is sound. Number five is the opposite: the block is porous but the liner sound. Parsons warns the workshop manager that he can fit the new liner but the water will eat its way through it in time. A decision is made to continue.
Liner seating
When cleaning the parent bore pay special attention to the step as debris here will stop the liner seating properly. Installing fully finished liners is done in the same way as with the partially machined type, but these do not need boring or honing.
While cylinders four and five have new pistons the others are to have the old ones reinstalled but with new rings. To help the seating of the new rings and remove the slight damage in cylinder number six, the old bores are slightly roughed up using a Flexhone.
An engine that has undergone partial repairs, such as replacing one or two liners, is never going to give the life of a fully reconditioned unit. its life will be limited to that of the original part-worn components.
That does not mean that such repairs are a false economy but the rest of the engine must be sound if the exercise is to pay off. So the next time a truck comes in with a sick engine, don't automatically order a fully reconditioned unit.