


HINTS AND TIPS WORTH KNOWING : .
Page 31
If you've noticed an error in this article please click here to report it so we can fix it.
Some Useful Contributions from Our Driver and Mechanic Readers.
WE WILL start this week's " Drivers"! page with a couple of letters about belt fasteners. Belts have always been troublesome to the motor driver, and one of the latest types of engines has the fan drive a positive cue, from crankshaft to fan by .gearing, thus eliminating one more worry.. We are, however, of the opinion that none of this week's contributions ta of sufficient merit to justify the award of the 15s. prize.
A.J. A., of Holloway, Lonclon, N., makes use of a split pin. He flattens one, cuts it in two, and sharpens the ends of the two pieces thus obtained. Each
end of each piece is then bent, as shown in the sketch. The fan belt is carefully cut, with square .ends, to the correct length, and laid, pulley side down, on a piece of soft wood. The two clips are then driven well in, being disposed side by side and parallel. The belt must then be turned over and the ends of the clips clinched, as is done with nails when securing battens.
" A.T.G.," of 31-usselburgh, uses a couple of kin. bolts. He files the hexa
gon heads until they are oblong, as the sketch illustrates. The belt, which has presumably been trimmed to length, is then drilled, and the ends placed together as shown. The fastening is most effective, and there is no metallic contact between belt fastener and pulley. It of course, be appreciated that this arrangement -would be impracticable in cases where there was no clearance between the back of the belt and Surrounding parts of the engine.
" og Workington, had a little trouble with a well-known make of vehicle which he was 'overhauling, owing to the gudgeon pins being a tight fit in the piston. He did net want to run any risk of breaking, or even distorting, the pistons, but, nevertheless, the pins had to come out. Eventually he decided to set to there and then and make a gudgeon-pin extractor. The tool he made has no particularly viovel features ; it is, however, cheap and practicable, and as, such we commend it to our readers.
A standard Whitworth nut was the first essential. On this a pair of a-in. trunnions were formed. A piece of On, sheet iron, 2 ins, wide and long enough to go round the piston, was the next. This was drilled a in. at each end, the holes being designed to fit the trunnions on the ft-in, nut. Plumb in the centre of this band a hole to clear the gudgeon pin was made. For a forcing screw an ordinary I-in, bolt sufficed. The tool was put together as shown in the sketch. The manner of its use is obvious.
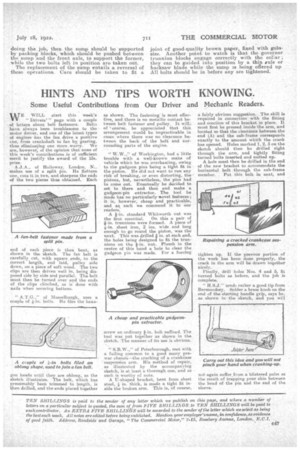
" 8.B.W.," of Peterborough, met with a failing common to a good many prewar chassis—the cracking of a crankcase suspension arm. His method of repair, as illustrated by the accompanying sketch, is at least a thorough one, and as • such is worthy of note.
A U-shaped bracket, bent fromsheet steel, * in. thick, is made a tight fit inside the broken arm. This is, of course,
a fairly obvious suggestion. The skill is required in connection with the fitting and erection of this bracket in place. It must first be pressed inside the arm, and located so that the clearance between the end (A) and the sub-frame corresponds exactly to the amount which the crank has opened. Holes marked 1, 2, 3 oil the sketch should then be drilled right through the arm, and tightly fitting turned bolts inserted and nutted up.
A hole must then be drilled in the end of the new bracket to accommodate the horizontal bolt through the sub-frame member. Put this bolt in next, and tighten up. If the prevous portion of the work has been done properly, the crack in the arm will be drawn together nicely.
Finally, drill holes Nos. 4 and 5, fit turned bolts as before, and the job is complete.
" H.S.j." Sends rather a good tip from Bermondsey. Solder a brass knob on the end of the starting handle grim, says he, as shown in the sketch, and you will
not again suffer from a blistered palm as the result of trapping your skin between the head of the pin and the end of the sleeve.